Manage Tenants
Organize and Isolate Resources with Tenants
n2x.io's tenant functionality allows you to create logical partitions within your n2x.io account, enabling segregation and isolation of resources. This is particularly useful for managing complex deployments or separating resources for different teams or projects.
Each tenant can group various resources within your n2x.io environment:
- Networks
- Subnets
- Nodes
- Virtual Servers
- Projects
- Workflows
- Tasklogs
- Alerts
Unlimited Tenant Creation
You have the flexibility to create an unlimited number of tenants in your n2x.io account, allowing you to customize your resource organization based on your specific needs.
Security and Tenant Association
Tenants play a crucial role in defining n2x.io authorization policies. They are typically associated with security groups. This association allows you to control access to resources based on the tenant they belong to.
Create a Tenant
Warning
Only the Account Administrator can manage tenants.
You can create a tenant in your account either using the n2x.io webUI or CLI (n2xctl).
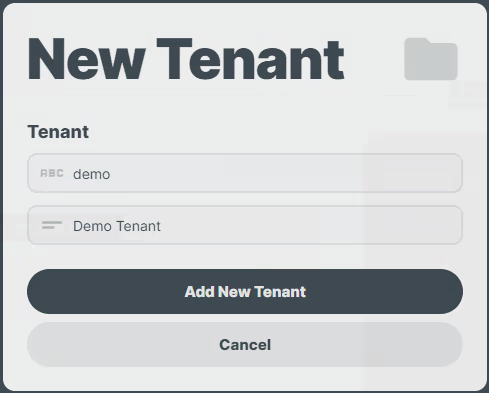
In the navigation menu on the left, click Account and follow these steps:
-
Click the
Tenantssection. -
Click on the
+ Add Tenantbutton.
-
Enter the
DescriptionandNamefor the tenant. -
Click on the
Add New Tenantbutton.
Use the following command to create a new tenant in your n2x.io account:
n2xctl tenant create
The command will prompt you for the following information:
Tenant Name: Enter a unique and descriptive name to identify your tenant.Description: Provide a brief description of the tenant's purpose (optional).
n2xctl tenant create
n2xctl v0.0.3-20240725171430+88c4863--go1.22.5

n2xctl is a CLI to control the n2x SASE platform.

Find more information at https://n2x.io/docs


» Tenant Name: demo
» Description: Demo tenant
                                                        ───── Tenant Details ≡
══════════════════
Tenant Information
══════════════════

Tenant ID   xxxxxxxxx-xxxx-xxxx-xxxx-xxxxxxxxxxxx
Name        demo
Description Demo tenant
Show the Tenant Details
You can view the tenant details either using the n2x.io webUI or CLI (n2xctl):
In the navigation menu on the left, click Account and follow these steps.

- Click on the
Tenantssection. - Select the
Tenantwhose details you want to view.
Use the following command to view tenant details in your n2x.io account:
n2xctl tenant show
The command will prompt you for the following information:
Tenant: Select theTenantwhose details you want to view.
$ n2xctl tenant show
n2xctl v0.0.4-20240819091023+6180dae--go1.22.6
n2xctl is a CLI to control the n2x SASE platform.
Find more information at https://n2x.io/docs
» Tenant: [demo] Demo tenant
                                                        ───── Tenant Details ≡
══════════════════
Tenant Information
══════════════════
Tenant ID   xxxxxxxxx-xxxx-xxxx-xxxx-xxxxxxxxxxxx
Name        new-demo
Description New demo Tenant
Rename a Tenant
Warning
Only the Account Administrator can manage tenants.
You can rename a tenant in your account either using the n2x.io webUI or CLI (n2xctl).
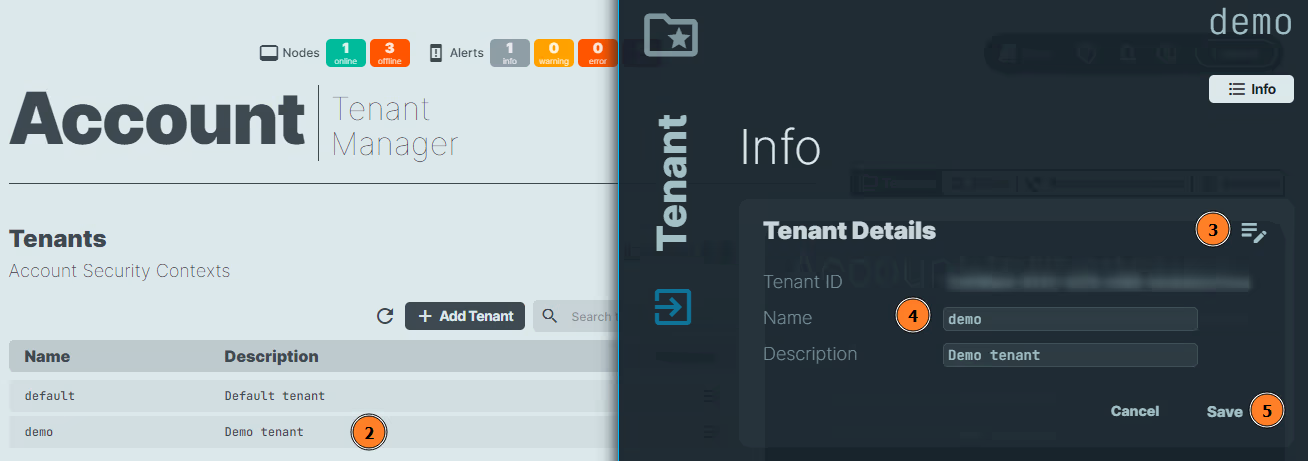
In the navigation menu on the left, click Account and follow these steps:

- Click on the
Tenantssection. - Select the
Tenantyou want to rename. - Click on the icon.
- Update
Namein the editable fields. - Click the
Savebutton to apply the new name.
Use the following command to rename a tenant in your n2x.io account:
n2xctl tenant update
The command will prompt you for the following information:
Tenant: Select the tenant you want to rename.Tenant Name: Enter a new, unique, and descriptive name to identify your tenant.Description: Provide a brief description of the tenant's purpose (optional).
$ n2xctl tenant update
n2xctl v0.0.3-20240725171430+88c4863--go1.22.5

n2xctl is a CLI to control the n2x SASE platform.

Find more information at https://n2x.io/docs

» Tenant: [demo] Demo tenant
» Tenant Name: new-demo
» Description: New demo Tenant
                                                        ───── Tenant Details ≡
══════════════════
Tenant Information
══════════════════

Tenant ID   xxxxxxxxx-xxxx-xxxx-xxxx-xxxxxxxxxxxx
Name        new-demo
Description New demo Tenant
Tip
Use the n2xctl tenant list command to get a list of all your existing tenants and their names.
Select a Tenant in WebUI
Use the drop-down menu in the top-left corner to switch between tenants.

Once you select a tenant, you'll be able to manage the resources associated with that specific tenant.
Info
Your access to tenants is controlled by your assigned security groups. Refer to the security groups documentation for details on how security groups define user permissions.
Delete a Tenant
Warning
Only the Account Administrator can manage tenants.
Warning
To delete a tenant, it must be empty of any associated resources. This ensures that critical resources are not accidentally removed during the deletion process.
You can delete a tenant from your account either using the n2x.io webUI or CLI (n2xctl):
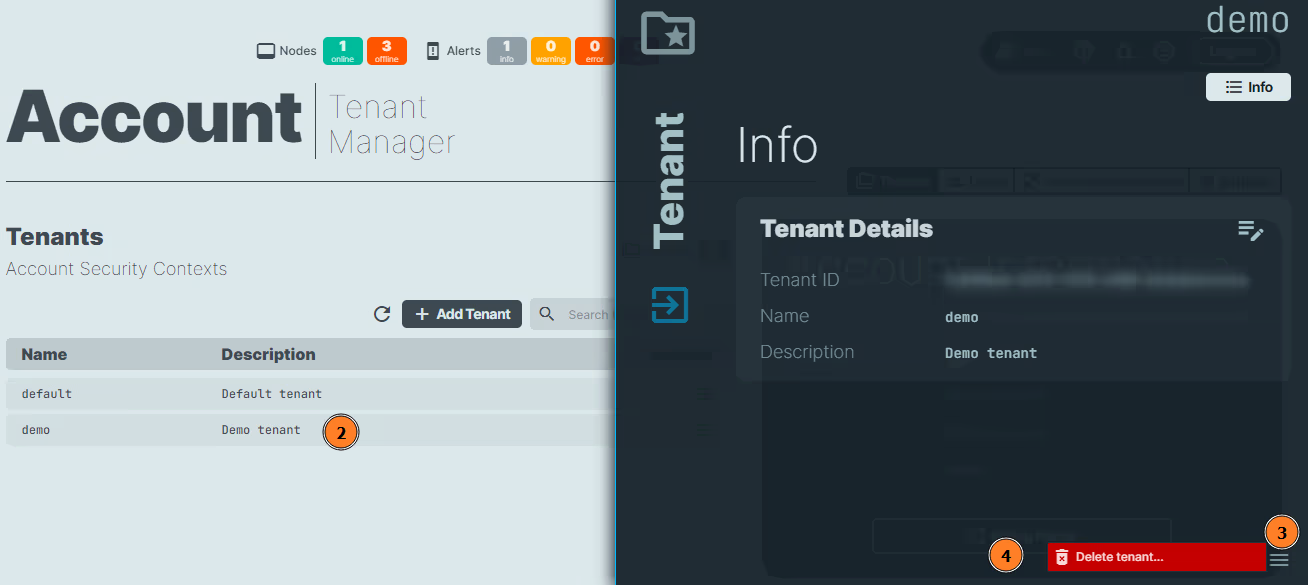
In the navigation menu on the left, click Account and follow these steps:

- Click on the
Tenantssection. - Select the
Tenantyou want to delete. - Click on the icon.
- Click on the
Delete tenant...button. - To permanently delete the Tenant, a confirmation prompt will appear for verification.
Use the following command to delete a tenant in your n2x.io account:
n2xctl tenant delete
The command will prompt you for the following information:
Tenant: Select the tenant you want to delete.Confirm deletion?: Typeyesto confirm and proceed with deleting the selected tenant.
$ n2xctl tenant delete
n2xctl v0.0.3-20240725171430+88c4863--go1.22.5

n2xctl is a CLI to control the n2x SASE platform.

Find more information at https://n2x.io/docs

» Tenant: [demo] Demo tenant

» Confirm deletion? Yes

  Done
Tip
Use the n2xctl tenant list command to get a list of all your existing tenants and their names.