Manage Security Policies
Security Policy Capabilities
-
Automatic Protection: Every n2x.io subnet comes with a built-in security policy that acts like a distributed firewall-as-a-service (FWaaS). This firewall automatically protects every
nodeconnected to the subnet. -
Default Security & Customization: Each security policy has a default action (allow or deny traffic) and a set of customizable filters that function like firewall rules.
-
Zero-Trust by Default: When creating a new subnet, we recommend a default policy of "deny" (
DROP) to align with a zero-trust security model. However, we allow you to choose "allow" (ACCEPT) for easier initial setup. -
Granular Control with Firewall Rules: You can define firewall rules within your subnet's security policy to control traffic flow. Each rule has a unique priority level, with lower numbers taking effect first.
-
Default Rule as a Safety Net: If your security policy has no rules defined, or no rule matches incoming traffic, a default rule takes over. This default rule acts as a final safety measure to determine how to handle the traffic.
-
Flexible Addressing: Our network filters support both
IPv4andIPv6addresses, giving you control over both modern and legacy network protocols.
Modify the default Security Policy
Warning
Only Account Administrators or Admin Users can manage security policies.
The default security policy can be modified either using the webUI or CLI (n2xctl).
In the navigation menu on the left, click Network Topology and follow these steps:
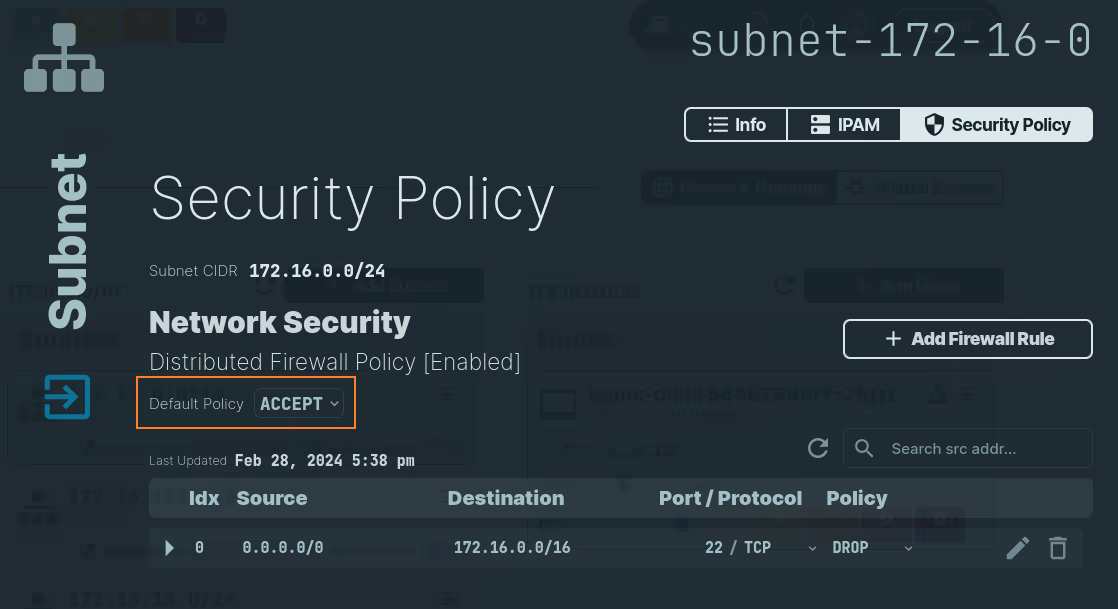
- Select the
Subnetthat you want to update. - Select the
Security Policytab. - Choose either
ACCEPTorDENYin theDefault Policyrule.
Use the following command to update a subnet's default security policy:
n2xctl subnet update
The command will prompt you for the following information:
Tenant: Select the tenant to which the subnet will be associated.Network: Select the network to which the subnet will belong.Subnet: Select the desired subnet within the chosen network.Subnet Description: Provide a brief description of the subnet (optional).Default Security Policy: Select the default security policy to apply to the subnet (ACCEPT or DROP).
$ n2xctl subnet update
n2xctl v0.0.3-20240725171430+88c4863--go1.22.5

n2xctl is a CLI to control the n2x SASE platform.

Find more information at https://n2x.io/docs

» Tenant: [demo] Demo tenant
» Network: [net-172-16] demo network
» Subnet: [subnet-172-16-15] Services
» Subnet Description: Services
» Default Security Policy: ACCEPT
                                                        ───── Subnet Details ≡
══════════════════
Subnet Information
══════════════════

Tenant ID   xxxxxxxx-xxxx-xxxx-xxxx-xxxxxxxxxxxx
Network ID  net-172-16
Subnet ID   subnet-172-16-15
Description Services

IP Address Management (IPAM)
────────────────────────────

Network CIDR                172.16.0.0/16
Subnet CIDR                 172.16.15.0/24
IPv4 Addresses Available    252
IPv4 Addresses Leased       2

IPv4 Address    IPv6 Address        Endpoint
------------------------------------------------------------------------
172.16.15.160   fd77:f:ac10:fa0:1:: k8s:default:nginx-service-2
172.16.15.106   fd77:f:ac10:f6a:1:: nginx-depl-585b788df7-2fgzr.d...

Security Policy
───────────────

Default Policy  [ACCEPT]

Index   Source  Destination Port/Proto  Policy
-----   ------  ----------- ----------  ------
Add a Firewall Rule in a Subnet's Security Policy
Warning
Only Account Administrators or Admin Users can manage security policies.
Tip
You always must create a firewall rule in the security policy associated with the subnet where the target IP addresses reside.
You can add a new firewall rule for your subnet's security policy using either the n2x.io webUI or CLI (n2xctl).
In the navigation menu on the left, click Network Topology and select the Subnet that you want to update. Select the Security Policy tab and follow these steps:
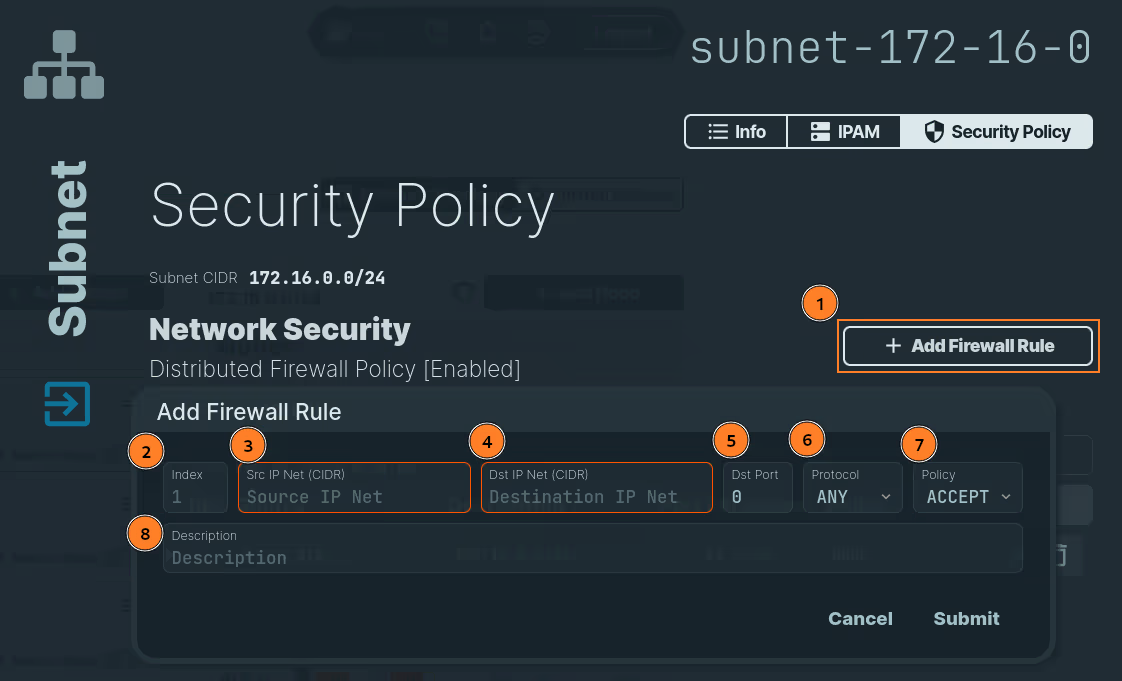
- Click on the
Add Firewall Rulebutton. - Add the index number of the policy. It must be a unique positive integer.
- Inform the CIDR for the Source IP Net.
- Inform the CIDR for the Destination IP Net. The destination IP should be on the subnet where the rule is being created.
- Inform the destination port.
- Inform the protocol. You can choose between
ANY,TCP,UDP,ICMPv4andICMPv6. - Choose
ACCEPTorDENYfor this rule. - Add a description.
- Click on the
Submitbutton.
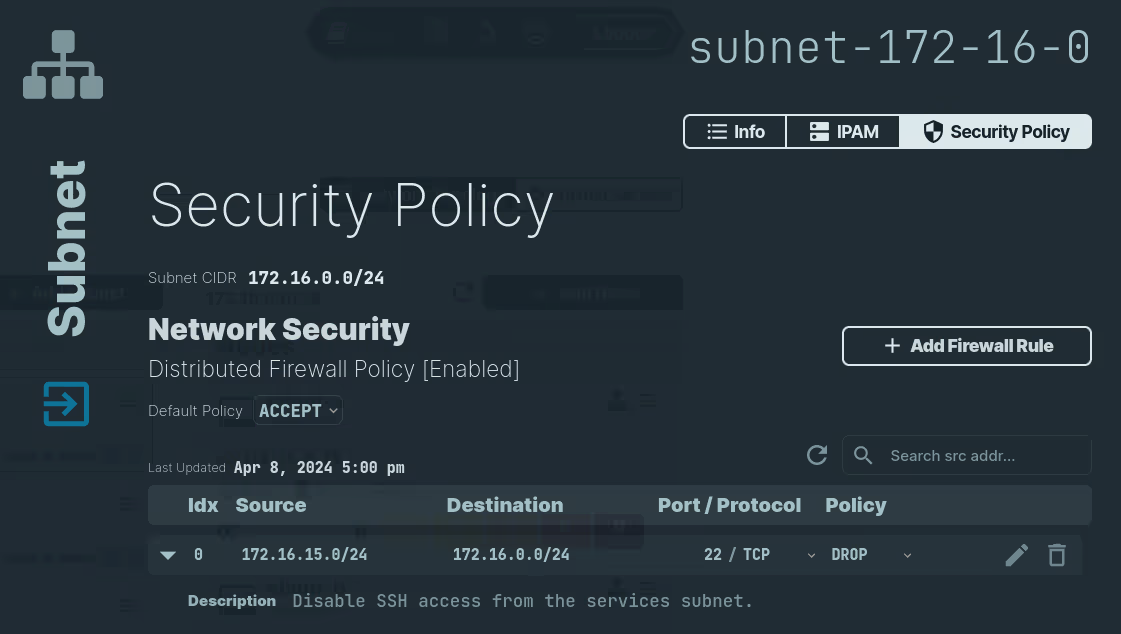
After submitting the policy, you can see the new policy in the list:
Use the following command to add a firewall rule to subnet's security policy:
n2xctl policy add-rule
The command will prompt you for the following information:
Tenant: Select the tenant to which the subnet belongs.Network: Select the network containing the subnet.Subnet: Select the subnet where the new rule will be added.PolicyIndex: Set the index at which the rule will be inserted.Description: Provide a brief description of the rule (optional).Protocol: Choose one of the following:IPv4orIPv6.Select Source: Choose betweenEndpoint ObjectorIPNet CIDRas the source type.Source IPv4 CIDR: Provide the source IP range in CIDR notation, such as 192.168.1.14/32 or 10.32.4.0/24.Select Destination: Choose betweenEndpoint ObjectorIPNet CIDRas the destination type.Destination IPv4 CIDR: Provide the destination IP range in CIDR notation, such as 192.168.1.14/32 or 10.32.4.0/24.Protocol: Choose one of the following:TCP,UDP,ICMPv4orANYDestination Port: Specify the destination port UDP or TCP (0-65535).Security Policy: Choose the action to apply:ACCEPTorDROP.
$ n2xctl policy add-rule
n2xctl v0.0.3-20240725171430+88c4863--go1.22.5

n2xctl is a CLI to control the n2x SASE platform.

Find more information at https://n2x.io/docs

» Tenant: [demo] Demo tenant
» Network: [net-172-16] demo network
» Subnet: [subnet-172-16-0] Users
» Policy Index: 1
» Description (optional): Disable SSH access from the services subnet.
» Protocol: IPv4
» Select Source: IPNet CIDR
» Source IPv4 CIDR: 172.16.15.0/24
» Select Destination: IPNet CIDR
» Destination IPv4 CIDR: 172.16.0.0/24
» Protocol: TCP
» Destination Port: 22
» Security Policy: DROP
                                               ───── Security Policy Details ≡
═══════════════
Security Policy
═══════════════

Tenant ID   xxxxxxxx-xxxx-xxxx-xxxx-xxxxxxxxxxxx
Network ID  net-172-16
Subnet ID   subnet-172-16-0
Description Users
Subnet CIDR 172.16.0.0/24
Default Policy  [ACCEPT]

Index   Source          Destination     Port/Proto  Policy
-----   ------          -----------     ----------  ------
0       172.16.15.0/24  172.16.0.0/24   22/TCP      [DROP]
Modify a Firewall Rule in a Subnet's Security Policy
Warning
Only Account Administrators or Admin Users can manage security policies.
You can modify a firewall rule in a subnet's security policy either using the n2x.io webUI or CLI (n2xctl):
In the navigation menu on the left, click Network Topology and select the Subnet that you want to update. Select the Security Policy tab and follow these steps:
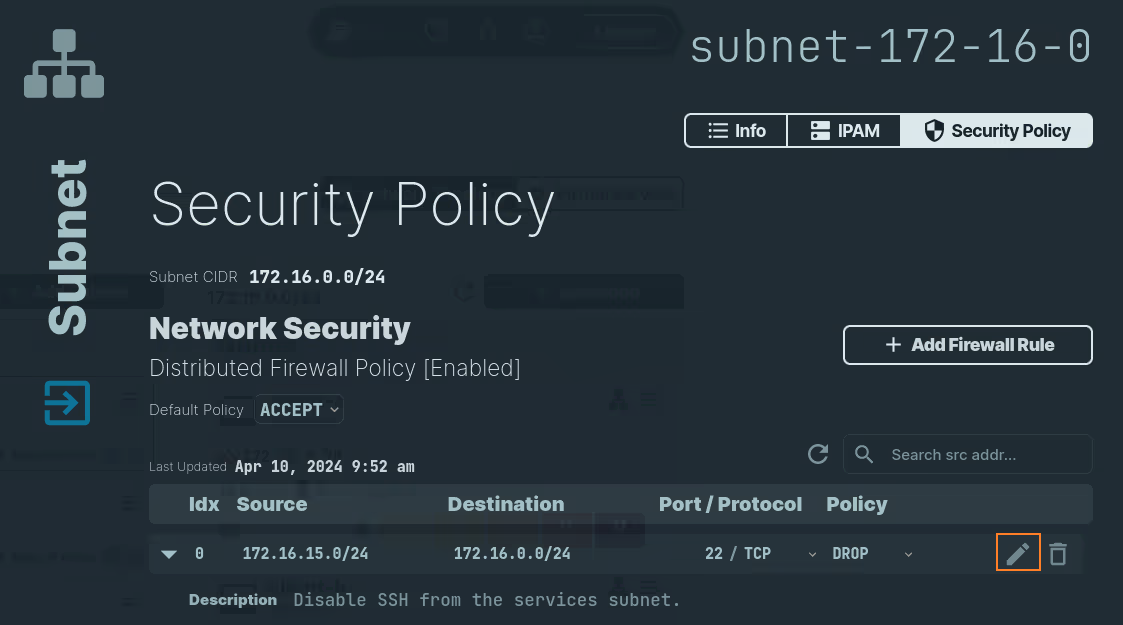
- Click on the icon next to the rule.
- Update the rule with the new information.
- Click on the
Savebutton.
Use the following command to modify a firewall rule in a subnet's security policy:
n2xctl policy edit-rule
The command will prompt you for the following information:
Tenant: Select the tenant to which the subnet belongs.Network: Select the network containing the subnet.Subnet: Select the subnet where the rule to modify exists.Policy Index: Specify the index of the existing rule you want to modify.Description: Update the description of the rule (optional).Protocol: Choose one of the following:IPv4orIPv6.Select Source: Choose betweenEndpoint ObjectorIPNet CIDRas the source type.Source IPv4 CIDR: Provide the updated source IP range in CIDR notation, such as 192.168.1.14/32 or 10.32.4.0/24.Select Destination: Choose betweenEndpoint ObjectorIPNet CIDRas the destination type.Destination IPv4 CIDR: Provide the updated destination IP range in CIDR notation, such as 192.168.1.14/32 or 10.32.4.0/24.Protocol: Choose one of the following:TCP,UDP,ICMPv4, orANY.Destination Port: Specify the updated destination port for UDP or TCP (0–65535).Security Policy: Choose the updated action to apply:ACCEPTorDROP.
$ n2xctl policy edit-rule
n2xctl v0.0.3-20240725171430+88c4863--go1.22.5

n2xctl is a CLI to control the n2x SASE platform.

Find more information at https://n2x.io/docs

» Tenant: [demo] Demo tenant
» Network: [net-172-16] demo network
» Subnet: [subnet-172-16-0] Users
» Network Filter 0: src 172.16.15.0/24 | dst 172.16.0.0/24 | 22/TCP | DROP
» Description (optional): Enable SSH access from the services subnet.
» Protocol: IPv4
» Select Source: IPNet CIDR
» Source IPv4 CIDR: 172.16.15.0/24
» Select Destination: IPNet CIDR
» Destination IPv4 CIDR: 172.16.0.0/24
» Protocol: TCP
» Destination Port: 22
» Security Policy: ACCEPT
                                               ───── Security Policy Details ≡
═══════════════
Security Policy
═══════════════

Tenant ID   xxxxxxxx-xxxx-xxxx-xxxx-xxxxxxxxxxxx
Network ID  net-172-16
Subnet ID   subnet-172-16-0
Description Users
Subnet CIDR 172.16.0.0/24
Default Policy  [ACCEPT]

Index   Source          Destination     Port/Proto  Policy
-----   ------          -----------     ----------  ------
0       172.16.15.0/24  172.16.0.0/24   22/TCP      [ACCEPT]
Delete a Firewall Rule from a Subnet's Security Policy
Warning
Only Account Administrators or Admin Users can manage security policies.
You can delete a firewall rule from a subnet's security policy either using the n2x.io webUI or CLI (n2xctl):
In the navigation menu on the left, click Network Topology and select the Subnet that you want to delete. Select the Security Policy tab and follow these steps:
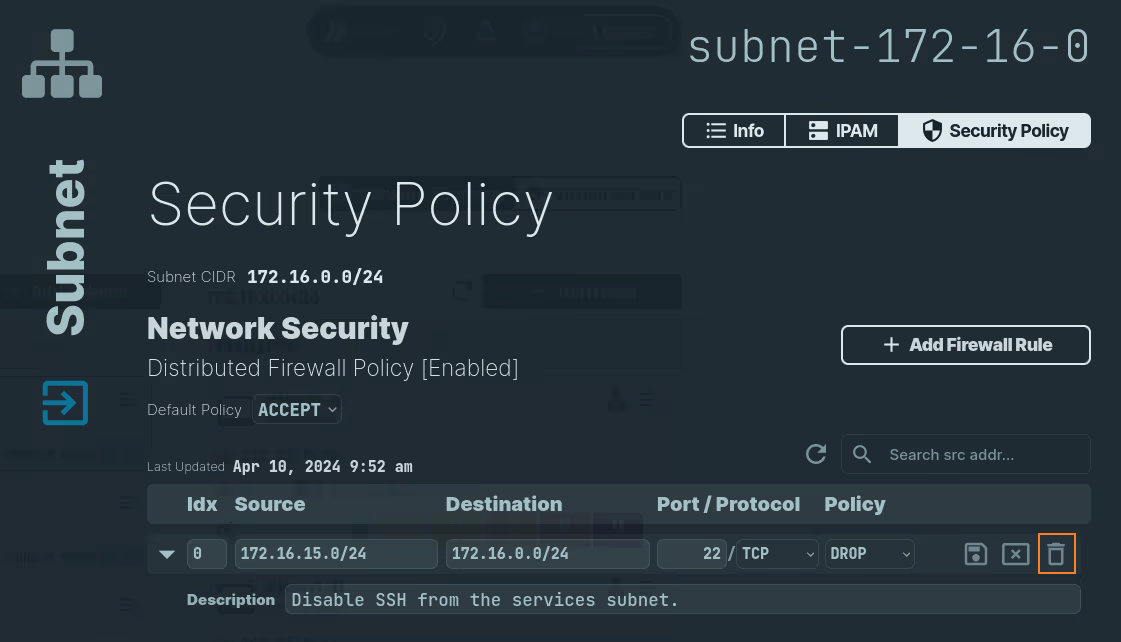
- Click on the icon next to the rule.
- Confirm deletion.
Use the following command to delete a firewall rule from a subnet's security policy:
n2xctl policy delete-rule
The command will prompt you for the following information:
Tenant: Select the tenant associated with the firewall rule.Network: Select the network to which the subnet belongs.Subnet: Select the subnet where the rule is defined.Firewall Rule Index: Choose the rule to deleteby its indexnumber from the list.
$ n2xctl policy delete-rule
n2xctl v0.0.3-20240725171430+88c4863--go1.22.5

n2xctl is a CLI to control the n2x SASE platform.

Find more information at https://n2x.io/docs

» Tenant: [demo] Demo tenant
» Network: [net-172-16] demo network
» Subnet: [subnet-172-16-0] Users
» Network Filter 1: src 172.16.15.0/24 | dst 172.16.0.0/24 | 22/TCP | DROP
                                               ───── Security Policy Details ≡
═══════════════
Security Policy
═══════════════

Tenant ID   xxxxxxxx-xxxx-xxxx-xxxx-xxxxxxxxxxxx
Network ID  net-172-16
Subnet ID   subnet-172-16-0
Description Users
Subnet CIDR 172.16.0.0/24
Default Policy  [ACCEPT]

Index   Source          Destination     Port/Proto  Policy
-----   ------          -----------     ----------  ------
Troubleshoot Security Policy
To troubleshoot a connection and review the firewall logs, take these steps:
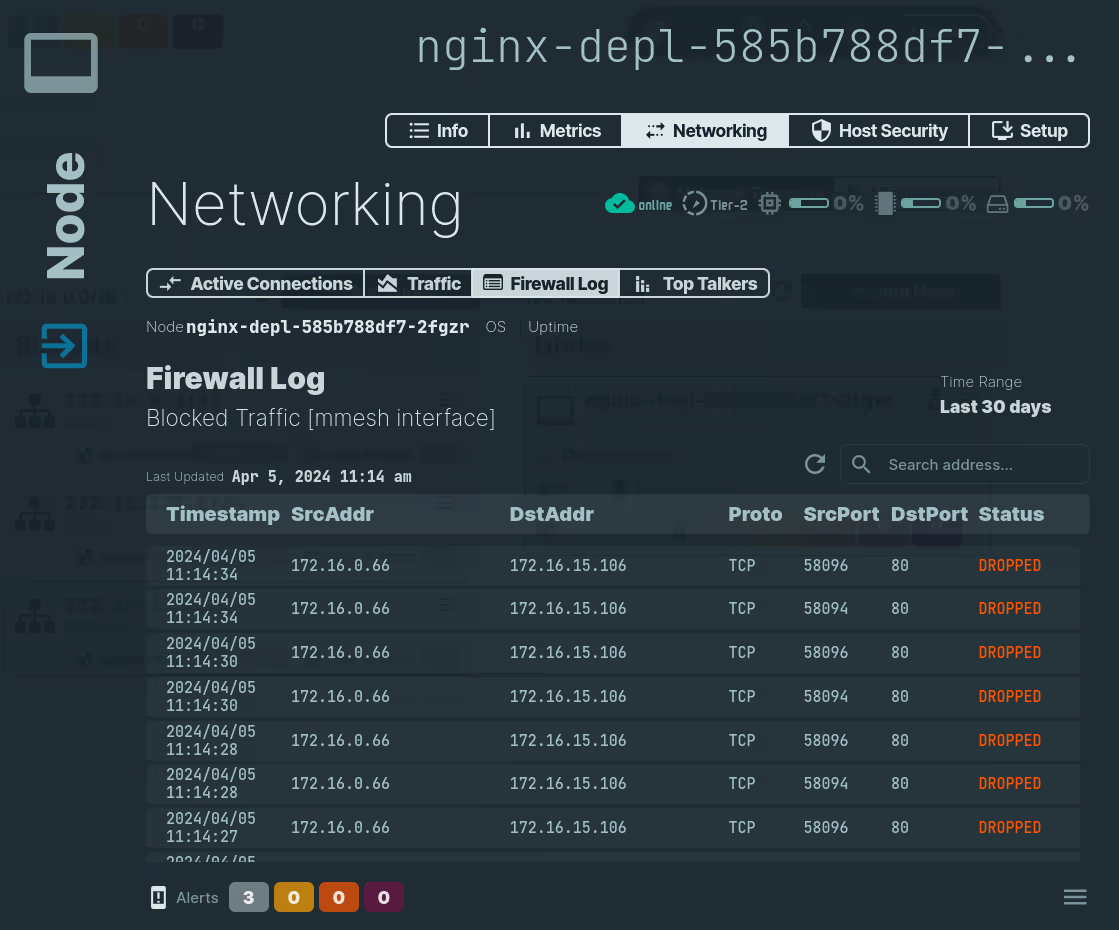
- Locate the target node of the failing connection.
- Open it on the webUI and select
NetworkingandFirewall Logtabs. - If required, click on the
Reloadbutton to update the data.
Tip
Review the Security Policy on the node's subnet and make the required changes to correct the issue.