Manage Virtual Servers
What are Virtual Servers?
n2x.io Virtual Servers deliver cloud-agnostic load balancing, distributing traffic across diverse environments including multi-cloud deployments and on-premises infrastructure. Additionally, they provide advanced functionalities like SSL termination and health checks, improving application security and performance.
Virtual Servers let you configure your custom domain to access your publicly exposed applications or services. Simply add a CNAME record in your DNS server pointing to the FQDN (Fully Qualified Domain Name) provided during the Virtual Server creation process.
To successfully configure a Virtual Server, follow these two steps:
- Select an existing network and create a Virtual Server within it.
- Add Node Services to the Virtual Server.
Info
Node Services are the resources that receive traffic distributed by the Virtual Server.
Create a Virtual Server
Warning
Only Account Administrators or Admin Users can manage virtual servers.
You can create a virtual server using the n2x.io webUI or CLI (n2xctl):
In the navigation menu on the left, click Virtual Servers and follow these steps:
- Select the
Tenantfrom the available list. - Select the
Networkwhere to create theVirtual Server. -
Click on the
+ Add Virtual Serverbutton.
-
Enter the
NameandDescription.Warning
The value of Name can only contain lowercase letters (a–z), numbers (0–9), and hyphens (-). It must start with a letter and end with a letter or a number. Valid examples: mi-app, demo123, webapp
-
You can add a custom
CNAME(Optional). - The
Identity-Aware Proxy Authenticationcheckbox lets you enable or disable IAP for your virtual server. To learn more about this feature, click here. - Assign the
tagsto your virtual server. These tags can be used by various features, such as Identity-Aware Proxy (IAP) authentication. - Click on the
Add New Virtual Serverbutton.
Use the following command to create a Virtual Server:
n2xctl vs create
The command will prompt you for the following information:
Tenant: Select the tenant to which the Virtual Server will belong.Network: Choose the appropriate network for the Virtual Server.-
Name: Enter a clear and descriptive name.Warning
The value of Name can only contain lowercase letters (a–z), numbers (0–9), and hyphens (-). It must start with a letter and end with a letter or a number. Valid examples: mi-app, demo123, webapp
-
Description: Provide a brief description of the Virtual Server. - You can add a custom
CNAME(Optional). Authenticationfield enable or disable Identity-Aware Proxy Authentication for the virtual server. To learn more about this feature, click here.- Assign the
tagsto your virtual server. These tags can be used by various features, such as Identity-Aware Proxy (IAP) authentication. Add node app svc to virtual serverfiled, simplifies virtual server configuration by allowing you to add node services to your virtual server in a single step.
$ n2xctl vs create
n2xctl v0.0.3-20240725171430+88c4863--go1.22.5

n2xctl is a CLI to control the n2x SASE platform.

Find more information at https://n2x.io/docs

» Tenant: [demo] Demo tenant
» Network: [net-172-16] Demo
» VS Name: demo-vs
» Description: Demo Virtual Service
» Custom DNS CNAME:
» Authentication: No
» Tags: nginx
» Add node app svc to virtual server? No
                                                ───── Virtual Server Details ≡
══════════════════════════
Virtual Server Information
══════════════════════════

VS ID               xxxxxxxx-xxxx-xxxx-xxxx-xxxxxxxxxxxx
Tenant ID           xxxxxxxx-xxxx-xxxx-xxxx-xxxxxxxxxxxx
Name                demo-vs
Description         Demo Virtual Service
Connectivity Zone   eu-south
Authentication      [no]

Tags
────

 ■ nginx


-> URL: https://xxxxxxxx-xxxx-xxxx-xxxx-xxxxxxxxxxxx.eu-south.iap.n2x.io
Tip
If a CNAME is not provided, a URL will be created for you with the format: https://xxxxxxxx-xxxx-xxxx-xxxx-xxxxxxxxxxxx.<network-connectivity-zone>.iap.n2x.io
Add Node Services to Virtual Servers
Warning
Only Account Administrators or Admin Users can manage virtual servers.
You can add node services to virtual servers either using the n2x.io webUI or CLI (n2xctl):
In the navigation menu on the left, click Virtual Servers and follow these steps:
- Select the
Tenantfrom the available list. - Select the
Network. - Select the
Virtual Serverwhere add the node service. -
Click on the
+ Add Node Servicebutton.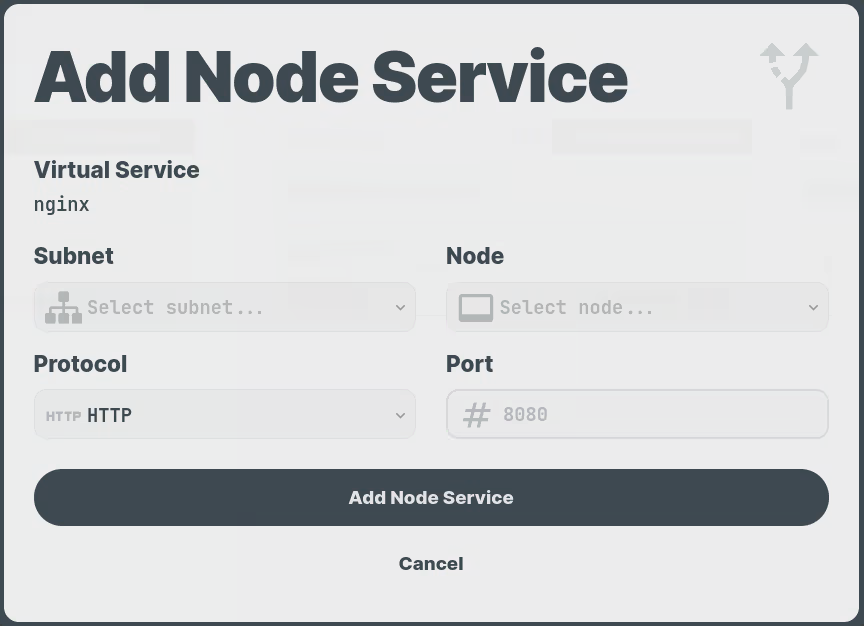
-
Select the desired
Subnetfrom the available list. - Select the desired
Nodefrom the available list. - Enter
ProtocolandPortof node service. - Click on the
Add Node Servicebutton.
Use the following command to add node services to virtual servers:
n2xctl vs add-node-svc
Configure a Virtual Server with a Node Service:
- Select the desired
Virtual Servicefrom the available list. - Confirm Node Service Addition: When prompted with the question "Add node appSvc to virtual server?", type
yesto proceed. - Choose the desired
Tenantfrom the available list. - Select the desired
Nodefrom the available list. - Enter the
Protocolused by the node service (HTTP/HTTPS). - Enter the
Portnumber on which the node service listens for traffic.
$ n2xctl vs add-node-svc
n2xctl v0.0.3-20240725171430+88c4863--go1.22.5

n2xctl is a CLI to control the n2x SASE platform.

Find more information at https://n2x.io/docs

» VS: [demo-vs] Demo Virtual Service
» Add node appSvc to virtual server? Yes
» Tenant: [demo] Demo tenant
» Node: [nginx-depl-7db98588fd-bdxm4] [k8s-pod] nginx-depl
» Protocol: HTTP
» App Svc Port: 80
                                                ───── Virtual Server Details ≡
══════════════════════════
Virtual Server Information
══════════════════════════

VS ID               xxxxxxxx-xxxx-xxxx-xxxx-xxxxxxxxxxxx
Tenant ID           xxxxxxxx-xxxx-xxxx-xxxx-xxxxxxxxxxxx
Name                demo-vs
Description         Demo Virtual Service
Connectivity Zone   eu-south
Authentication      [no]

Node App Services
─────────────────

Tenant  Subnet              Node                                Proto   Port
------  ------              ----                                -----   ----
demo    subnet-172-16-15    nginx-depl-7db98588fd-bdxm4         TCP     80

Tags
────

 ■ nginx


-> URL: https://xxxxxxxx-xxxx-xxxx-xxxx-xxxxxxxxxxxx.eu-south.iap.n2x.io
Delete Node Services from a Virtual Service
Warning
Only Account Administrators or Admin Users can manage virtual servers.
You can delete node services from a virtual service either using the n2x.io webUI or CLI (n2xctl):
In the navigation menu on the left, click Virtual Servers and follow these steps:
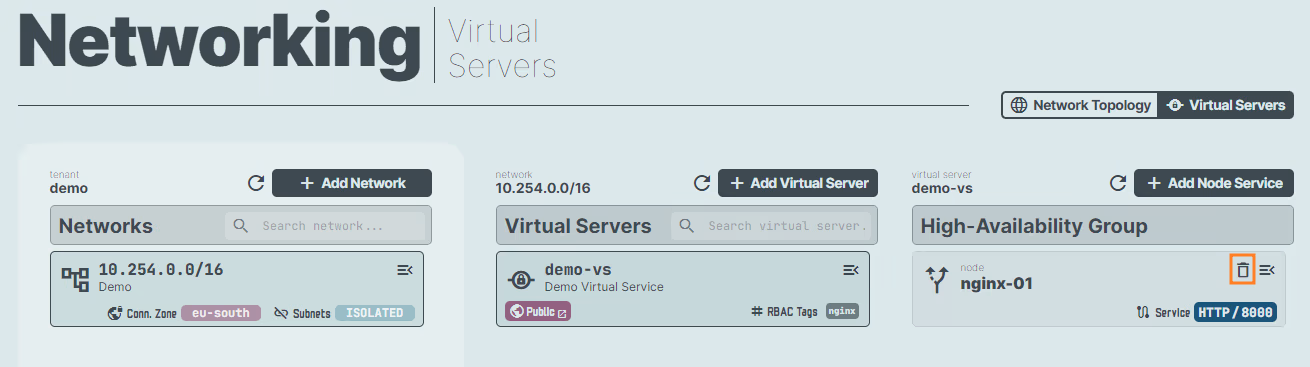
- Select the desired
Virtual Servicefrom the available list. - Click on the
binicon ofNodeto delete. - Confirm the deletion.
Use the following command to delete node services from a virtual service:
n2xctl vs remove-node-svc
The command will typically prompt you to:
- Select the
Virtual Serviceyou want to modify. - Choose the
Node Serviceyou want to delete from the available list.
$ n2xctl vs remove-node-svc
n2xctl v0.0.3-20240725171430+88c4863--go1.22.5

n2xctl is a CLI to control the n2x SASE platform.

Find more information at https://n2x.io/docs

» VS: [demo-vs] Demo Virtual Service
» Remove node appSvc: [nginx-01] port 8000
                                                ───── Virtual Server Details ≡
══════════════════════════
Virtual Server Information
══════════════════════════

VS ID               xxxxxxxx-xxxx-xxxx-xxxx-xxxxxxxxxxxx
Tenant ID           xxxxxxxx-xxxx-xxxx-xxxx-xxxxxxxxxxxx
Name                demo-vs
Description         Demo Virtual Service
Connectivity Zone   eu-south
Authentication      [no]

Tags
────

 ■ nginx


-> URL: https://xxxxxxxx-xxxx-xxxx-xxxx-xxxxxxxxxxxx.eu-south.iap.n2x.io
Delete a Virtual Server
Warning
Only Account Administrators or Admin Users can manage virtual servers.
You can delete a virtual server from your network either using the n2x.io webUI or CLI (n2xctl):
In the navigation menu on the left, click Virtual Servers and follow these steps:
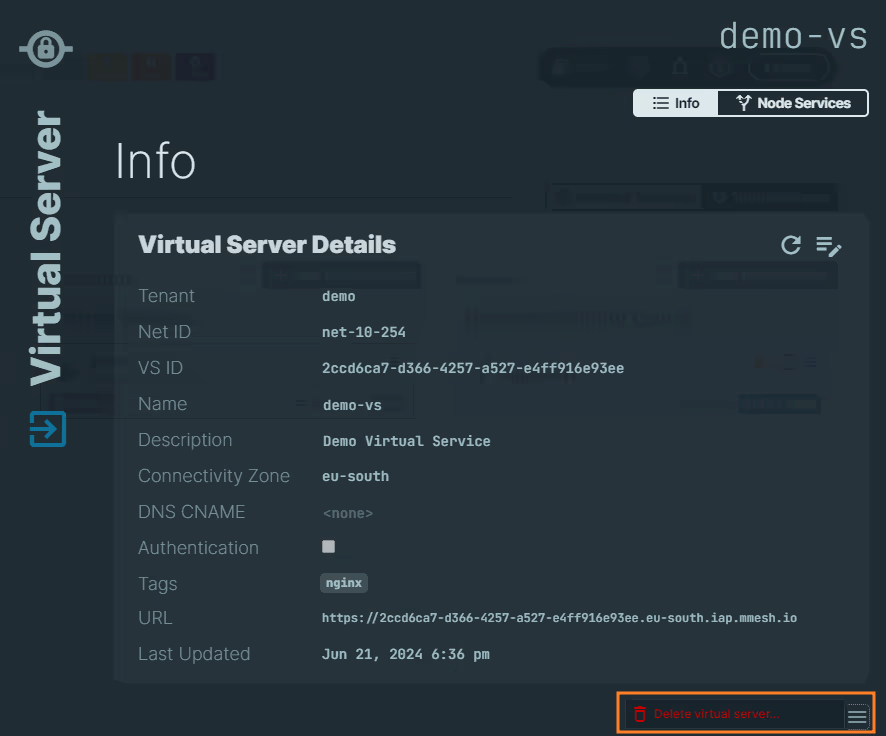
- Select the desired
Virtual Servicefrom the available list. - Click on the icon.
- Click on the
Delete virtual servers...button.
Note
Confirmation is requested before deleting a virtual server.
Use the following command to delete a virtual server from your network:
n2xctl vs delete
The command will prompt you for the following information:
VS: Select theVirtual Serveryou want to delete.Confirm deletion?: Typeyesto confirm and proceed with deleting the selectedVirtual Server.
$ n2xctl vs delete
n2xctl v0.0.3-20240725171430+88c4863--go1.22.5

n2xctl is a CLI to control the n2x SASE platform.

Find more information at https://n2x.io/docs

» VS: [test2] test load balancer

» Confirm deletion? Yes

   Done