Manage Network
What are Networks?
A network is a component that logically groups smaller network segments called subnets.
Each network requires a configuration with a /16 IPv4 prefix (CIDR). This prefix can be customized based on your needs and typically falls within the RFC1918 private address range for enhanced security.
Isolation and Scalability:
-
Networks in n2x.io are inherently isolated from each other, ensuring secure separation of network traffic.
-
The platform offers exceptional scalability. You can create an unlimited number of networks per tenant and up to 255 subnets within each network. This allows for granular network organization, enabling you to create separate networks for distinct environments like
developmentandproduction, maintaining complete isolation between them.
Routed Subnets
The Routed Subnets feature of n2x.io networks allows you to control how traffic is routed between different subnets within a network.
You can configure the Routed Subnets flag in the network settings:
- Enabled (
Routed Subnets): A node connected to a subnet under this network can reach other nodes in different subnets on the same network. - Disabled (
Isolated Subnets): A node connected to a subnet under this network will only be able to reach other nodes connected to the same subnet since all network subnets become isolated from the routing point of view.
Tip
Routed subnets might be used for communication between different services, while isolated subnets could be used for increased security.
Note
A network with this option disabled, it becomes an isolated virtual router (VRF).
Create a Network
Warning
Only Account Administrators or Admin Users can manage networks.
You can create a network for your tenant either using the n2x.io webUI or CLI (n2xctl):
In the navigation menu on the left, click Network Topology and follow these steps:
- Select the
Tenantfrom the available list. -
Click on the
+ Add Networkbutton.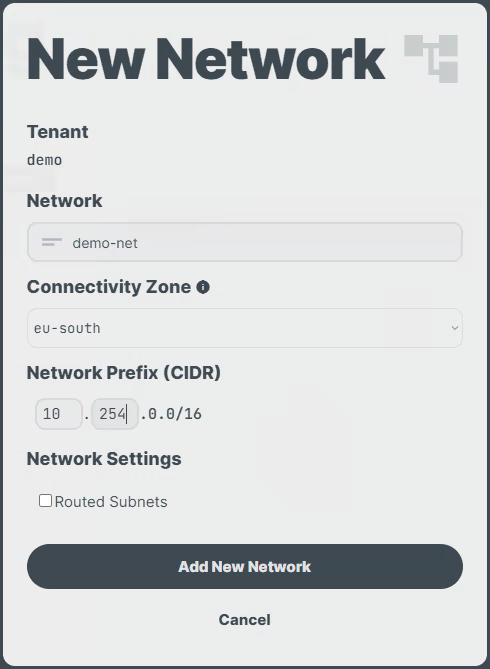
-
Enter the
DescriptionandNetwork Prefix, select theConnectivity Zoneto assign the network, and click theRouted Subnetscheckbox to enable this feature. - Click on the
Add New Networkbutton.
Note
Only the Description and Routed Subnets fields can be modified after the network is created.
Use the following command to create a network:
n2xctl network create
The command will prompt you for the following information:
Tenant: Select the Tenant to which the network will belong.Network CIDR: Provide a valid /16 network in the formatn.n.0.0/16.Description: Brief description of the network.- Answer
yeswhen prompted to enable the Routed Subnets feature. Connectivity Zone: Select one of the options from the displayed list.
$ n2xctl network create
n2xctl v0.0.3-20240725171430+88c4863--go1.22.5

n2xctl is a CLI to control the n2x SASE platform.

Find more information at https://n2x.io/docs

» Tenant: [demo] Demo Tenant
» Network CIDR: 10.254.0.0/16
» Description: demo-net
» Route this network's subnets each other? Yes
» Connectivity Zone: eu-south
                                                       ───── Network Details ≡
═══════════════════
Network Information
═══════════════════

Tenant ID           xxxxxxxxx-xxxx-xxxx-xxxx-xxxxxxxxxxxx
Network ID          net-10-254
Network CIDR        10.254.0.0/16
Description         demo-net
Routed Subnets      [yes]
Connectivity Zone   eu-south
Note
Only the Description and Routed Subnets fields can be modified after the network is created.
Enable/Disable Routed Subnet in a Network
Warning
Only Account Administrators or Admin Users can manage networks.
You enable/disable the routed subnet setting in your network either using the n2x.io webUI or CLI (n2xctl):
In the navigation menu on the left, click Network Topology and follow these steps:
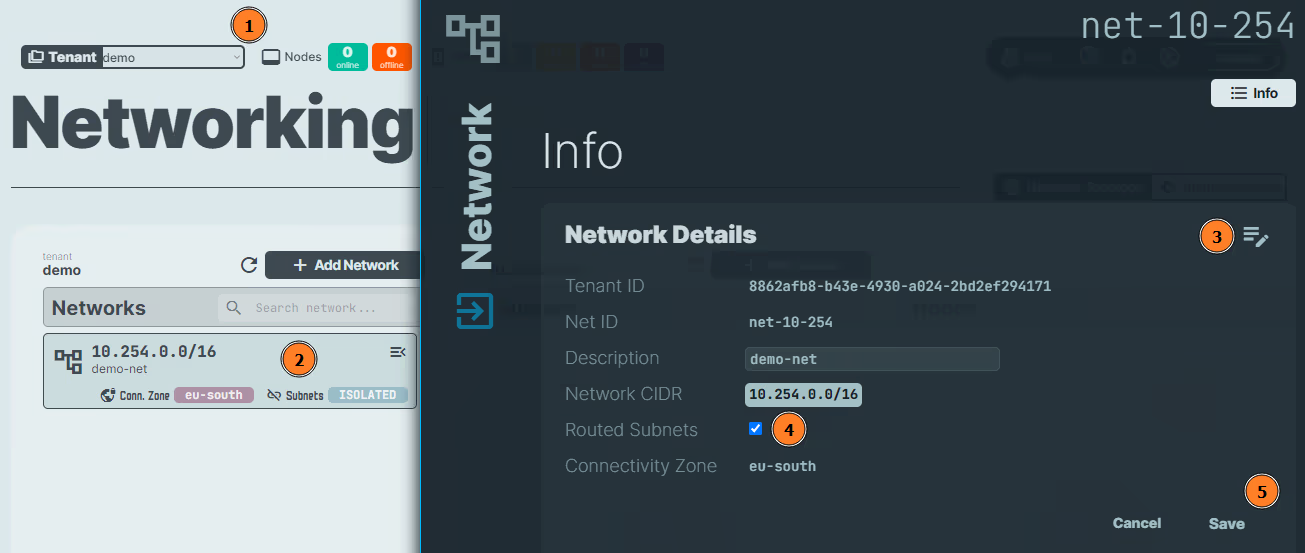
- Select the
Tenant. - Select the
Networkto update. - Click on the icon.
- Click the
Routed Subnetscheckbox to disable or enable this feature. - Click on the
Savebutton.
Use the following command to enable/disable the Routed Subnet setting in your network:
n2xctl network update
The command will prompt you for the following information:
Tenant: Select the Tenant to which the network belongs.Network: Choose the Network you want to configure.Description: Enter a brief description, or press Enter if you do not wish to make any changes.- Answer
yesto enable ornoto disable the Routed Subnets feature
$ n2xctl network update
n2xctl v0.0.3-20240725171430+88c4863--go1.22.5

n2xctl is a CLI to control the n2x SASE platform.

Find more information at https://n2x.io/docs

» Tenant: [demo] Demo Tenant
» Network CIDR: 10.254.0.0/16
» Description: demo-net
» Route this network's subnets each other? No
                                                       ───── Network Details ≡
═══════════════════
Network Information
═══════════════════

Tenant ID           xxxxxxxxx-xxxx-xxxx-xxxx-xxxxxxxxxxxx
Network ID          net-10-254
Network CIDR        10.254.0.0/16
Description         demo-net
Routed Subnets      [no]
Connectivity Zone   eu-south
Delete a Network
Warning
Only Account Administrators or Admin Users can manage networks.
Info
You can only delete a network if it is empty. Therefore, you must delete any associated subnets before deleting a network.
You can delete a network from your tenant either using the n2x.io webUI or CLI (n2xctl):
In the navigation menu on the left, click Network Topology and follow these steps:

- Select the
Tenant. - Select the
Networkto delete. - Click on the icon.
- Click on the
Delete network...button.
Info
To permanently delete the network, a confirmation prompt will appear for verification.
Use the following command to delete a network from your tenant:
n2xctl network delete
The command will prompt you for the following information:
Tenant: Select the tenant associated with the network you want to delete.Network: Select the network you want to delete.Confirm deletion?: Typeyesto confirm and proceed with deleting the selected network.
$ n2xctl network delete
n2xctl v0.0.3-20240725171430+88c4863--go1.22.5

n2xctl is a CLI to control the n2x SASE platform.

Find more information at https://n2x.io/docs

» Tenant: [demo] Demo Tenant
» Network: [net-10-254] demo-net

» Confirm deletion? Yes

Done