Manage Subnets
What are Subnets?
A subnet within the n2x.io network is a logical subdivision that connects devices (nodes).
A subnet is configured with a /24 IPv4 prefix belonging to the network IP range. Therefore, a subnet can have at most 254 nodes.
Subnet prefix
For simplicity, the subnets only support /24 prefixes.
From a routing point of view, you need to keep these two assumptions in mind:
- Any node connected to a subnet by default will be able to reach other nodes connected to the same subnet.
- Any node connected to a subnet under the same network only will be able to reach other nodes in different subnets if the Routed Subnets network feature is enabled.
IP Address Management
Every n2x.io subnet has an internal IP Address Management System (IPAM) service responsible for automatically assigning and releasing stable IP addresses for each nodes connected. These addresses stay the same, no matter where nodes move to in the physical world, making them easy to manage.
This feature allows that when a node is connected to a specific subnet, the subnet's IPAM automatically assigns an IPv4 and IPv6 to the node and cannot be changed by hand.
Once issued, your node's IP address will not change for as long as the node remains registered. Both IPv4 and IPv6 addresses are fixed.
Security Policies
Every n2x.io subnet comes with a built-in security policy that acts like a distributed firewall-as-a-service (FWaaS). This firewall automatically protects every node connected to the subnet.
To understand and restrict the communication between nodes in your subnet, see Security Policies
Create a Subnet
Warning
Only Account Administrators or Admin Users can manage subnets.
You can create a subnet to your network either using the n2x.io webUI or CLI (n2xctl):
In the navigation menu on the left, click Network Topology and follow these steps:
- Select the
Tenantfrom the available list. - Select the
Networkwhere to create the subnet. -
Click on the
+ Add Subnetbutton.
-
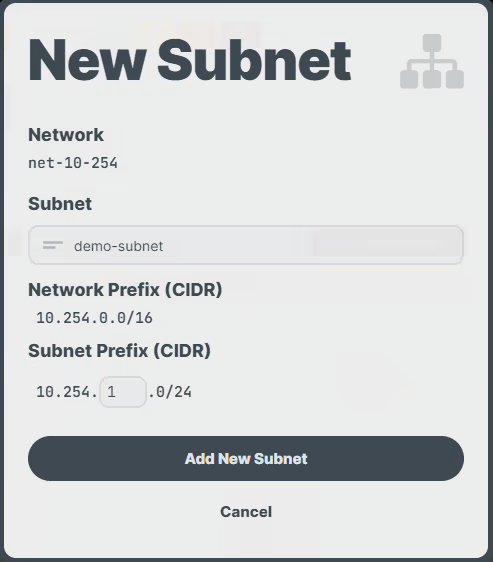
Enter the
DescriptionandSubnet Prefix (CIDR). - Click on the
Add New Subnetbutton.
Note
Only the Description field can be modified after the subnet is created.
Use the following command to create a subnet:
n2xctl subnet create
The command will prompt you for the following information:
Tenant: Select the tenant to which the new subnet will be associated.Network: Select the network to which the new subnet will belong.Subnet CIDR: Provide a valid /24 subnet in the format 10.250.n.0/24 (e.g., if the network is 10.250.0.0/16, a valid subnet could be 10.250.1.0/24).Subnet Description: Provide a brief description of the new subnet.Default Security Policy: Select the default security policy to apply to the subnet (ACCEPT or DROP).
$ n2xctl subnet create
n2xctl v0.0.3-20240725171430+88c4863--go1.22.5

n2xctl is a CLI to control the n2x SASE platform.

Find more information at https://n2x.io/docs

» Tenant: [demo] Demo Tenant
» Network: [net-10-254] demo-net
» Subnet CIDR: 10.254.1.0/24
» Subnet Description: demo-subnet
» Default Security Policy: DROP
                                                        ───── Subnet Details ≡
══════════════════
Subnet Information
══════════════════

Tenant ID   xxxxxxxxx-xxxx-xxxx-xxxx-xxxxxxxxxxxx
Network ID  net-10-254
Subnet ID   subnet-10-254-1
Description demo-subnet

IP Address Management (IPAM)
────────────────────────────

Network CIDR                10.254.0.0/16
Subnet CIDR                 10.254.1.0/24
IPv4 Addresses Available    254
IPv4 Addresses Leased       0

Security Policy
───────────────

Default Policy  [DROP]

Index   Source  Destination Port/Proto  Policy
-----   ------  ----------- ----------  ------
Delete an IPAM entry manually from a Subnet
Warning
Only Account Administrators or Admin Users can manage subnets.
You can delete an IPAM entry manually from a subnet using the n2x.io CLI:
Use the following command to delete IPAM entry manually from a Subnet:
n2xctl subnet delete-ipam-entry
The command will prompt you for the following information:
Tenant: Select the tenant associated with the subnet you want to modify.Network: Select the network to which the subnet belongs.Subnet: Select the subnet from which the IPAM entry will be deleted.IPAM Endpoint: Indicate the IPAM endpoint associated with the subnet.
$ n2xctl subnet delete-ipam-entry
n2xctl v0.0.3-20240725171430+88c4863--go1.22.5

n2xctl is a CLI to control the n2x SASE platform.

Find more information at https://n2x.io/docs

» Tenant: [demo] Demo Tenant
» Network: [net-10-254] demo-net
» Subnet: [subnet-10-254-1] [net-10-254] demo-subnet
» IPAM Endpoint: 10.254.1.175: node-demo
                                                        ───── Subnet Details ≡
══════════════════
Subnet Information
══════════════════

Tenant ID   xxxxxxxxx-xxxx-xxxx-xxxx-xxxxxxxxxxxx
Network ID  net-10-254
Subnet ID   subnet-10-254-1
Description demo-subnet

IP Address Management (IPAM)
────────────────────────────

Network CIDR                10.254.0.0/16
Subnet CIDR                 10.254.1.0/24
IPv4 Addresses Available    254
IPv4 Addresses Leased       0

Security Policy
───────────────

Default Policy  [DROP]

Index   Source  Destination Port/Proto  Policy
-----   ------  ----------- ----------  ------
Manage the Security Policy in a Subnet
To understand and restrict the communication between nodes in your subnet, see Security Policies
Delete a Subnet
Warning
Only Account Administrators or Admin Users can manage subnets.
Note
You can only delete a subnet if it is empty. Therefore, you must delete any node before deleting a subnet.
You can delete a subnet from your network either using the n2x.io webUI or CLI (n2xctl):
In the navigation menu on the left, click Network Topology and follow these steps:

- Select the
Tenant. - Select the
Subnetto delete. - Click on the icon.
- Click on the
Delete subnet...button.
Info
Confirmation is requested before deleting a subnet.
Use the following command to delete a Subnet from a network:
n2xctl subnet delete
The command will prompt you for the following information:
Tenant: Select the tenant associated with the subnet you want to delete.Network: Select the network to which the subnet belongs.Subnet: Select the subnet you want to delete.Confirm deletion?: Typeyesto confirm and proceed with deleting the selected subnet.
$ n2xctl subnet delete
n2xctl v0.0.3-20240725171430+88c4863--go1.22.5

n2xctl is a CLI to control the n2x SASE platform.

Find more information at https://n2x.io/docs

» Tenant: [demo] Demo Tenant
» Network: [net-10-254] demo-net
» Subnet: [subnet-10-254-1] demo-subnet

» Confirm deletion? Yes

Done