Manage Nodes
Add a Connected Node
Warning
Only Account Administrators or Admin Users can manage nodes.
You can add new connected nodes to your subnet either using the n2x.io webUI or CLI (n2xctl):
In the navigation menu on the left, click Nodes and follow these steps:
- Select the
Tenantfrom the available list. -
Click on
+ Add Connected Nodebutton.
-
Choose the appropriate
NetworkandSubnetfor the node. -
Enter the
Node NameandDescriptionfor the node.Warning
The value of Node Name can only contain lowercase letters (a–z), numbers (0–9), and hyphens (-). It must start with a letter and end with a letter or a number. Valid examples: node, db01, node-01
-
Click on the
Add New Connected Node to Subnetbutton.Note
A pop-up window will appear, providing a one-line command to quickly and easily install the
n2x-nodeagent on your devices. For more installation details, click here.
Use the following command to add a connected node to a subnet:
n2xctl node add
The n2xctl tool will prompt you for the following information:
Tenant: Select the tenant to which the node will belong.NetworkandSubnet: Select the appropriate network and subnet for the node.-
Node Name: Enter a clear and descriptive name for your node.Warning
The value of Node Name can only contain lowercase letters (a–z), numbers (0–9), and hyphens (-). It must start with a letter and end with a letter or a number. Valid examples: node, db01, node-01
-
Description: Provide a brief description of the node.
$ n2xctl node add
n2xctl v0.0.3-20240725171430+88c4863--go1.22.5

n2xctl is a CLI to control the n2x SASE platform.

Find more information at https://n2x.io/docs

» Tenant: [default] Default tenant
» Network: [net-10-254] Default network
» Subnet: [subnet-10-254-0] [net-10-254] default subnet
» Node Name: node-01
» Description: Example Node
                                                          ───── Node Details ≡
════════════════
Node Information
════════════════

Tenant ID   xxxxxxxx-xxxx-xxxx-xxxx-xxxxxxxxxxxx
Network ID  net-10-254
Subnet ID   subnet-10-254-0
Node ID     xxxxxxxx-xxxx-xxxx-xxxx-xxxxxxxxxxxx
Node Name   node-01
Description Example Node
Status      [offline]

...
Add a Stubby Node
Warning
Only Account Administrators or Admin Users can manage nodes.
You only can add new stubby nodes using the n2x.io webUI:
In the navigation menu on the left, click Nodes and follow these steps:
- Select the
Tenantfrom the available list. -
Click on
+ Add Stubby Nodebutton.
-
Enter the
Node NameandDescriptionfor the node.Warning
The value of Node Name can only contain lowercase letters (a–z), numbers (0–9), and hyphens (-). It must start with a letter and end with a letter or a number. Valid examples: node, db01, node-01
-
Click on the
Add New Stubby Node Nodebutton.Note
A pop-up window will appear, providing a one-line command to quickly and easily install the
n2x-nodeagent on your devices. For more installation details, click here.
Show the Nodes Details
You can view the nodes details in your tenant either using the n2x.io webUI or CLI (n2xctl):
In the navigation menu on the left, click Nodes and follow these steps:
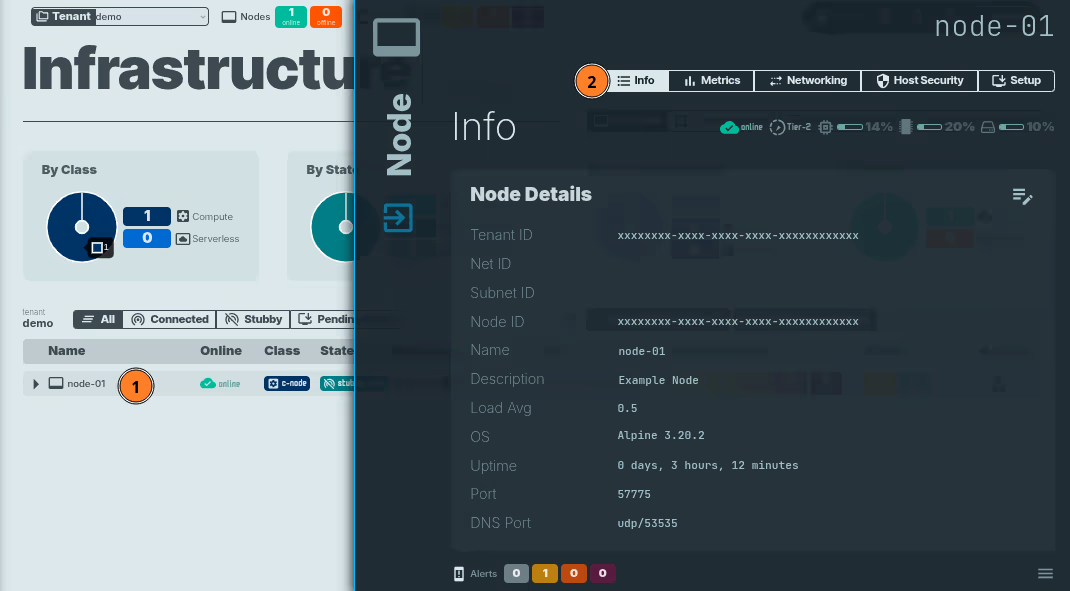
- Select the
Nodewhose details you want to view. - Click on the Info icon.
Use the following command to view node details in your n2x.io account:
n2xctl node show
The command will prompt you for the following information:
Tenant: Select the tenant associated with the node to review.Node: Select the node whose details you want to view.
$ n2xctl node show
n2xctl v0.0.4-20240819091023+6180dae--go1.22.6
n2xctl is a CLI to control the n2x SASE platform.
Find more information at https://n2x.io/docs
» Tenant: [demo] Demo tenant
» Node: [node-01] Example Node
                                                          ───── Node Details ≡
════════════════
Node Information
════════════════
Tenant ID   xxxxxxxx-xxxx-xxxx-xxxx-xxxxxxxxxxxx
Node ID     xxxxxxxx-xxxx-xxxx-xxxx-xxxxxxxxxxxx
Node Name   node-01
Description Example Node
Status      [online]

-----NODE AUTHORIZATION TOKEN-----
xxxxxxxxxxxxxxxxxxxxxxxxxxxxxxxxxxxxxxxxxxxxxxxxxxxxxxxxxxxxxxxxxxxxxxxxxxxxxxxxxxxxxxxxxxxxxxxxxxxxxxxxxxxxxxxxxxxxxxxxxxxxxxxxxxxxxxxxxxxxxxxxxxxxxxxxxxxxxxxxxxxxxxxxxxxxxxxxxxxxxxxxxxxxxxxxxxxxxxxxxxxxxxxxxxxxxxxxxxxxxxxxxxxxxxxxxxxxxxxxxxxxxxxxxxxxxxxxxxxxxxxxxxxxxxxxxxxxxxxxxxxxxxxxxxxxxxxxxxxxxxxxxxxxxxxxxxxxxxxxxxxxxxxxxxxxxxxxxxxxxxxxxxxxxxxxxxxxxxxxxxxxxxxxxxxxxxxxxxxxxxxxxxxxxxxxxxxxxxxxxxxxxxxxxxxxxxxxxxxxxxxxxxxxxxxxxxxxxxxxxxxxxxxxxxxxxxxxxxxxxxxxxxxxxxxxxxxxxxxxxxxxxxxxxxxxxxxxxxxxxxxxxxxxxxxxxxxxxxxxxxxxxxxxxxxxxxxxxxxxxxxxxxxxxxxxxxxxxxxxxxxxxxxxxxxxxxxxxxxxxxxxxxxxxxxxxxxxxxxx
-----NODE AUTHORIZATION TOKEN-----

OS          Alpine 3.20.2
Uptime      0 days, 13 hours, 03 minutes
Maintenance [auto-update] Scheduled [02:00]
Options     [exec] [transfer] [portForward] [workflows]
External IP n/a
Port        57775
DNS Port    udp/53535
Routing     [priority-6]
Resources   Load 0.970000 | RAM [24%] ██░░░░░░░░ | Disk [10%] █░░░░░░░░░
List the Nodes
Warning
Only Account Administrators or Admin Users can manage nodes.
You can list the nodes in your tenant either using the n2x.io webUI or CLI (n2xctl):
To view your nodes, follow these steps:
- Navigate to the left-hand menu and click on
Nodes. - Select the desired
Tenant.
A list of your nodes will be displayed.

Tip
Use the filters and search bar to refine your node list.
Use the following command to get a list of nodes, grouped by tenant:
n2xctl node list --by-tenant
The n2xctl tool will prompt you to select the Tenant for which you want to list nodes:
$ n2xctl node list --by-tenant
n2xctl v0.0.3-20240725171430+88c4863--go1.22.5

n2xctl is a CLI to control the n2x SASE platform.

Find more information at https://n2x.io/docs

» Tenant: [default] Default tenant
                                                                 ───── Nodes ≡
═════════
Node List
═════════

NODE NAME / FQDN                    IPv4            FLAGS / ENDPOINT
--------------------------------------------------------------------------
█ node-01                                           [prio-6]
█ node-01.n2x.local                 10.254.0.125    node-01
--------------------------------------------------------------------------
█ node-02                                           [prio-6]
--------------------------------------------------------------------------
Enable Networking in Stubby Nodes
Warning
Only Account Administrators or Admin Users can manage nodes.
You can enable networking in stubby nodes either using the n2x.io webUI or CLI (n2xctl):
In the navigation menu on the left, click Nodes and follow these steps:

- Select the desired
Tenant. - Choose the
Nodeyou want to configure. - Click on the icon.
- Select
Configure networking.... -
Select
Enabledoption and choose the appropriateNetworkandSubnetfrom the available list.
-
Click
Enable Networking and Connect Node to Subnetto save changes.
Use the following command to connect a stubby node to a network:
n2xctl node connect
The n2xctl tool prompts you to specify the following details:
Tenant: Select the tenant associated with the node you want to connect.Node: Choose the specific node you want to configure networking for.Network: Select the appropriate network from the available options.Subnet: Select the desired subnet within the chosen network.
$ n2xctl node connect
n2xctl v0.0.3-20240725171430+88c4863--go1.22.5

n2xctl is a CLI to control the n2x SASE platform.

Find more information at https://n2x.io/docs

» Tenant: [default] Default tenant
» Node: [node-02] Example Node
» Network: [net-10-254] Default network
» Subnet: [subnet-10-254-0] [net-10-254] default subnet
                                                          ───── Node Details ≡
════════════════
Node Information
════════════════

Tenant ID   xxxxxxxx-xxxx-xxxx-xxxx-xxxxxxxxxxxx
Network ID  net-10-254
Subnet ID   subnet-10-254-0
Node ID     xxxxxxxx-xxxx-xxxx-xxxx-xxxxxxxxxxxx
Node Name   node-02
Description Example Node
Status      [online]

...
Disable Networking in Connected Nodes
Warning
Only Account Administrators or Admin Users can manage nodes.
You can disable networking in connected nodes either using the n2x.io webUI or CLI (n2xctl):
In the navigation menu on the left, click Nodes and follow these steps:

- Select the desired
Tenant. - Choose the
Nodeyou want to configure. - Click on the icon.
- Select
Configure networking.... -
Select
Disabledoption.
-
Click
Disable Networking (Stubby-Mode)to save changes.
Use the following command to disable networking (Stubby-Mode) in connected nodes:
n2xctl node disable-networking
The n2xctl tool prompts you to specify the following details:
Tenant: Select the tenant associated with the node you want to connect.Node: Choose the specific node you want to disable networking.
$ n2xctl node disable-networking
n2xctl v0.0.3-20240725171430+88c4863--go1.22.5

n2xctl is a CLI to control the n2x SASE platform.

Find more information at https://n2x.io/docs

» Tenant: [default] Default tenant
» Node: [node-02] Example Node
                                                          ───── Node Details ≡
════════════════
Node Information
════════════════

Tenant ID   xxxxxxxx-xxxx-xxxx-xxxx-xxxxxxxxxxxx
Node ID     xxxxxxxx-xxxx-xxxx-xxxx-xxxxxxxxxxxx
Node Name   node-02
Description Example Node
Status      [online]

...
Delete a Node
Warning
Only Account Administrators or Admin Users can manage nodes.
Data Storage on Nodes
Nodes you manage through n2x.io collect data such as metrics or vulnerability reports. This data is stored on the nodes themselves, not on the n2x.io platform. The n2x.io platform only stores information related to the node's configuration (network, subnet or IP address).
Danger
Deleting a node is a permanent action. The node information will be erased from your n2x.io tenant and cannot be recovered.
You can delete a node from your tenant either using the n2x.io webUI or CLI (n2xctl):
In the navigation menu on the left, click Nodes and follow these steps:

- Select the
Tenant. - Select the
Nodeto delete. - Click on the icon.
- Click on the
Delete node...button.
Info
To permanently delete the node, a confirmation prompt will appear for verification.
Use the following command to delete a node from your tenant:
n2xctl node delete
Tenant, and Node to delete: $ n2xctl node delete
n2xctl v0.0.3-20240725171430+88c4863--go1.22.5
n2xctl is a CLI to control the n2x SASE platform.
Find more information at https://n2x.io/docs
» Tenant: [default] Default tenant
» Node: [node-01] Example Node
» Confirm deletion? Yes
Done
Uninstall n2x-node agent
Remember to uninstall the n2x-node agent from your device or application. This will help maintain a clean environment and prevent potential configuration issues.