How to Extend VPC Interface Endpoints beyond AWS
A VPC Endpoint allows you to establish a connection between your Virtual Private Cloud (VPC) and AWS services, without the need for an internet gateway, NAT device, VPN, or an AWS Direct Connect connection. Instances in your VPC don't use public IP addresses to communicate with AWS services; instead, they use VPC Endpoints for this purpose.
There are two types of VPC endpoints:
-
VPC Gateway Endpoint: This acts as a gateway in your route table that directs traffic for a specified AWS service.
-
VPC Interface Endpoint: This creates a network interface within the VPC's IP range, enabling communication with AWS services. It can also be useful with an AWS Direct Connect setup, routing traffic to AWS services via VPC Interface Endpoint.
Note
For a deeper understanding of AWS VPC Endpoints, we recommend reading the article Enhanced Connectivity: Navigating the Benefits of AWS VPC Endpoints.
This tutorial focuses on using VPC Interface Endpoints to create a private connection from a private subnet to Amazon S3. We'll then extend the S3 private endpoint to server-01 located in Private Data Center using n2x-node-01 instance deployed in the public subnet and n2x.io to create a virtual private network connection. This allows us to mount the Amazon S3 bucket as a filesystem from server-01.
Here is the high-level overview of tutorial setup architecture:
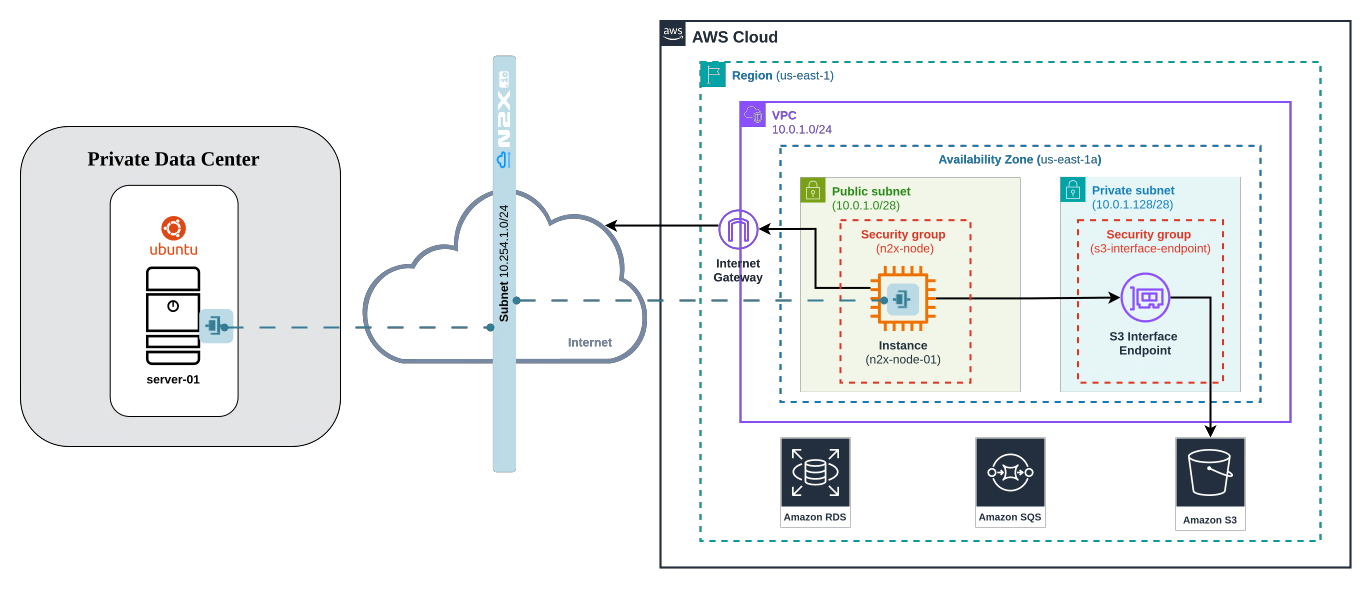
In our setup, we will be using the following components:
-
Interface VPC endpoint to connect to services powered by AWS PrivateLink. For more info please visit the AWS Documentation
-
n2x-node is an open-source agent that runs on the machines you want to connect to your n2x.io network topology. For more info please visit n2x.io Documentation.
Before you begin
In order to complete this tutorial, you must meet the following requirements:
-
An AWS account.
-
An Amazon S3 bucket created. We'll use the Amazon S3 bucket
n2x-demo-bucketfor this tutorial. -
A n2x.io account and one subnet with
10.254.1.0/24prefix. -
Installed n2xctl command-line tool, version
v0.0.3or greater.
Note
Please note that this tutorial uses a Linux OS with an Ubuntu 22.04 (Jammy Jellyfish) with amd64 architecture.
Step-by-step Guide
Step 1 - Deploying a n2x-node in AWS
Follow this step-by-step guide to set up an n2x-node in AWS. This guide will walk you through creating all the necessary infrastructure within the cloud service provider, including a VPC, public subnet, internet gateway, network security group, and instance.
Step 2 - Configuring n2x-node instance to export VPC CIDR
Before configuring n2x-node-01 to export VPC CIDR, we need to enable IPv4 forwarding it at the Linux level in AWS Instance to allow forward IPv4 packets. Let's proceed to execute the following steps for that purpose:
Now, to make the VPC CIDR available on your n2x.io subnet we need to configure the n2x-node-01 to export this CIDR. For this, we need to edit /etc/n2x/n2x-node.yml and add the following configuration:
# network routes behind this node (optional)
routes:
  export:
    - <VPC CIDR>
  import:
Info
Replace <VPC CIDR> with the VPC CIDR value, in this case is 10.0.1.0/24.
Restart the n2x-node service for this change to take effect:
sudo systemctl restart n2x-node
Step 3 - Deploying S3 Interface Endpoint
Before creating the S3 Interface Endpoint we need to create a private subnet and some additional resources:
-
Create the
privatesubnet in the VPCs as described in the following table. For more information, see Creating a Subnet:Subnet Settings
Subnet name tag VPC AZ IPv4 CIDR edge-pri-net-az1 edge us-east-1a 10.0.1.128/28 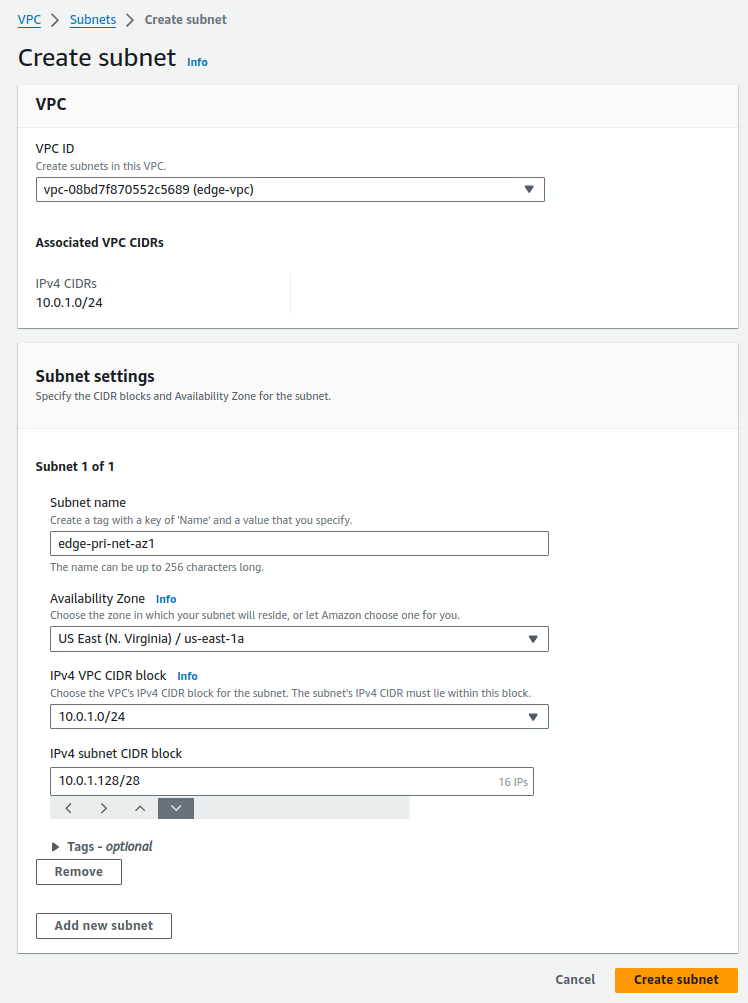
-
Create a routing table for the
edge-pri-net-az1private subnet and add a new route in the route table with the destination10.254.1.0/24(n2x.io subnet CIDR) vían2x-node-01instance. For more information, see Adding and Removing Routes from a route table.Routing Table Settings
Route table name tag VPC edge-pri-net-rt edge 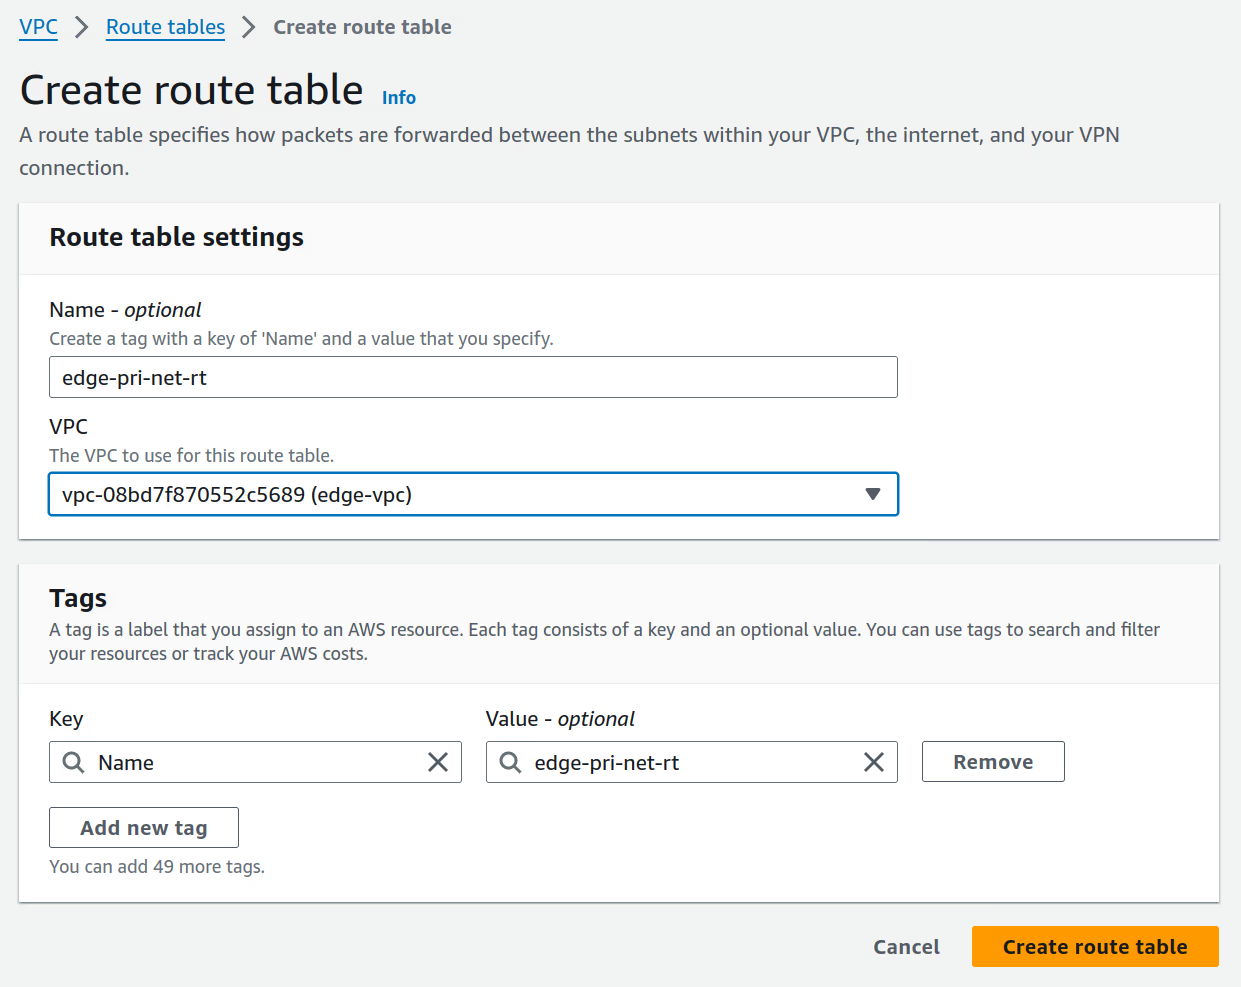

-
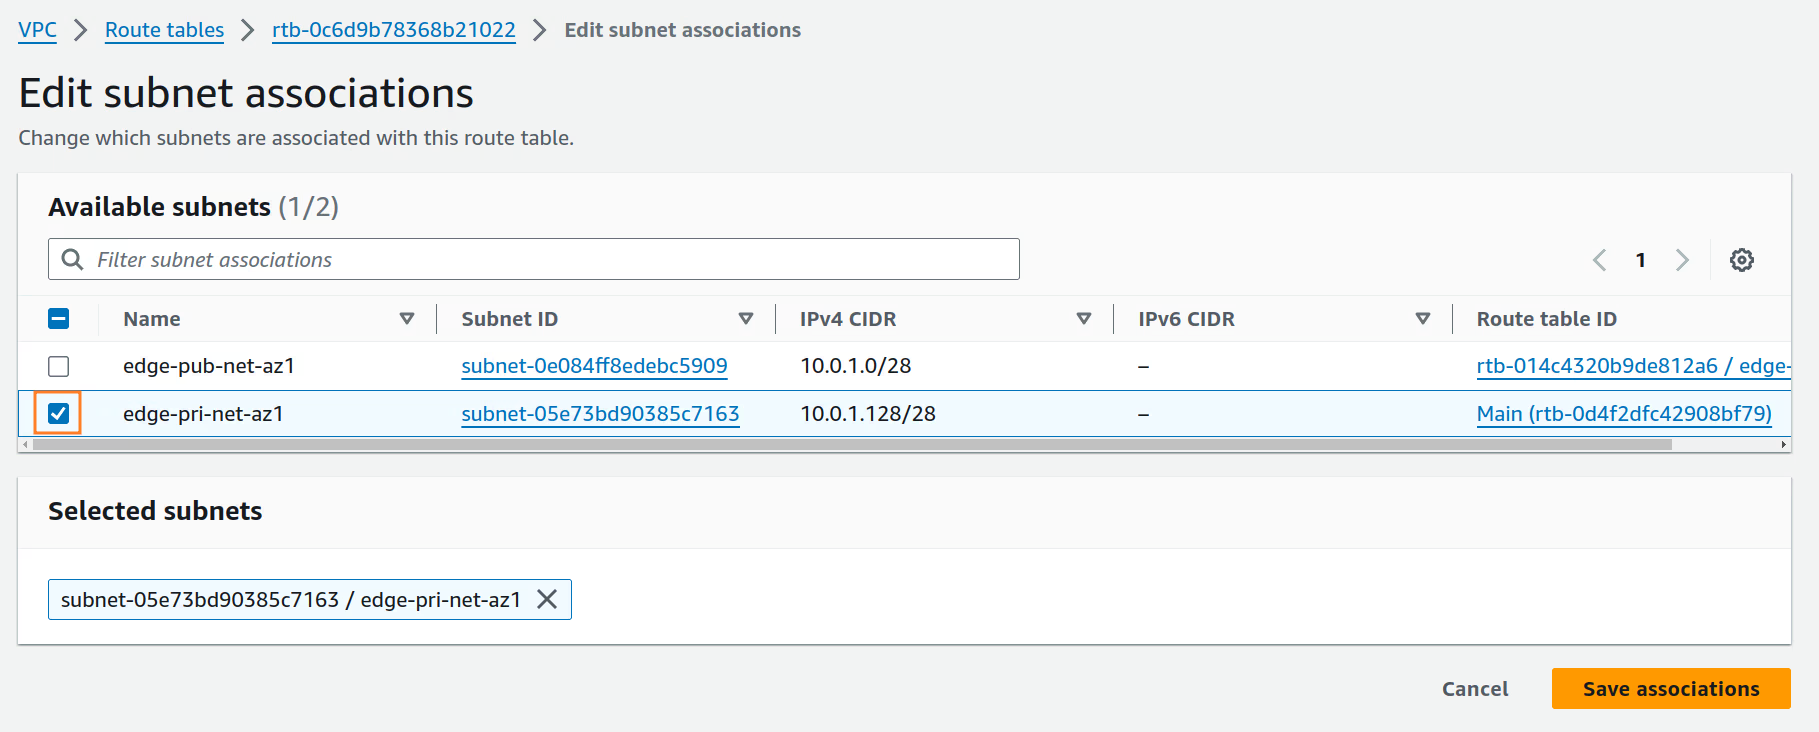
Create a subnet route table association between
edge-pri-net-rtrouting table andedge-pri-net-az1private subnet.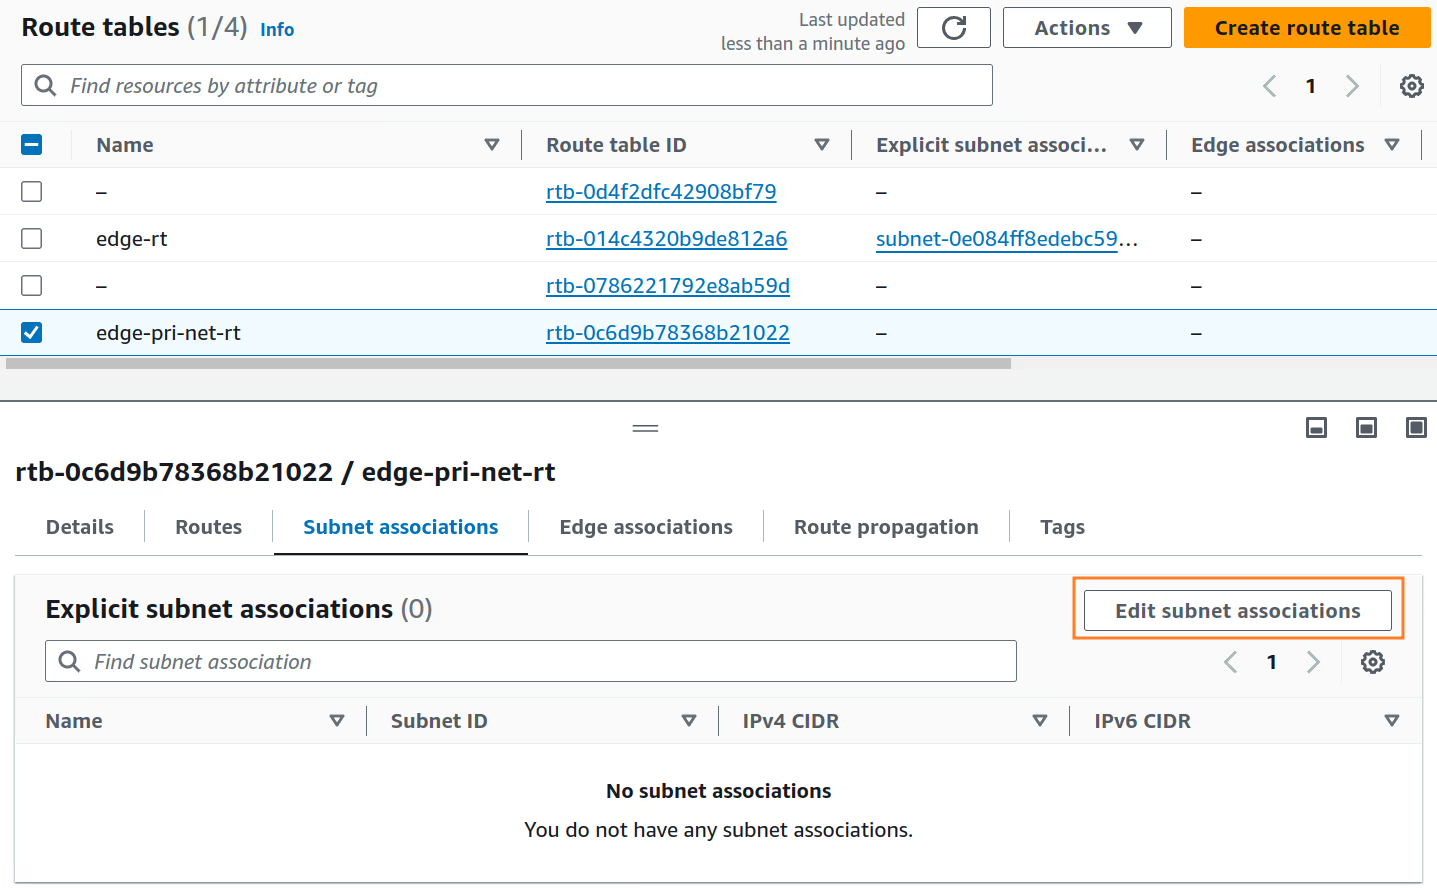
-
Create a security group
s3-interface-endpointthat enable ports 80 and 443 from0.0.0.0/0, we will attach the security group to the Interface Endpoint later:Security Group Settings
Rule Protocol Port Range Src/Dest Inbound TCP 80 0.0.0.0/0 Inbound TCP 443 0.0.0.0/0 Outbound All All 0.0.0.0/0 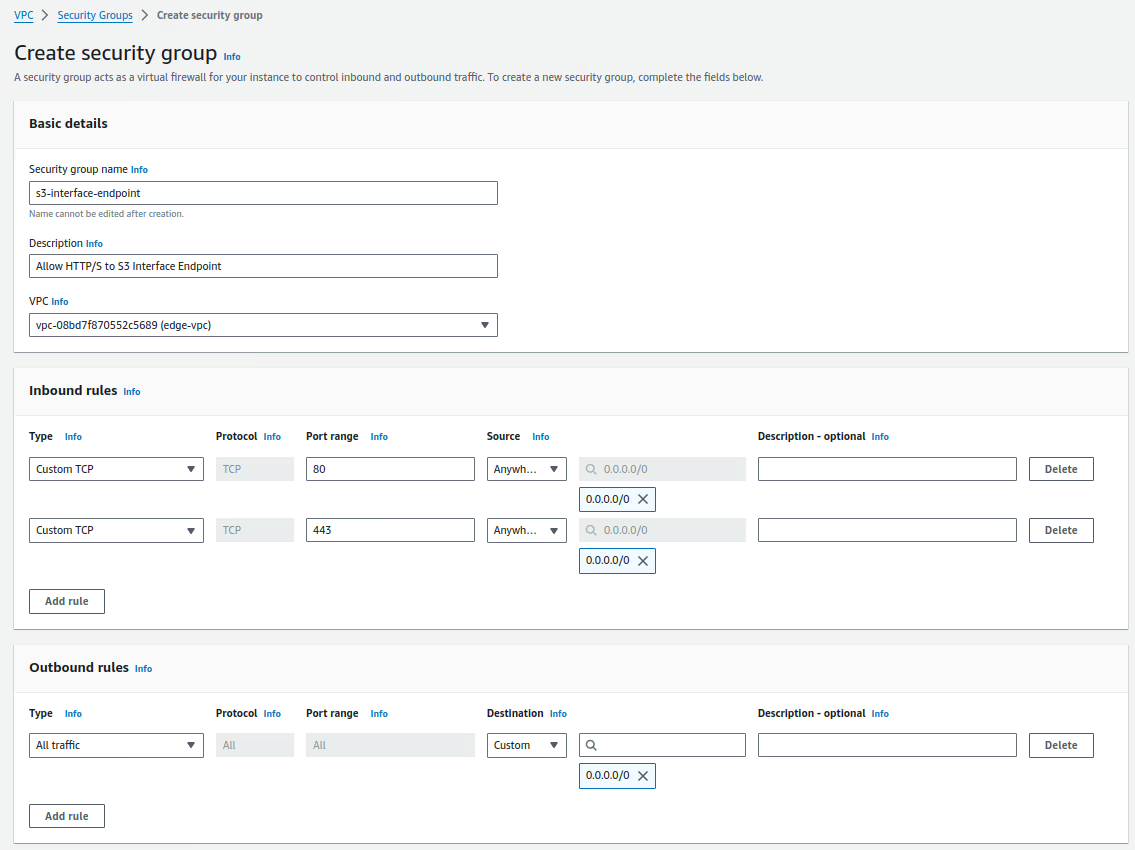
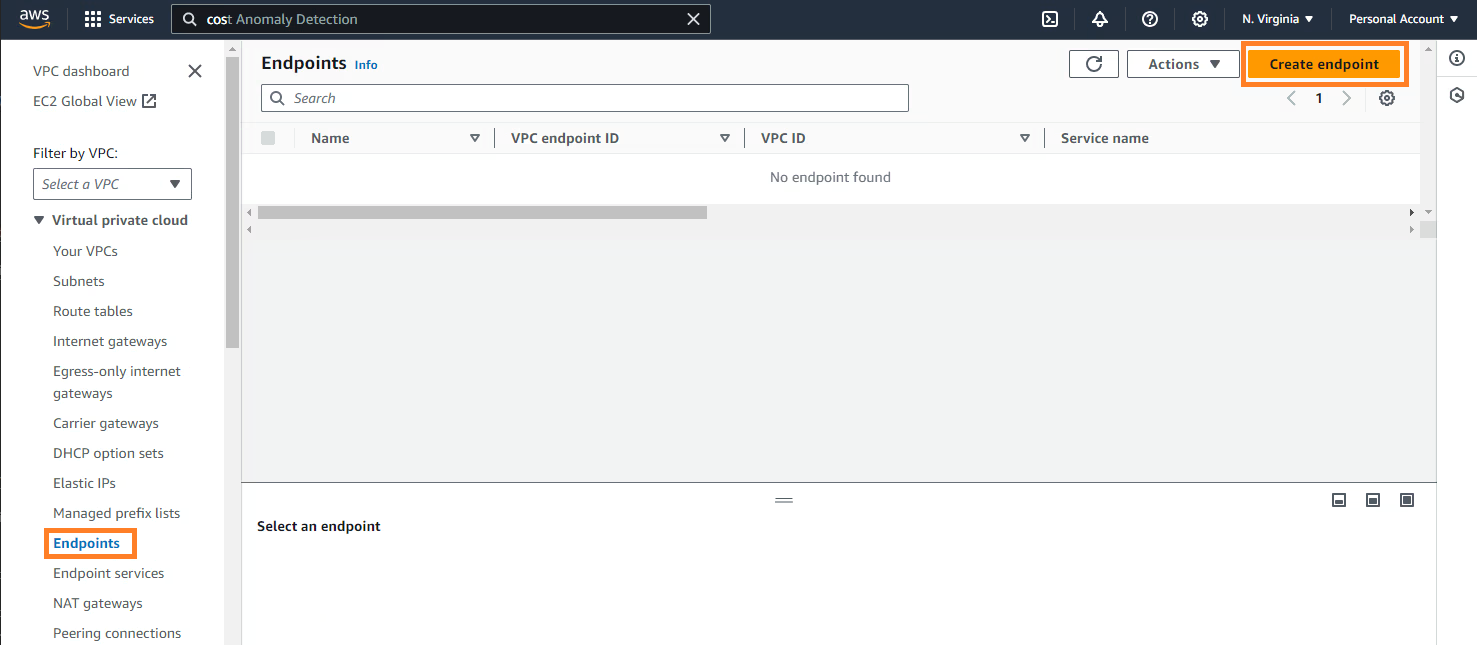
Now we can create the VPC Endpoint, you must search for the VPC services in the AWS web console. In the left pane select Endpoints and click Create Endpoint:
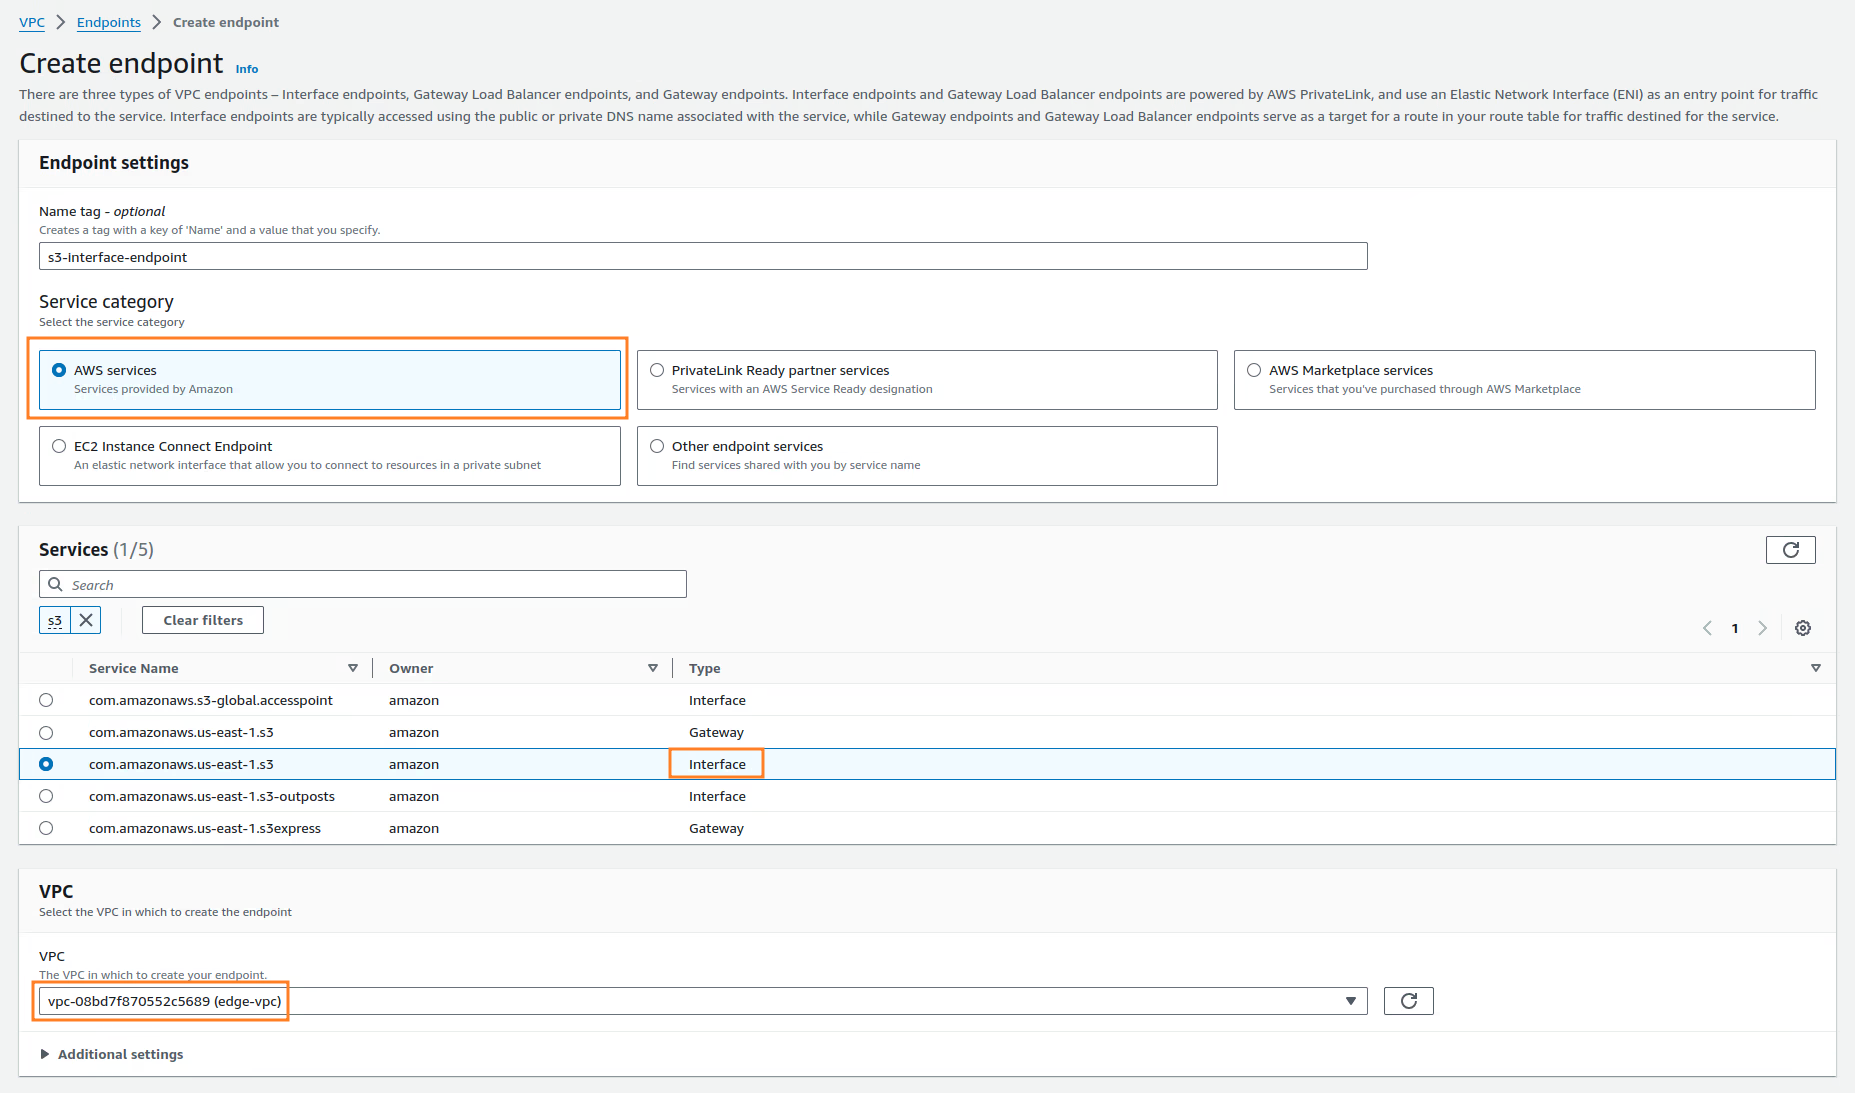
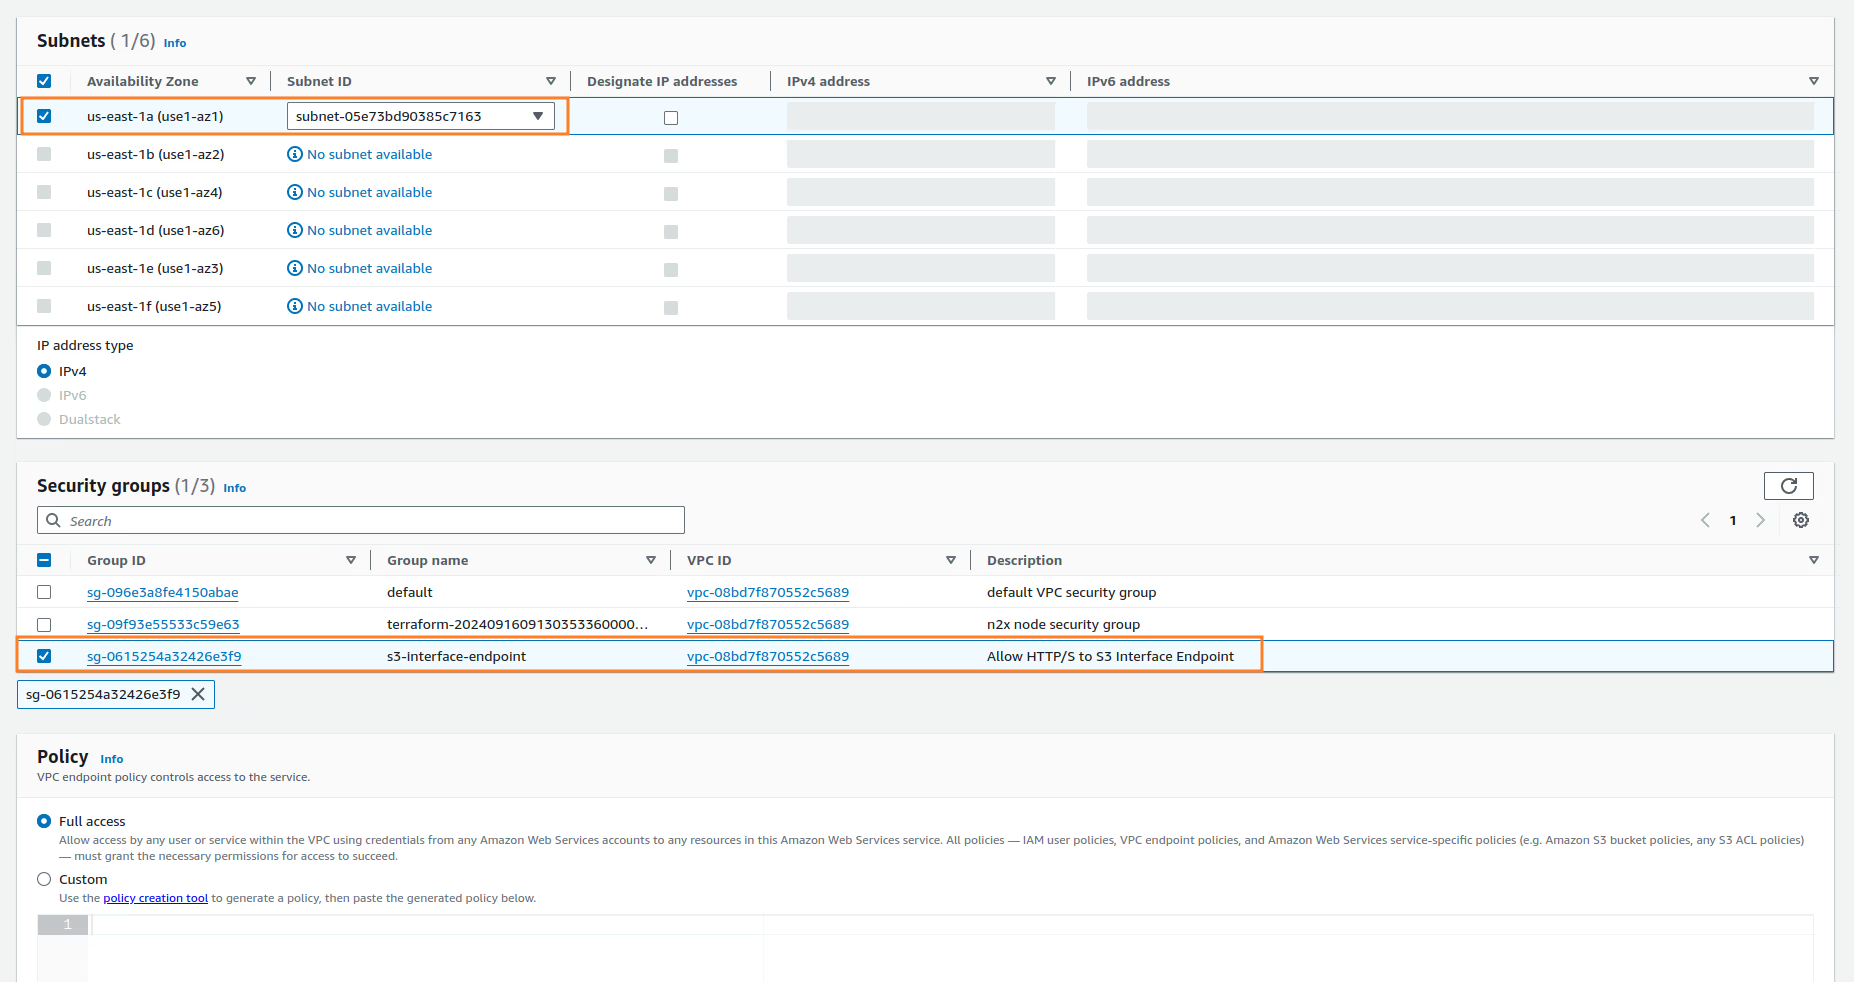
When the window opens, select AWS Sevice of Service category. Search by S3 and select the service of your availability zone and Interface type. Also, you must select the VPC, the edge-pri-net-az1 private Subnet and Security Group we have created from the previous step.
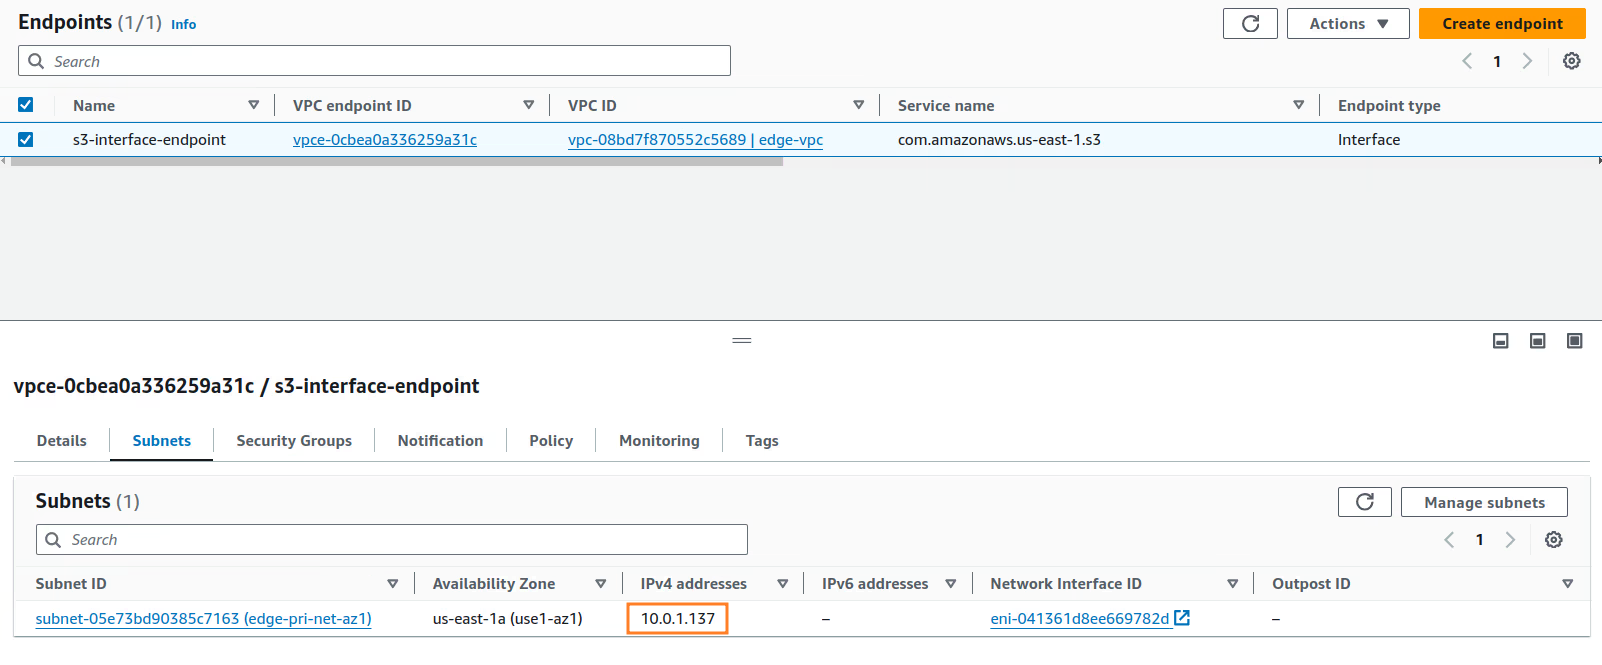
Once the Endpoint is created, in the Subnet section you can see the IP address assigned to the endpoint:
Info
Remember the IP address assigned to this endpoint, we must be used it to connect with Amazon S3 buckets.
Step 4 - Connecting the server-01 to our n2x.io network topology
Now we need to connect the server-01 must be able to access Amazon S3 buckets using the VPC Interface Endpoint.
Adding a new node in a subnet with n2x.io is very easy. Here's how:
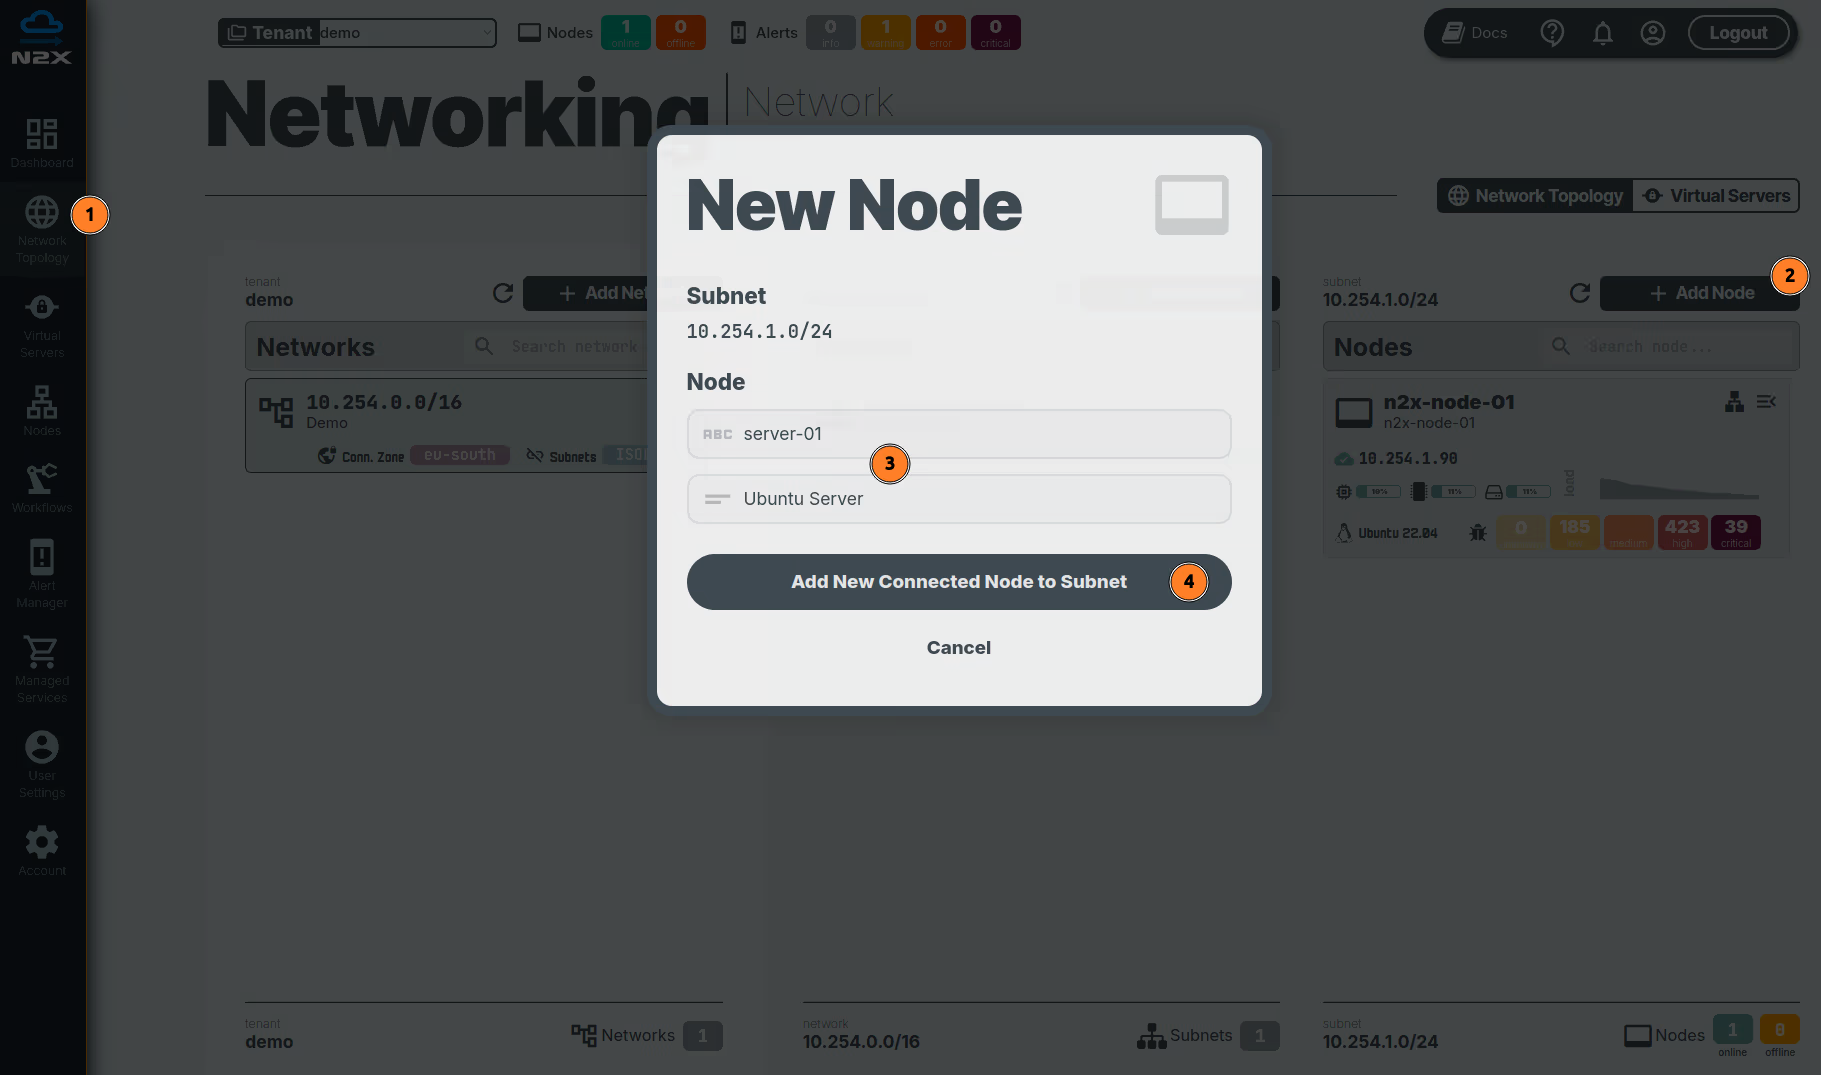
- Head over to the n2x WebUI and navigate to the
Network Topologysection in the left panel. - Click the
Add Nodebutton and ensure the new node is placed in the same subnet as then2x-node-01. - Assign a
nameanddescriptionfor the new node. - Click
Add New Connected Node to Subnet.
Here, we can select the environment where we are going to install the n2x-node agent. In this case, we are going to use Linux:
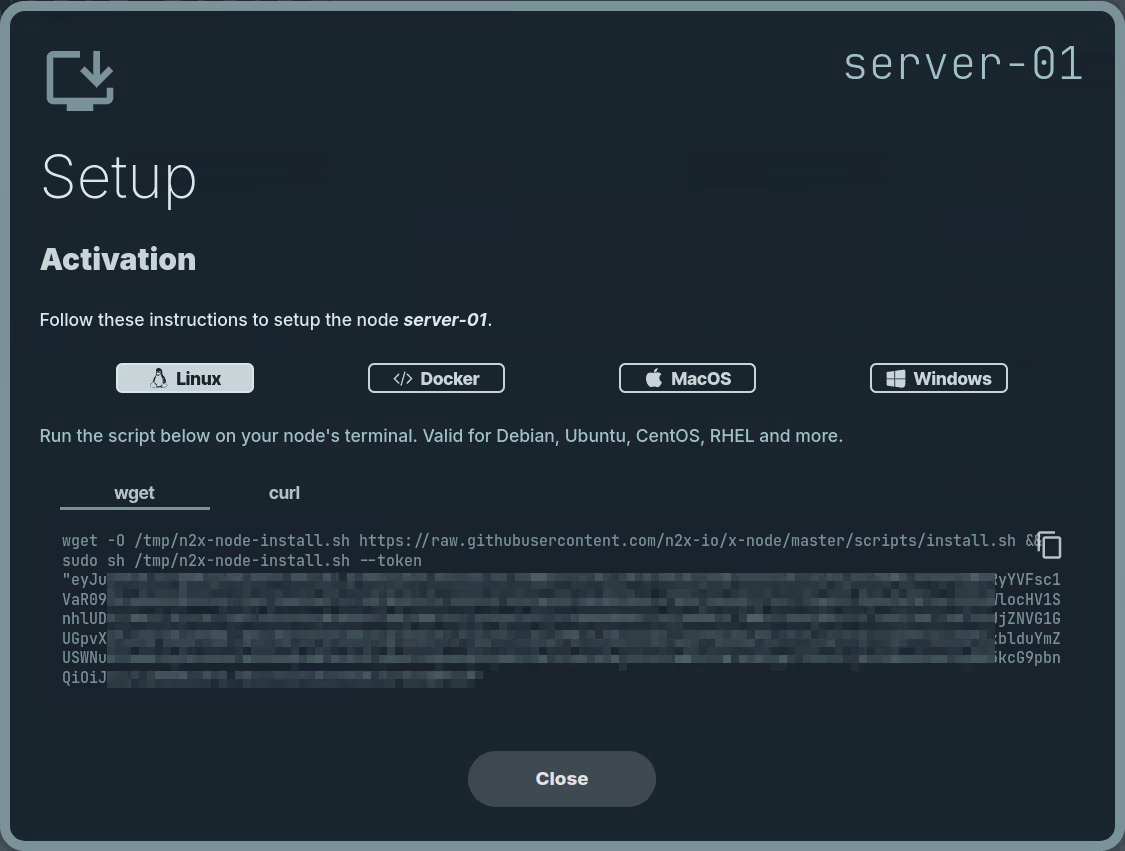
Run the script on server-01 terminal and check if the service is running with the command:
systemctl status n2x-node
You can use ip addr show dev n2x0 command on server-01 to check the IP assigned to this node:

At this point, we need to make the VPC CIDR available in our server-01 importing this CIDR. For this, we need to edit /etc/n2x/n2x-node.yml in server-01 and add the following configuration:
# network routes behind this node (optional)
routes:
  export:
    -
  import:
    - <VPC CIDR>
Info
Replace <VPC CIDR> with the VPC CIDR value, in this case is 10.0.1.0/24.
Restart the n2x-node service for this change to take effect:
systemctl restart n2x-node
We can check the local routing table in server-01 with the following command:
ip route

Step 5 - Mount the Amazon S3 Bucket as a filesystem in server-01
Finally, we will show you how to mount an Amazon S3 bucket using S3FS in server-01 (Ubuntu 22.04):
-
The package
s3fsis available in the official Ubuntu repositories, we can install it with the following command:sudo apt-get update && sudo apt-get install -y s3fs -
Now you need to create the mount point in your local machine, in this case, we will use
/mnt/s3-bucket:sudo mkdir -p /mnt/s3-bucket -
Once S3FS is installed, set up the credentials as shown below:
echo <ACCESS_KEY>:<SECRET_KEY> > ~/.passwd-s3fsInfo
Replace
<ACCESS_KEY>and<SECRET_KEY>with the AWS credentials for your account (IAM user). The IAM user must have S3 full access. -
You will also need to set the right access permission for the
passwd-s3fsfile to run S3FS successfully. To do that, run the command below:chmod 600 ~/.passwd-s3fs -
Now we’re ready to mount the Amazon S3 bucket:
sudo s3fs <bucket-name> /mnt/s3-bucket -o passwd_file=~/.passwd-s3fs,use_path_request_style -o allow_other -o url=http://<vpc-endpoint-ip>Info
Replace
<bucket-name>and<vpc-endpoint-ip>with the S3 bucket name (n2x-demo-bucketin this case) and IP addresSs (10.0.1.137in this case) assigned to the vpc endpoint respectively.You might notice a little delay when firing the above command: that’s because S3FS tries to reach Amazon S3 internally for authentication purposes. If you don’t see any errors, your S3 bucket should be mounted on the
/mnt/s3-bucketfolder. -
To verify if the bucket successfully mounted, you can type
mount | grep s3fson terminal, and then check the last entry, as shown in the screenshot below:
-
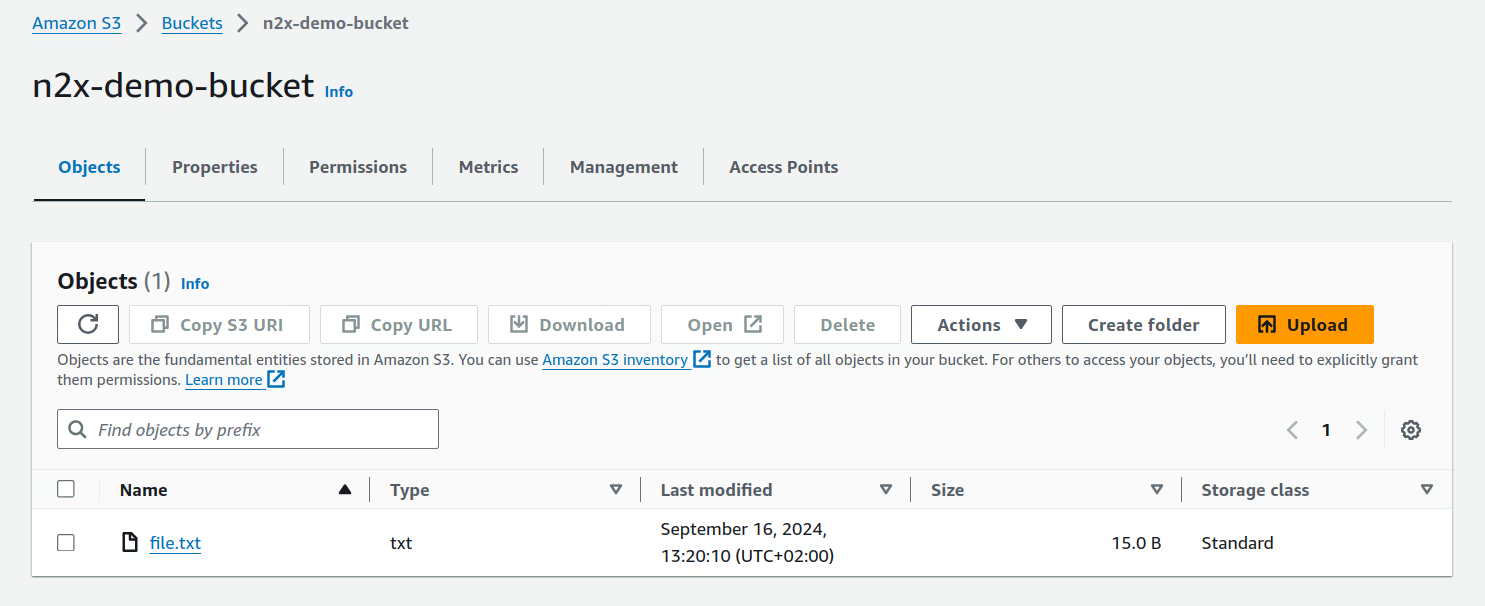
Once mounted, you can interact with the Amazon S3 bucket same way as you would use any local folder. You can create a testing file in
/mnt/s3-bucketfolder:cd /mnt/s3-bucket echo "Testing bucket" > file.txt
We can access the AWS console to verify that the information is the same as the local directory mounted through s3fs.
Success
That's it! The Amazon S3 bucket is now mounted as a filesystem using an S3 Interface Endpoint.
Conclusion
This article demonstrated how to create Interface VPC endpoints for Amazon S3, enabling access to S3 buckets from on-premises applications or servers over the n2x.io network topology. While this focused on S3, the same approach applies to other AWS-supported services like Amazon RDS, Amazon SQS, and AWS Systems Manager.