Deploying a MongoDB Replica Set Across Multiple Data Centers
MongoDB, a popular open-source NoSQL database, excels at handling large volumes of unstructured and semi-structured data. It uses a document-oriented approach, storing data in flexible JSON-like BSON (Binary JSON) documents, enabling dynamic schema-less data models.
When dealing with databases, contingency plans for server failures are crucial. Here's where replication comes in – synchronizing data across multiple databases. Replication allows for data redundancy, reducing read latencies and enhancing scalability and availability.
Designed for high scalability, MongoDB enables horizontal scaling across multiple servers, making it ideal for modern web applications and environments demanding flexibility and scalability.
MongoDB uses replica sets to provide basic protection against single-instance failures. However, if all replica set members reside within a single data center, they are susceptible to data center outages.
Best practices recommend distributing replica set members across geographically distinct data centers. This adds redundancy and fault tolerance, ensuring data availability even if one data center becomes unavailable.
This tutorial guides you through deploying a five-member MongoDB replica set across three geographically distributed data centers. Data Center 1 and Data Center 2 will each have two MongoDB replicas deployed in their respective Kubernetes clusters. Data Center 3 will have a single replica deployed on an Ubuntu server. We'll set up a private network topology using n2x.io to facilitate communication between all replicas across the three data centers.
Here is the high-level overview of tutorial setup architecture:
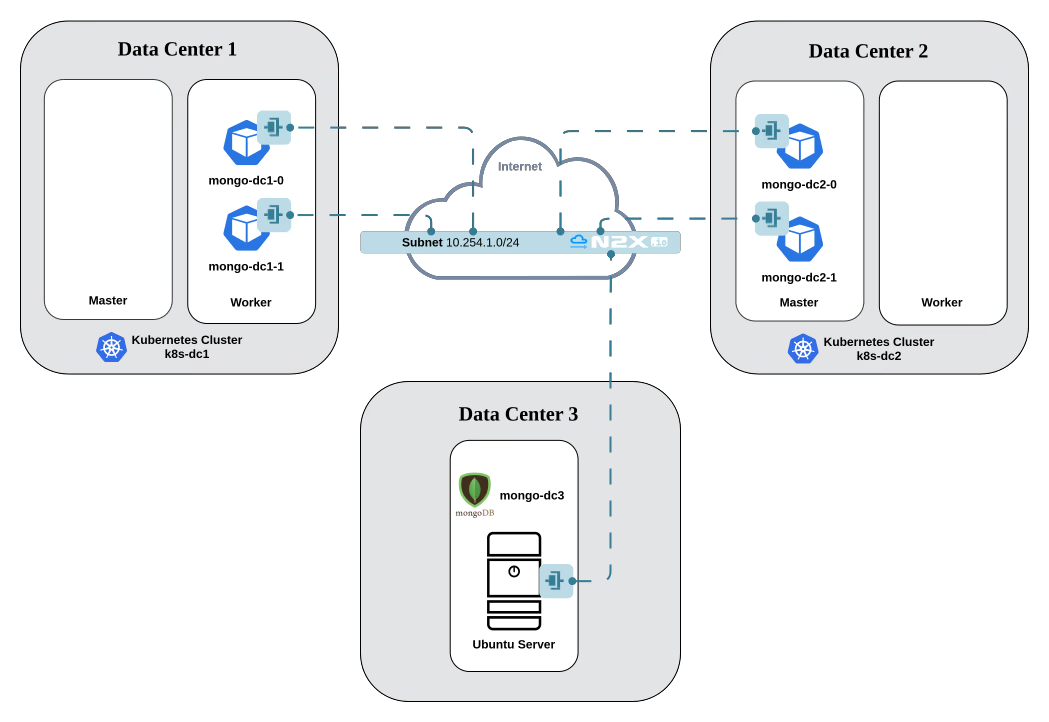
The following diagram shows how the 5 members of the MongoDB replica set will be distributed across three data centers:

In our setup, we will be using the following components:
-
MongoDB is a document database designed for ease of application development and scaling. For more info please visit the MongoDB Documentation
-
n2x-node is an open-source agent that runs on the machines you want to connect to your n2x.io network topology. For more info please visit n2x.io Documentation.
Before you begin
To follow along in this tutorial, you should meet the following requirements:
-
Access to two Kubernetes clusters, version
v1.27.xor greater. -
A n2x.io account created and one subnet with
10.254.1.0/24prefix. -
Installed n2xctl command-line tool, version
v0.0.4or greater. -
Installed kubectl command-line tool, version
v1.27.xor greater.
Note
Please note that this tutorial uses a Linux OS with an Ubuntu 24.04 (Noble Numbat) with amd64 architecture.
Step-by-step Guide
Step 1: Deploy MongoDB servers in the k8s-dc1 Kubernetes cluster
Setting your context to k8s-dc1 Kubernetes cluster:
kubectl config use-context k8s-dc1
We are going to create a mongo-dc1.yaml file with the following configuration:
apiVersion: apps/v1
kind: StatefulSet
metadata:
  name: mongo-dc1
spec:
  selector:
    matchLabels:
      app: mongo-dc1
  replicas: 2
  template:
    metadata:
      labels:
        app: mongo-dc1
    spec:
      containers:
      - name: mongodb
        image: mongo:7.0
        command:
          - mongod
          - "--replSet"
          - rs0
          - "--bind_ip"
          - "*"
        imagePullPolicy: Always
        volumeMounts:
        - name: mongodb-data
          mountPath: /data/db
  volumeClaimTemplates:
  - metadata:
      name: mongodb-data
    spec:
      accessModes: [ "ReadWriteOnce" ]
      storageClassName: "standard"
      resources:
        requests:
          storage: 1Gi
The following manifest defines two replicas of a MongoDB StatefulSet. The MongoDB container mounts the PersistentVolume /data/db for database data files.
After that, we can apply the changes with this command:
kubectl apply -f mongo-dc1.yaml
The mongodb pods should be up and running:
kubectl get pod
NAME          READY   STATUS    RESTARTS   AGE
mongo-dc1-0   1/1     Running   0          116s
mongo-dc1-1   1/1     Running   0          17s
Step 2: Connect MongoDB Replicas of k8s-dc1 Kubernetes cluster to our n2x.io network topology
To set a Replica Set between all MongoDB members, we need a network configuration that allows each member to connect to every other member.
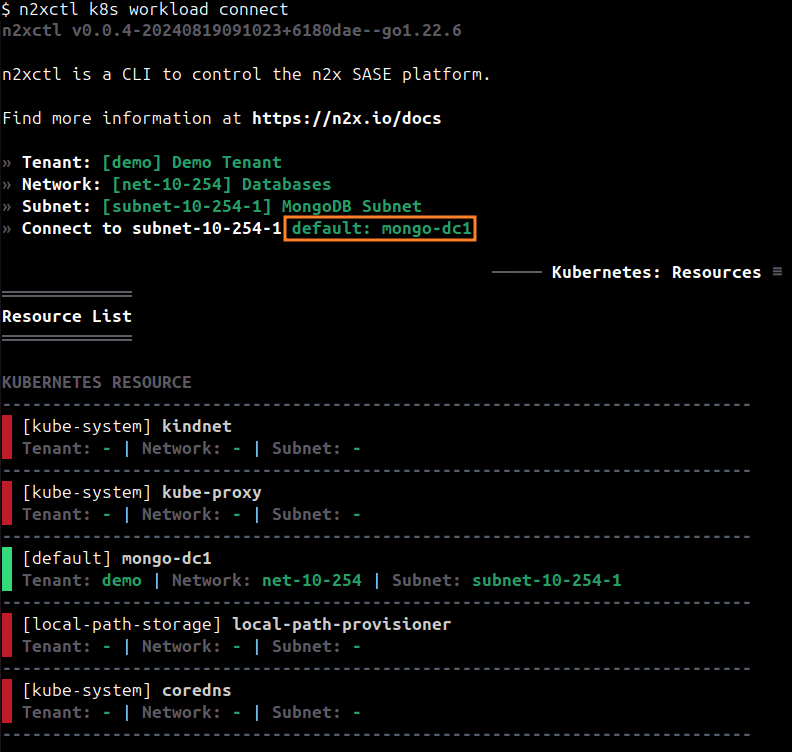
To connect the mongo-dc1 statefulset to the n2x.io subnet, you can execute the following command:
n2xctl k8s workload connect
The command will typically prompt you to select the Tenant, Network, and Subnet from your available n2x.io topology options. Then, you can choose the workloads you want to connect by selecting it with the space key and pressing enter. In this case, we will select default: mongo-dc1.
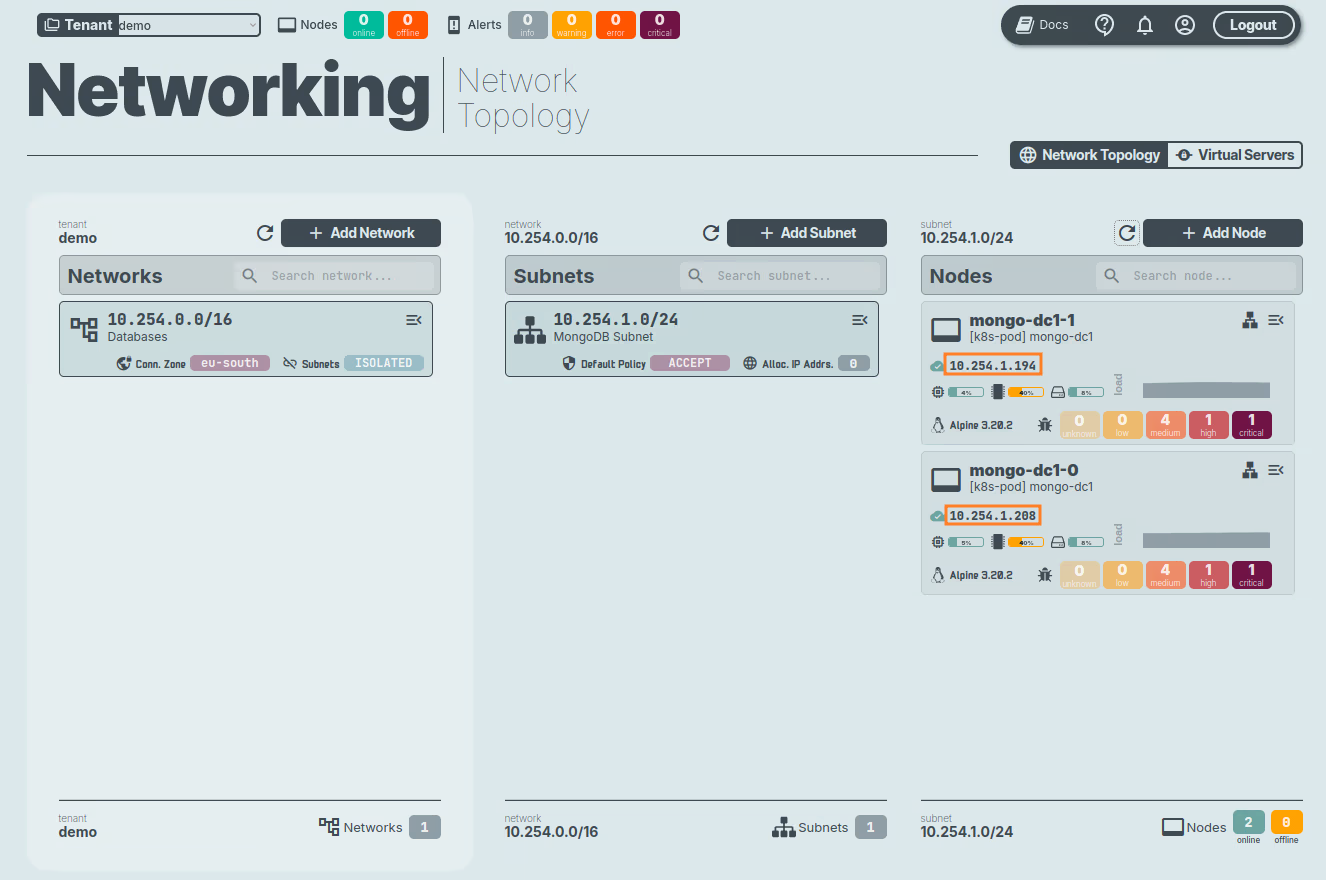
Now we can access the n2x.io WebUI to verify that the nodes is correctly connected to the subnet selected.
Info
Remember the IP addresses assigned to the nodes. We will need them to configure the Replica Set.
Step 3: Deploy MongoDB servers in the k8s-dc2 Kubernetes cluster
Setting your context to k8s-dc2 Kubernetes cluster:
kubectl config use-context k8s-dc2
We are going to create a mongo-dc2.yaml file with the following configuration:
apiVersion: apps/v1
kind: StatefulSet
metadata:
  name: mongo-dc2
spec:
  selector:
    matchLabels:
      app: mongo-dc2
  replicas: 2
  template:
    metadata:
      labels:
        app: mongo-dc2
    spec:
      containers:
      - name: mongodb
        image: mongo:7.0
        command:
          - mongod
          - "--replSet"
          - rs0
          - "--bind_ip"
          - "*"
        imagePullPolicy: Always
        volumeMounts:
        - name: mongodb-data
          mountPath: /data/db
  volumeClaimTemplates:
  - metadata:
      name: mongodb-data
    spec:
      accessModes: [ "ReadWriteOnce" ]
      storageClassName: "standard"
      resources:
        requests:
          storage: 1Gi
The following manifest defines two replicas of a MongoDB StatefulSet. The MongoDB container mounts the PersistentVolume /data/db for database data files.
After that, we can apply the changes with this command:
kubectl apply -f mongo-dc2.yaml
The mongodb pods should be up and running:
kubectl get pod
NAME          READY   STATUS    RESTARTS   AGE
mongo-dc2-0   1/1     Running   0          3m31s
mongo-dc2-1   1/1     Running   0          47s
Step 4: Connect MongoDB Replicas of k8s-dc2 Kubernetes cluster to our n2x.io network topology
To connect the mongo-dc2 statefulset to the n2x.io subnet, you can execute the following command:
n2xctl k8s workload connect
The command will typically prompt you to select the Tenant, Network, and Subnet from your available n2x.io topology options. Then, you can choose the workloads you want to connect by selecting it with the space key and pressing enter. In this case, we will select default: mongo-dc2.
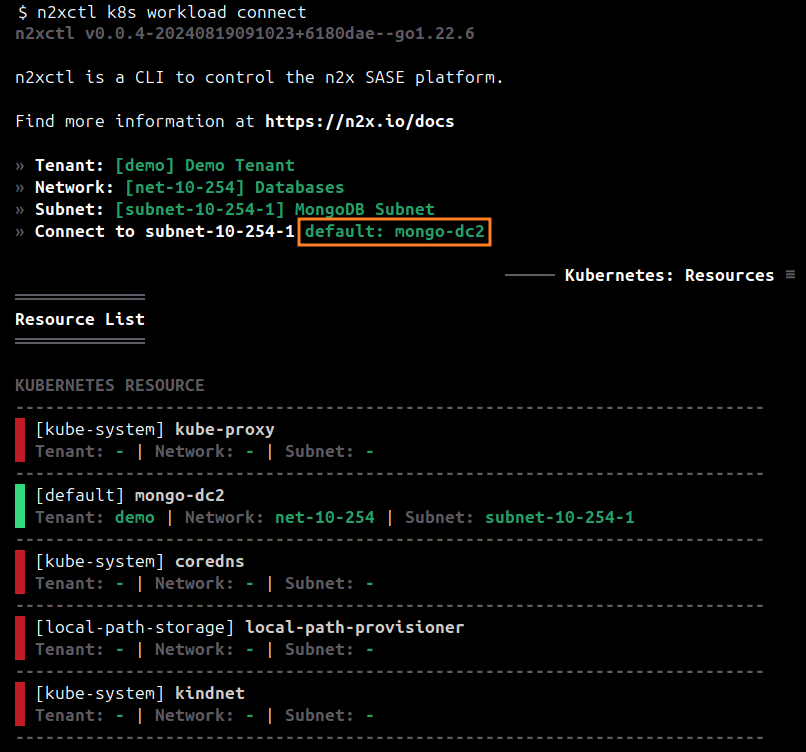
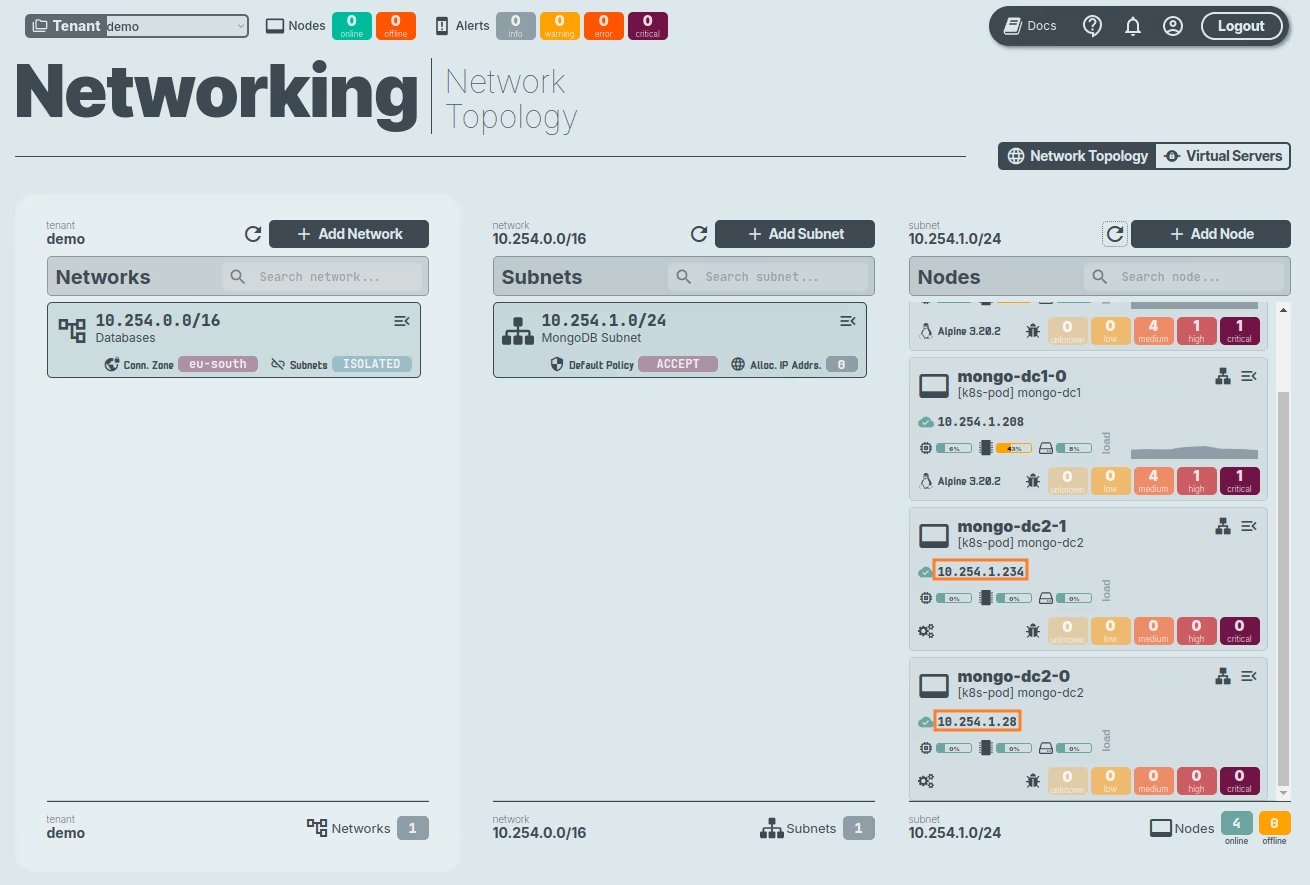
Now we can access the n2x.io WebUI to verify that the nodes is correctly connected to the subnet selected.
Info
Remember the IP addresses assigned to the nodes. We will need them to configure the Replica Set.
Step 5: Install MongoDB on the Ubuntu Server
The first step is to install the prerequisite packages needed during the installation. To do so, run the following command:
sudo apt install software-properties-common gnupg apt-transport-https ca-certificates -y
Import the public key for MongoDB on your system and add the MongoDB package repository to your /etc/apt/sources.list.d directory:
curl -fsSL https://pgp.mongodb.com/server-7.0.asc | sudo gpg -o /usr/share/keyrings/mongodb-server-7.0.gpg --dearmor
echo "deb [ arch=amd64,arm64 signed-by=/usr/share/keyrings/mongodb-server-7.0.gpg ] https://repo.mongodb.org/apt/ubuntu jammy/mongodb-org/7.0 multiverse" | sudo tee /etc/apt/sources.list.d/mongodb-org-7.0.list
Once the repository is added, reload the local package index and install the mongodb-org package that provides MongoDB 7.0:
sudo apt update && sudo apt install mongodb-org -y
Once the installation is complete, verify the version of MongoDB installed:
mongod --version
$ mongod --version
db version v7.0.14
Build Info: {
    "version": "7.0.14",
    "gitVersion": "ce59cfc6a3c5e5c067dca0d30697edd68d4f5188",
    "openSSLVersion": "OpenSSL 3.0.13 30 Jan 2024",
    "modules": [],
    "allocator": "tcmalloc",
    "environment": {
        "distmod": "ubuntu2204",
        "distarch": "x86_64",
        "target_arch": "x86_64"
    }
}
By default, MongoDB is configured to listen only on the loopback interface (127.0.0.1), restricting connections to the same server where it is running. To allow connections from other machines, we need to modify the configuration file /etc/mongod.conf.
Locate the network interfaces section, and change the bindIP value from 127.0.0.1 to "*". This will allow MongoDB to accept connections from all network interfaces.
# network interfaces
net:
  port: 27017
  bindIp: "*"
Now, we need to add the following lines in the same file /etc/mongod.conf to configure the replication:
replication:
  replSetName: "rs0"
The MongoDB service is disabled upon installation by default, and you can verify this by running the below command:
sudo systemctl status mongod
Start the MongoDB service and enable it to start automatically at the next system restart by running the following commands:
sudo systemctl start mongod
sudo systemctl enable mongod
Finally check the MongoDB service is running successfully:
sudo systemctl status mongod
Step 6: Connect the Ubuntu Server to our n2x.io network topology
To set a Replica Set between all MongoDB members, we need a network configuration that allows each member to connect to every other member. So we need to connect the Ubuntu Server to our n2x.io network topology.
Adding a new node in a subnet with n2x.io is very easy. Here's how:
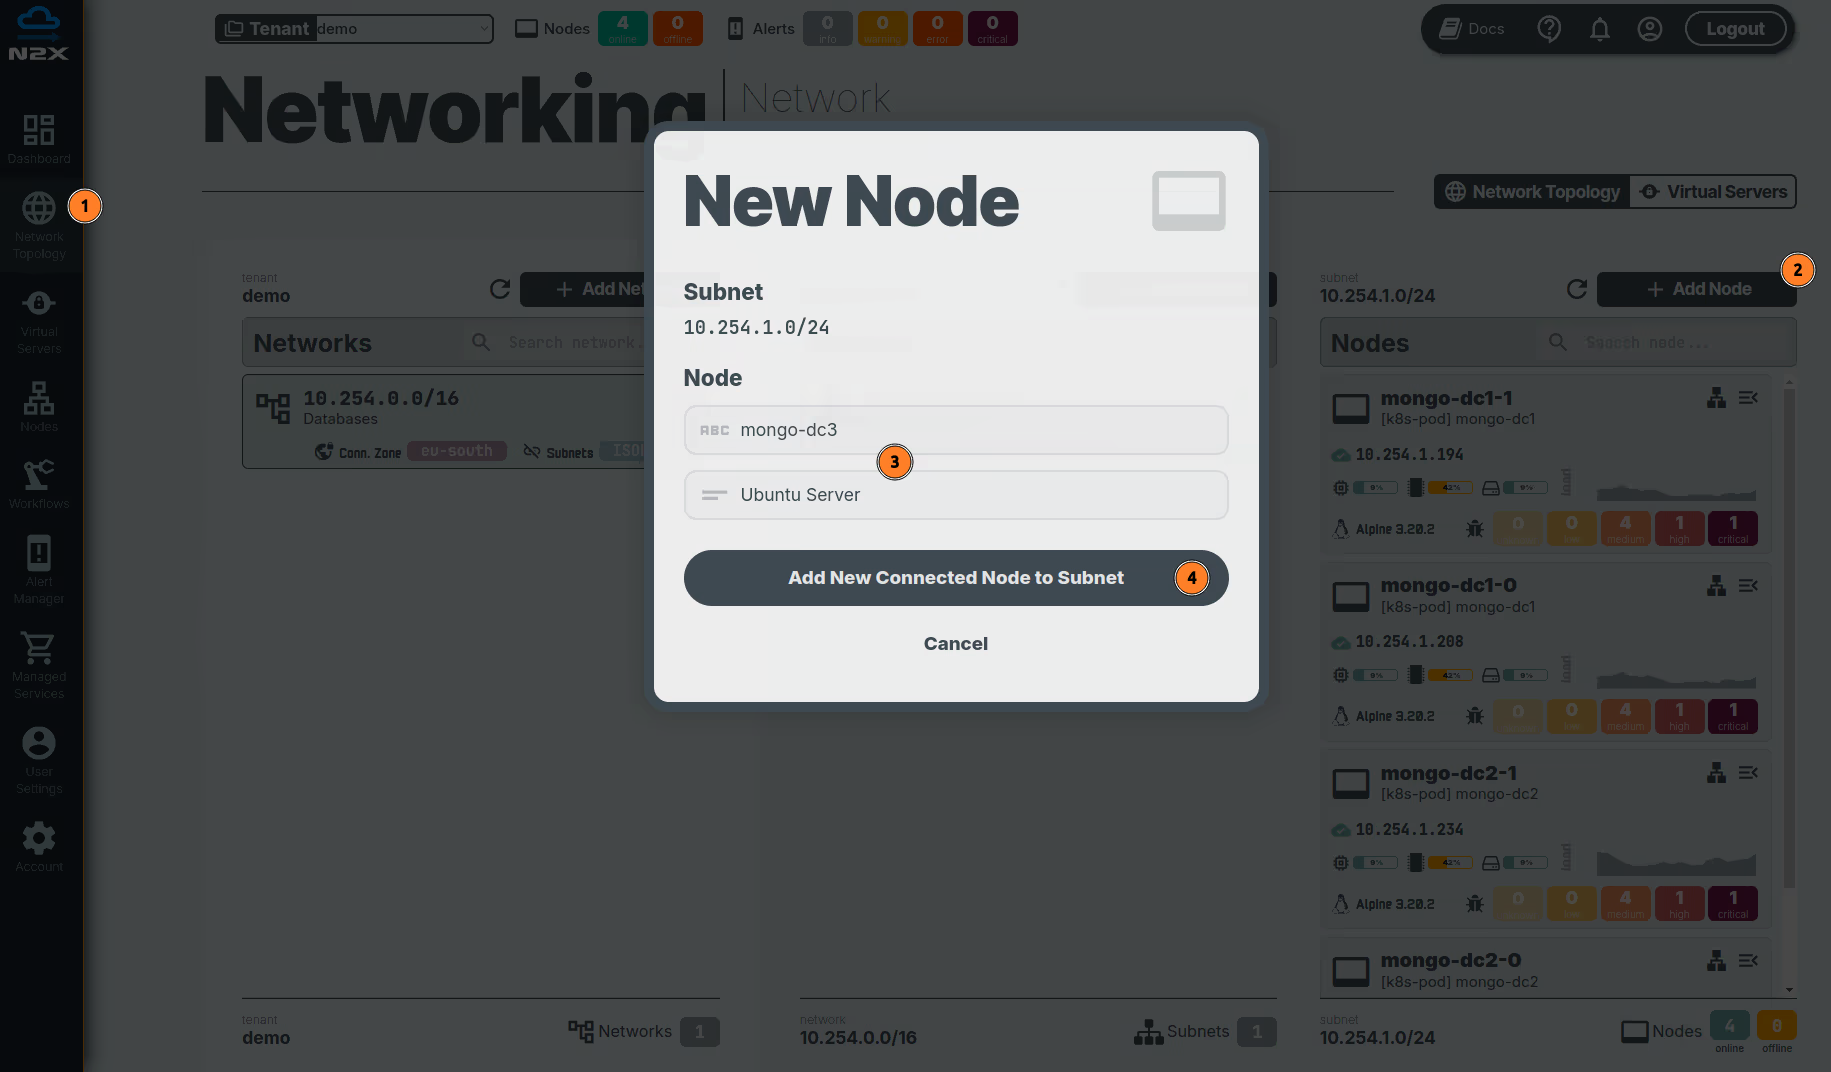
- Head over to the n2x.io WebUI and navigate to the
Network Topologysection in the left panel. - Click the
Add Nodebutton and ensure the new node is placed in the same subnet as the other MongoDB members. - Assign a
nameanddescriptionfor the new node. - Click
Add New Connected Node to Subnet.
Here, we can select the environment where we are going to install the n2x-node agent. In this case, we are going to use Linux:
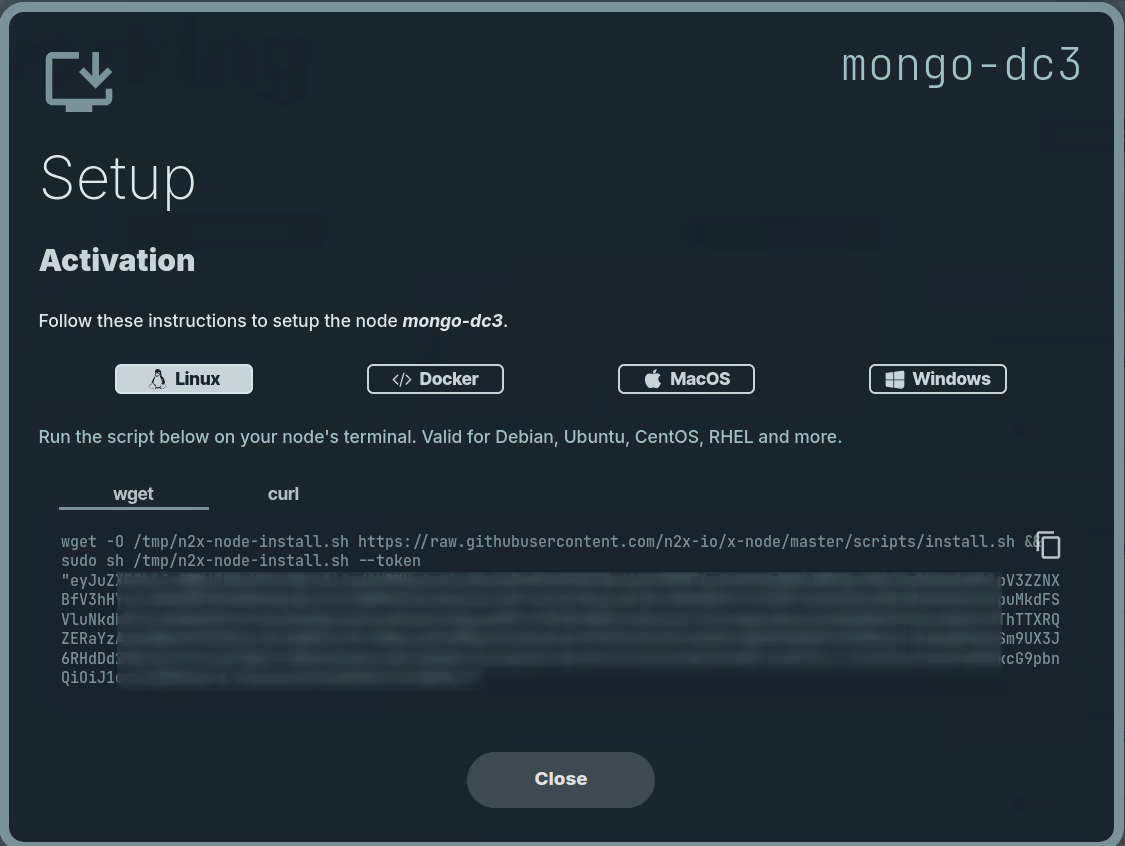
Run the script on Ubuntu Server terminal and check if the service is running with the command:
systemctl status n2x-node
You can use ip addr show dev n2x0 command on Ubuntu Server to check the IP assigned to this node:

Note
Remember the IP addresses assigned to the node. We will need them to configure the Replica Set.
Step 7: Configure MongoDB Replica Set
Once the MongoDB deployments are complete across different data centers, we need to establish them as a replica set. Thanks to n2x.io's network topology connecting all members, they can form the replica set seamlessly, regardless of their physical location.
To configure the MongoDB Replica Set, follow these steps:
-
From
Ubuntu Serverlog in to Mongo Shell:$ mongosh Current Mongosh Log ID: 66e9bb52f9bf1d61c6964032 Connecting to: mongodb://127.0.0.1:27017/?directConnection=true&serverSelectionTimeoutMS=2000&appName=mongosh+2.3.1 Using MongoDB: 7.0.14 Using Mongosh: 2.3.1 For mongosh info see: https://www.mongodb.com/docs/mongodb-shell/ test> -
Initialize the
rs0replica set with the following command:> rs.initiate( { _id : "rs0", members: [ { _id: 0, host: "<IP_MONGO_DC1_0>:27017" }, { _id: 1, host: "<IP_MONGO_DC1_1>:27017" }, { _id: 2, host: "<IP_MONGO_DC2_0>:27017" }, { _id: 3, host: "<IP_MONGO_DC2_1>:27017" }, { _id: 4, host: "<IP_MONGO_DC3>:27017" } ] })Important Note
Replace the
{{ IP_MONGO_DC* }}variables with the actual IP addresses assigned by n2x.io's IPAM service for each MongoDB deployment across data centers.The output in this example:
> rs.initiate( { ... _id : "rs0", ... members: [ ... { _id: 0, host: "10.254.1.208:27017" }, ... { _id: 1, host: "10.254.1.194:27017" }, ... { _id: 2, host: "10.254.1.28:27017" }, ... { _id: 3, host: "10.254.1.234:27017" }, ... { _id: 4, host: "10.254.1.183:27017" } ... ] ... }) { ok: 1 } -
Verify the status of the members' array:
> rs.status()
Step 8: Insert documents and observe replication
Now that the MongoDB members are connected as a replica set through n2x.io's network, let's verify successful replication. We'll insert some documents into the primary member and observe their replication to the backup members.
We'll establish a Mongosh session connected to the primary member and insert some sample documents:
$ mongosh
> use test
> for (i=0; i<1000; i++) {db.coll.insertOne({count: i})}

We can verify the documents were successfully inserted in primary member using the following command:
> db.coll.countDocuments()

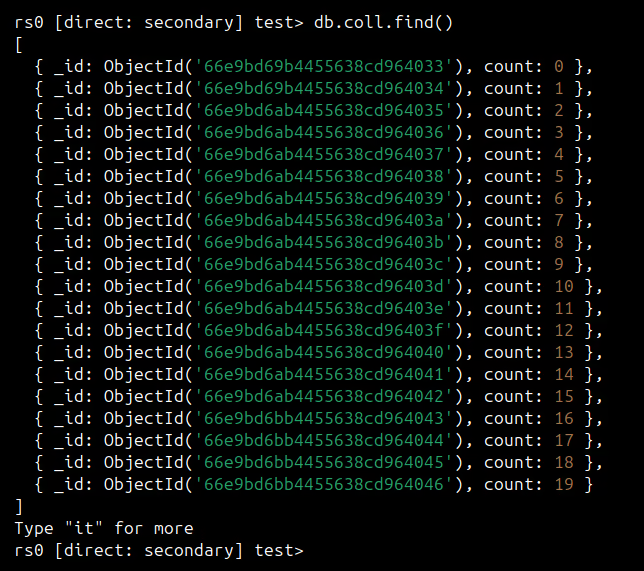
Now, using a Mongosh session connected to any secondary member, we need to verify if the documents were successfully replicated:
$ mongosh 10.254.1.208:27017
> use test
> db.coll.countDocuments()

> db.coll.find()
Success
Congratulations! You've successfully deployed a five-member MongoDB replica set across three geographically distributed data centers.
Conclusion
This guide demonstrated how n2x.io plays a crucial role in establishing a secure connection between all MongoDB replicas distributed across your geographically dispersed data centers. Remarkably, we achieved this without exposing any IP addresses or endpoints to the public internet.
By keeping endpoints private, this approach significantly strengthens security in several ways. It minimizes the potential attack surface, safeguards sensitive information, and effectively reduces the risk of cyberattacks. This aligns perfectly with best cybersecurity practices and fosters a more resilient and secure system architecture.