GitHub Actions with n2x.io
Introduction
GitHub Actions are a built-in feature of GitHub that allows you to automate tasks within your software development lifecycle directly on your GitHub repositories, helping you deliver code faster and more reliably.
GitHub Actions, in conjunction with n2x.io, allows you to create an overlay network. This network connects your runners to the services within your private network. This enables direct access to n2x-nodes in your subnet from your GitHub workflow.
Modern development workflows often require access to data or services for various purposes. Here are some example uses:
-
Securely deploy applications to your private and public infrastructure.
-
Securely access package registries or secret management services.
-
Securely retrieve sample data from database servers without internet exposure.
How to set it up?
Adding the n2x-node agent to your GitHub workflow allows subsequent steps to access other nodes within your n2x.io network topology. However, before adding this step, you'll need to complete a one-time setup:
-
Add a new connected node to the desired n2x.io subnet. This process will generate a node authorization token (TOKEN), which is required to connect the node to the network. Refer to our guide here for detailed instructions on adding new nodes.
-
Store this TOKEN securely as a secret in GitHub encrypted secrets. This secret will then be accessible for use within your GitHub Actions workflows.
Now, you can add the Install n2x-node agent step in your GitHub Actions workflow to install n2x-node agent:
jobs:
  example:
    runs-on: ubuntu-latest

    steps:

      - name: Install n2x-node agent
        run: |
          curl -s -o /tmp/n2x-node-install.sh https://raw.githubusercontent.com/n2x-io/x-node/master/scripts/install.sh && sudo sh /tmp/n2x-node-install.sh --token  ${{ secrets.N2X_NODE_TOKEN }} && \
          sleep 30
Example: Using GitHub Actions to Retrieve Data from MongoDB
In this example, we'll establish a manual connection to private MongoDB Replica Set and retrieve data from your MongoDB collections directly within your GitHub Actions workflow using Node.js. Since the MongoDB cluster resides within a n2x.io subnet, an additional step is required to install the n2x-node within the workflow. This agent facilitates a secure connection between your workflow and the MongoDB cluster.
Pre-requisites
-
A n2x.io account created and one subnet with
10.254.1.0/24prefix. -
This example assumes a MongoDB replica set connected to the subnet
10.254.1.0/24. For configuration details, see the guide Deploying a MongoDB Replica Set Across Multiple Data Centers. -
Basic understanding of YAML syntax used in GitHub Actions workflows.
-
Familiarity with
Node.jsand the MongoDB driver. -
A GitHub repository to create and run a GitHub Actions workflow.
Note
Please note that this tutorial uses a Linux OS with an Ubuntu 22.04 (Jammy Jellyfish) with amd64 architecture.
Step-by-step Guide
Step 1: Add a new connected node in n2x.io to use in the GitHub workflow
To enable the GitHub runners to connect securely to the members of the replica set in MongoDB, we need to add a new n2x-node in the same subnet.
Adding a new node in a subnet with n2x.io is very easy. Here's how:
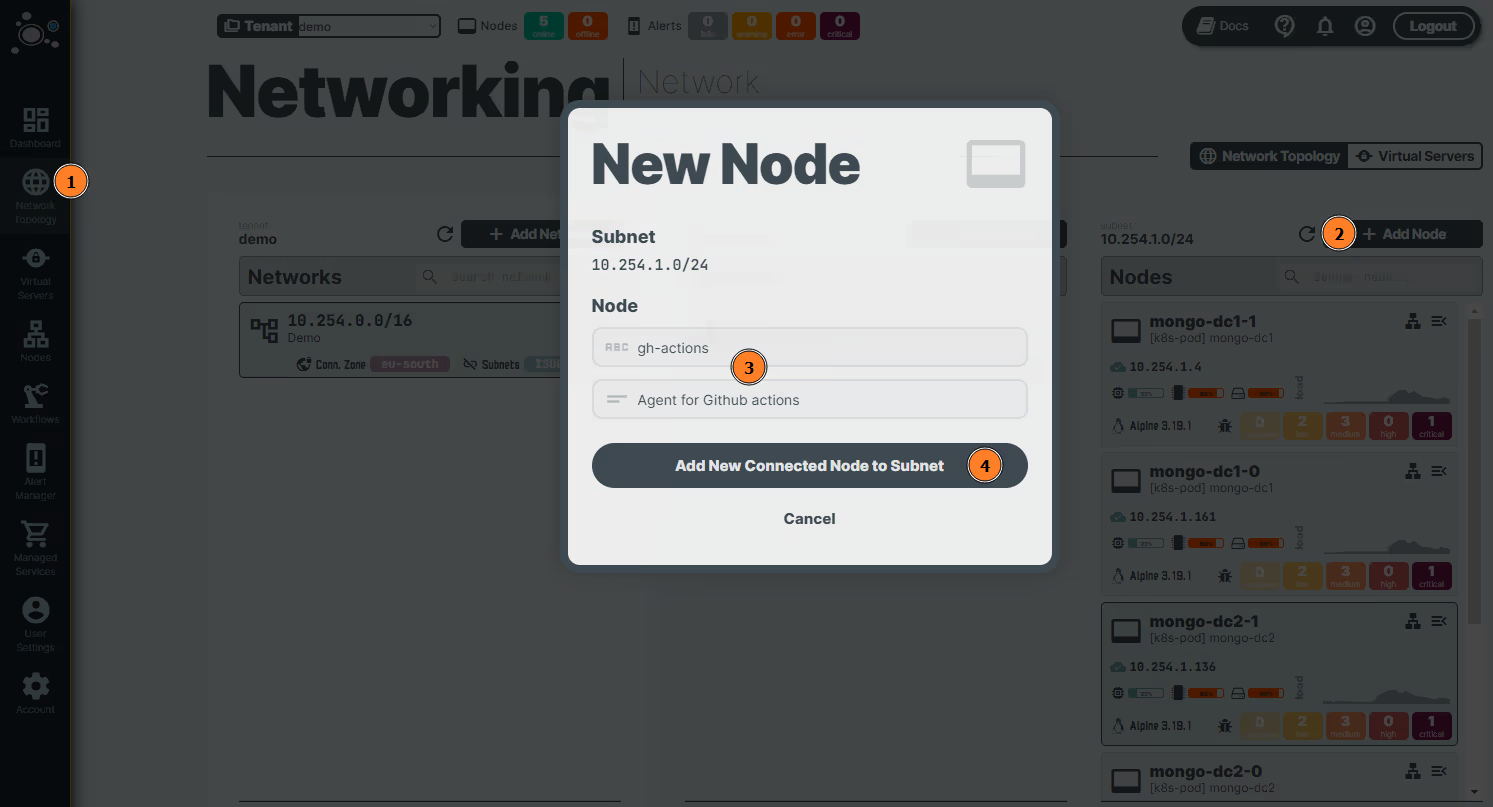
- Head over to the n2x.io WebUI and navigate to the
Network Topologysection in the left panel. - Click the
Add Nodebutton and ensure the new node is placed in the same subnet as the MongoDB members. - Assign a
nameanddescriptionfor the new node. - Click
Add New Connected Node to Subnet.
Here, we'll retrieve the n2x-node token needed for the GitHub workflow.
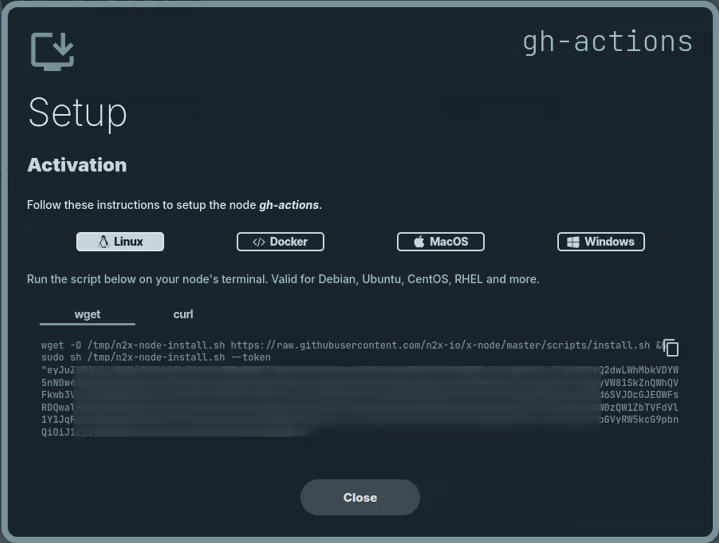
Step 2: Add GitHub encrypted secrets
For security reasons, we shouldn't directly store the n2x-node token and MongoDB connection string within the workflow YAML file. Instead, we'll use a secure method like GitHub encrypted secrets to manage them.
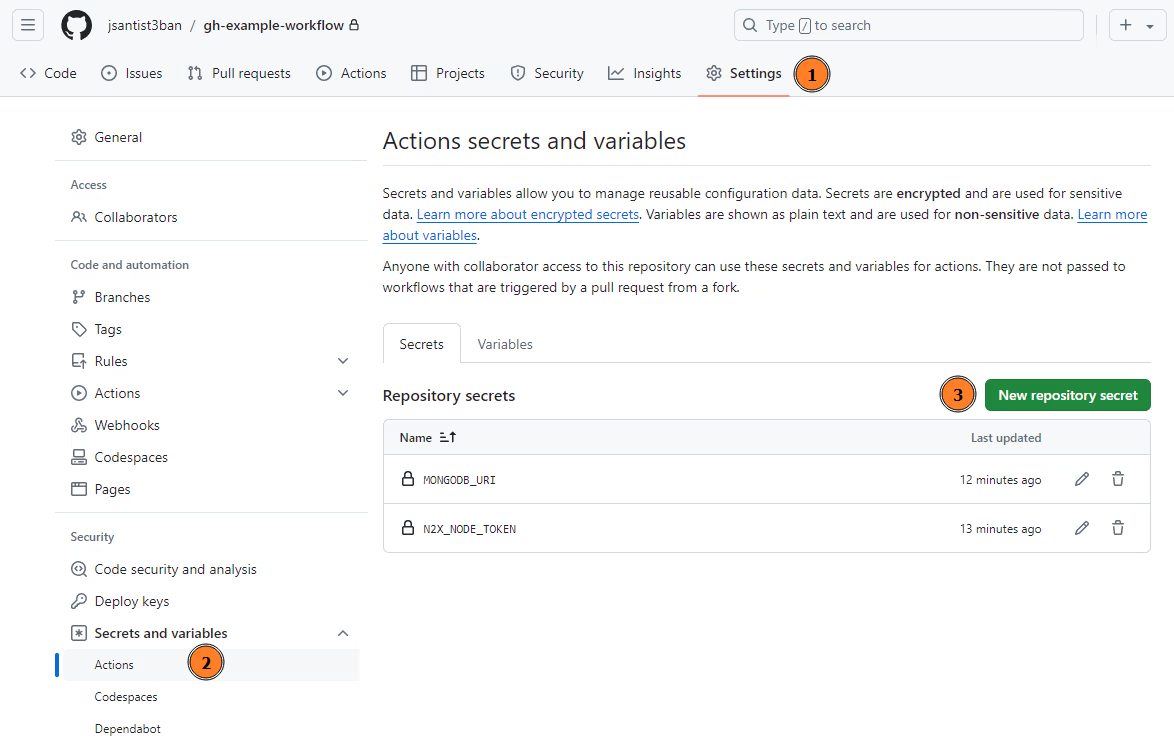
Follow these steps to add the secrets:
-
Go to the GitHub repository and click on
Settingsfrom the top navigation bar. -
In the left sidebar under
Securitysection, expandSecrets and variblessection and click onActions. -
Add these secrets by clicking on
New repository secret:- MongoDB connection string: Create a secret named
MONGODB_URIwith your actual connection string value. Example the MongoDB connection string format:
mongodb://<username>:<password>@<host1>:<port>,<host2>:<port>,<hostN>:<port>/<database>?replicaSet=<replicaSetName>!!! info Replace the placeholders in a connection string with your actual credentials, database name, replicaSet hosts, etc.- Token of n2x-node: Create a secret named
N2X_NODE_TOKENwith the actual value of your n2x-node token obtained from the n2x.io WebUI in the previous step.
- MongoDB connection string: Create a secret named
Step 3: Add Github action to the GitHub repository
In the GitHub repository, we'll need to perform the following steps on our laptop:
-
Clone your GitHub repository: Run the
git clone <github-repo-url>command. -
Create the workflows directory: Create the directory named
.github/workflowsusing the command:mkdir -p .github/workflows. -
Add the code to the workflow YAML file: Create a file named
main.yml(lowercase) within.github/workflowsand add the following code:name: Fetch Data from MongoDB on: push: branches: [ main ] jobs: fetch_data: runs-on: ubuntu-latest env: MONGODB_URI: ${{ secrets.MONGODB_URI }} steps: - uses: actions/checkout@v4 - name: Install n2x-node agent run: | curl -s -o /tmp/n2x-node-install.sh https://raw.githubusercontent.com/n2x-io/x-node/master/scripts/install.sh && sudo sh /tmp/n2x-node-install.sh --token ${{ secrets.N2X_NODE_TOKEN }} && \ sleep 30 - name: Setup Node.js environment uses: actions/setup-node@v3 with: node-version: 20 - name: Install MongoDB driver run: npm install mongodb - name: Run script to fetch data run: node fetch_data.js - uses: actions/upload-artifact@v4 with: name: fetched-data path: data.jsonWorkflow Detail
Detail of the individual steps to be executed within the job:
- Checkout code: This step fetches the code from the GitHub repository using the
actions/checkout@v4action. - Install n2x-node agent: This step installs the
n2x-node agentusing official script. - Setup Node.js environment: This step sets up a Node.js environment with the specified version using
actions/setup-node@v3. - Install MongoDB driver: This step installs the MongoDB driver using
npm install mongodbcommand. - Run script to fetch data: This step executes the JavaScript file
fetch_data.jsthat contains the logic for connecting to MongoDB and retrieving data. - Persist data as artifact: This step uploads the retrieved data, typically in JSON format, as an artifact using the
actions/upload-artifact@v4action for use in subsequent workflows.
- Checkout code: This step fetches the code from the GitHub repository using the
-
Add script to fetch data: Create a file named
fetch_data.js(lowercase) in the root directory of the repository and add the following code:const { MongoClient } = require('mongodb'); // Retrieve the connection URI from a workflow input const uri = process.env.MONGODB_URI; async function fetchData() { const client = new MongoClient(uri); try { await client.connect(); const database = client.db("test"); // Use the specified database name const collection = database.collection("coll"); // Use the provided collection name const data = await collection.find().toArray(); // Fetch all documents in the collection // Process the retrieved data (example: save to a file) const fs = require('fs'); fs.writeFileSync('data.json', JSON.stringify(data, null, 2)); // Save data as JSON console.log("Data fetched successfully!"); } catch (error) { console.error(error); const customError = new Error("An error occurred while fetching data."); throw customError; } finally { await client.close(); } } fetchData(); -
Commit and Push the workflow to your GitHub repository: Run the following commands in your terminal:
git add .
git commit -m "Add workflow"
git push origin main
Step 4: How to view GitHub action activity
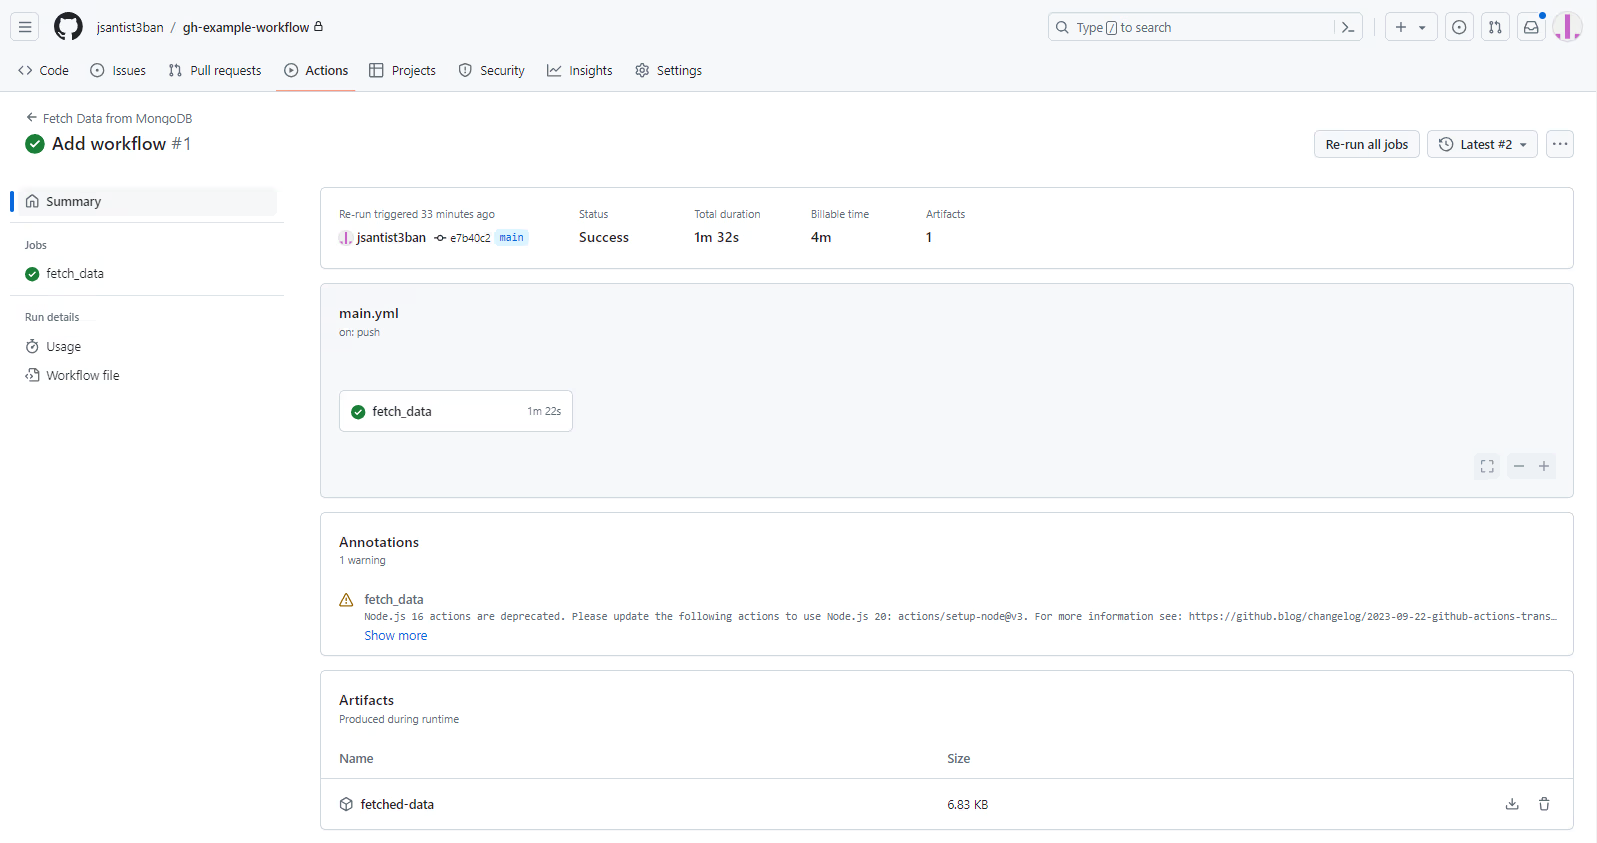
Once the GitHub actions are configured and running, you can view each step’s activity on GitHub.
-
Go to your repository on github.com.
-
Click the
Actionstab under the repository name.
-
In the left sidebar, you can select
Fetch Data from MongoD. Otherwise, all workflows will be shown. -
In the
Workflow runssection, click the name of the run to view the details.
-
You can view the logs of each step by clicking on the
fetch_datajob.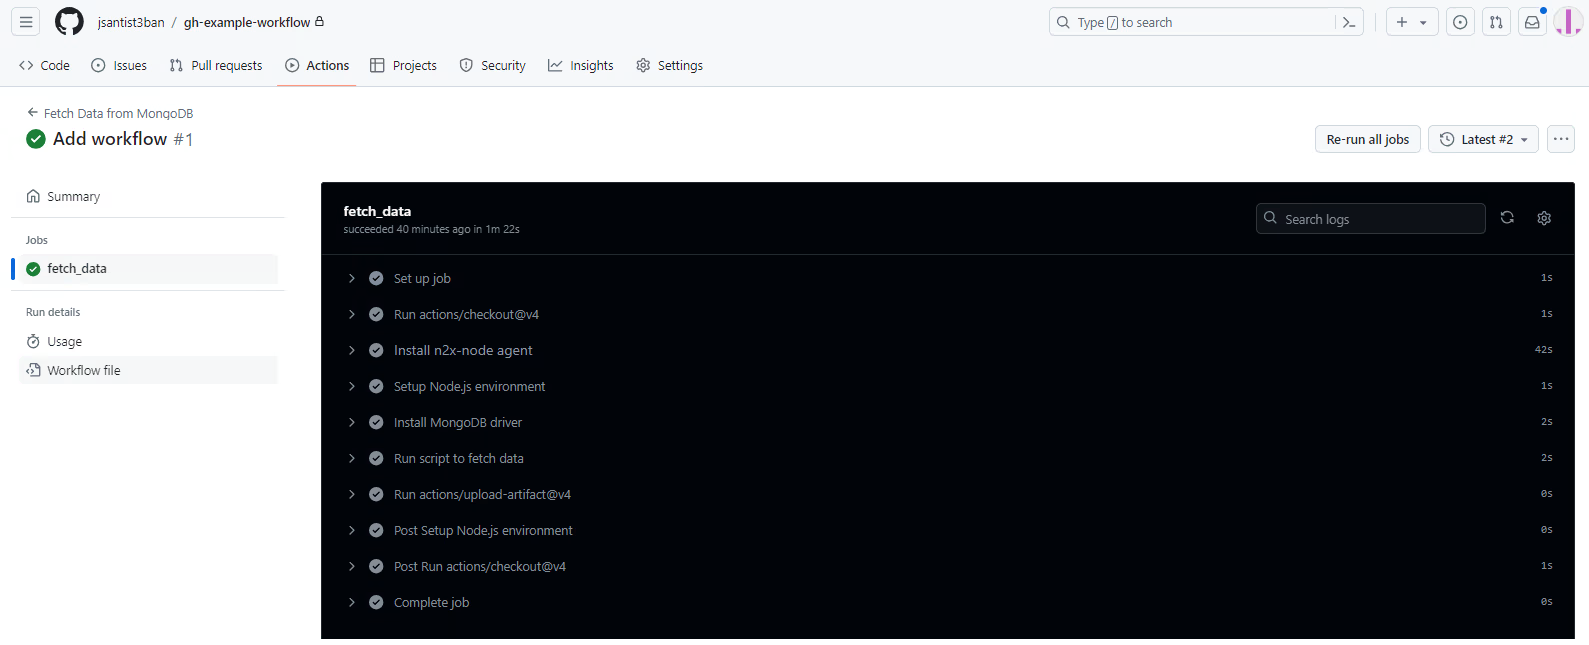
Conclusion
Using the integration of GitHub Actions and n2x.io, you've established an automated, secure and efficient workflow for retrieving data from your MongoDB database. This approach streamlines data retrieval within your development process, reducing manual intervention and ensuring consistency.