How to Manage Apps Across Multiple Kubernetes Clusters with Argo CD
GitOps is a powerful framework that uses Git as the single source of truth for managing infrastructure and application delivery. By defining the desired state in configuration files within a Git repository, GitOps ensures that any deviations are automatically corrected.
ArgoCD, a leading GitOps tool, simplifies the management of applications across multiple Kubernetes clusters. However, ensuring secure communication between Argo CD and private Kubernetes clusters can be challenging.
In this tutorial, we propose using n2x.io to create a secure network topology that facilitates communication between Argo CD and your private Kubernetes clusters, eliminating the need to expose Kubernetes APIs to the internet.
Here is the high-level overview of tutorial setup architecture:

In our setup, we will be using the following components:
-
Argo CD is a declarative, GitOps continuous delivery tool for Kubernetes. For more info please visit the Argo CD Documentation
-
n2x-node is an open-source agent that runs on the machines you want to connect to your n2x.io network topology. For more info please visit n2x.io Documentation.
Before you begin
In order to complete this tutorial, you must meet the following requirements:
-
A n2x.io account created and one subnet configured with the
10.254.1.0/24CIDR prefix. -
Access two Kubernetes clusters:
-
A private Kubernetes cluster, version
v1.27.xor greater. -
An EKS cluster with private endpoint, version
v1.27.xor greater.
-
-
Command-Line Tools:
Note
Please note that this tutorial uses a Linux OS with an Ubuntu 22.04 (Jammy Jellyfish) with amd64 architecture.
Step-by-step Guide
Step 1: Install Argo CD in Self-hosted Kubernetes cluster
Once you have successfully set up your Self-Hosted Kubernetes cluster, setting your context:
kubectl config use-context <self_hosted_cluster>
We are going to deploy an Argo CD on a Self-hosted Kubernetes cluster using the official Helm chart:
-
First, let’s add the following Helm repo:
helm repo add argo https://argoproj.github.io/argo-helm -
Update all the repositories to ensure helm is aware of the latest versions:
helm repo update -
We can then install Argo CD version
v2.12.1available chart version7.4.4in theargocdnamespace:helm install argocd argo/argo-cd -n argocd --create-namespace --version 7.4.4Once Argo CD is installed, you should see the following output:
NAME: argocd LAST DEPLOYED: Fri Aug 23 10:06:37 2024 NAMESPACE: argocd STATUS: deployed REVISION: 1 TEST SUITE: None NOTES: ... -
Now, we can verify if all of the pods in the
argocdnamespace are up and running:kubectl -n argocd get pod5. The default username isNAME READY STATUS RESTARTS AGE argocd-application-controller-0 1/1 Running 0 76s argocd-applicationset-controller-d64d955b7-hjb5h 1/1 Running 0 76s argocd-dex-server-55fcfbd4bc-kw4nl 1/1 Running 0 76s argocd-notifications-controller-754cc4c75d-2dsgd 1/1 Running 0 76s argocd-redis-6db8ccc448-w5vhm 1/1 Running 0 76s argocd-repo-server-69c6574c9d-574xd 1/1 Running 0 76s argocd-server-567685fb9d-kcl75 1/1 Running 0 76sadmin. ArgoCD Helm chart generates the password automatically during the installation. And you will find it inside theargocd-initial-admin-secretsecret:kubectl get secret -n argocd argocd-initial-admin-secret --template={{.data.password}} -n argocd | base64 -d; echo
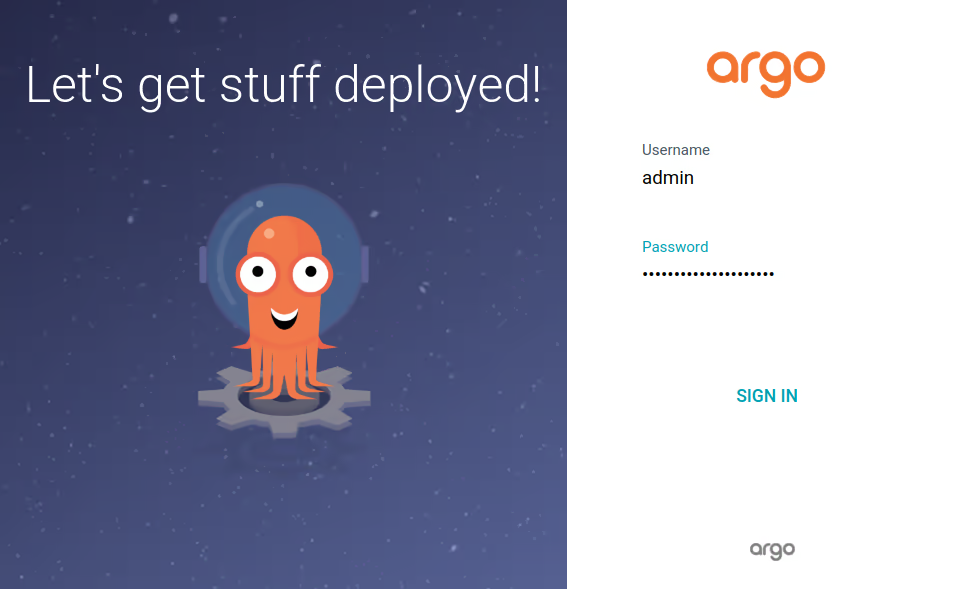
To access the Argo CD dashboard, we'll expose the argocd-server kubernetes service using port-forwarding. This will allow us to interact with Argo CD directly at http://localhost:8080.
kubectl port-forward svc/argocd-server 8080:80 -n argocd
Step 2: Connect Argo CD to our n2x.io network topology
Argo CD instance needs to have connectivity to remote Kubernetes clusters.
To connect a new kubernetes workloads to the n2x.io subnet, you can execute the following command:
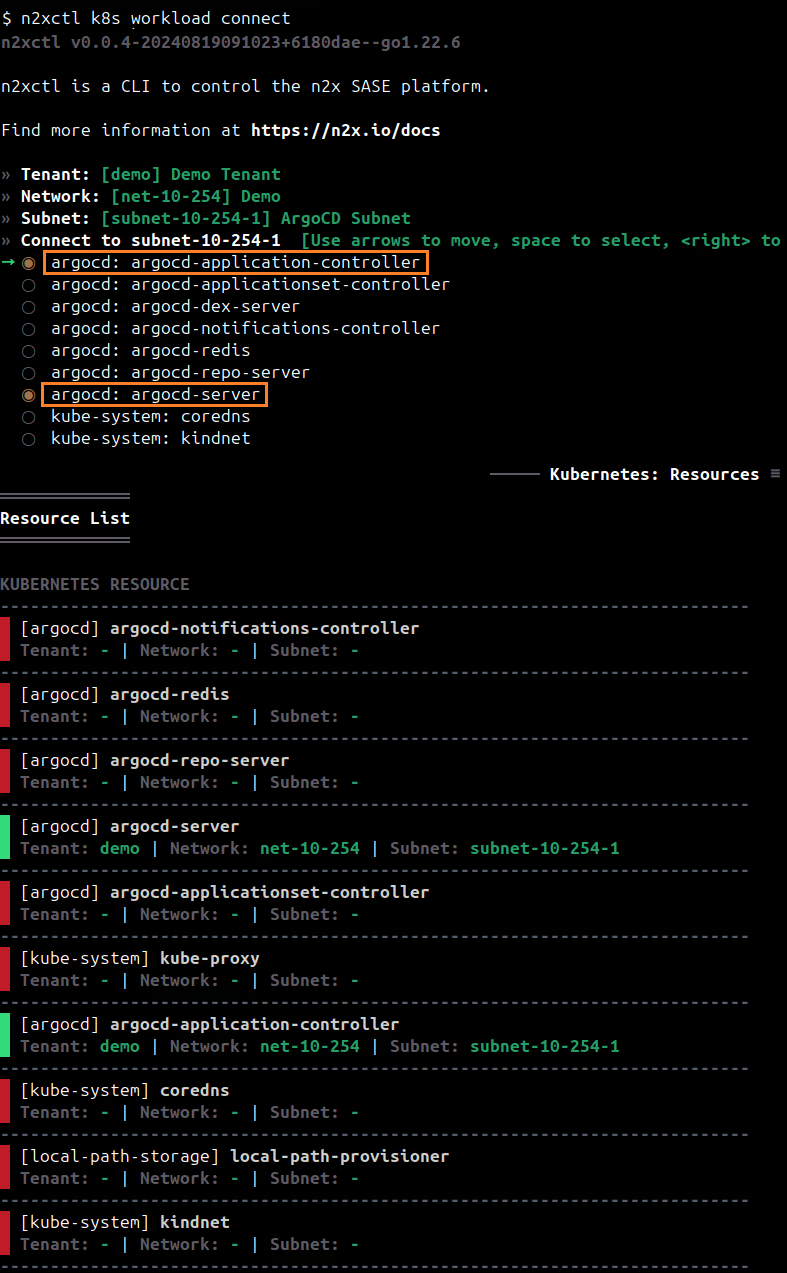
n2xctl k8s workload connect
The command will typically prompt you to select the Tenant, Network, and Subnet from your available n2x.io topology options. Then, you can choose the workloads you want to connect by selecting it with the space key and pressing enter. In this case, we will select argocd: argocd-server and argocd: argocd-application-controller.
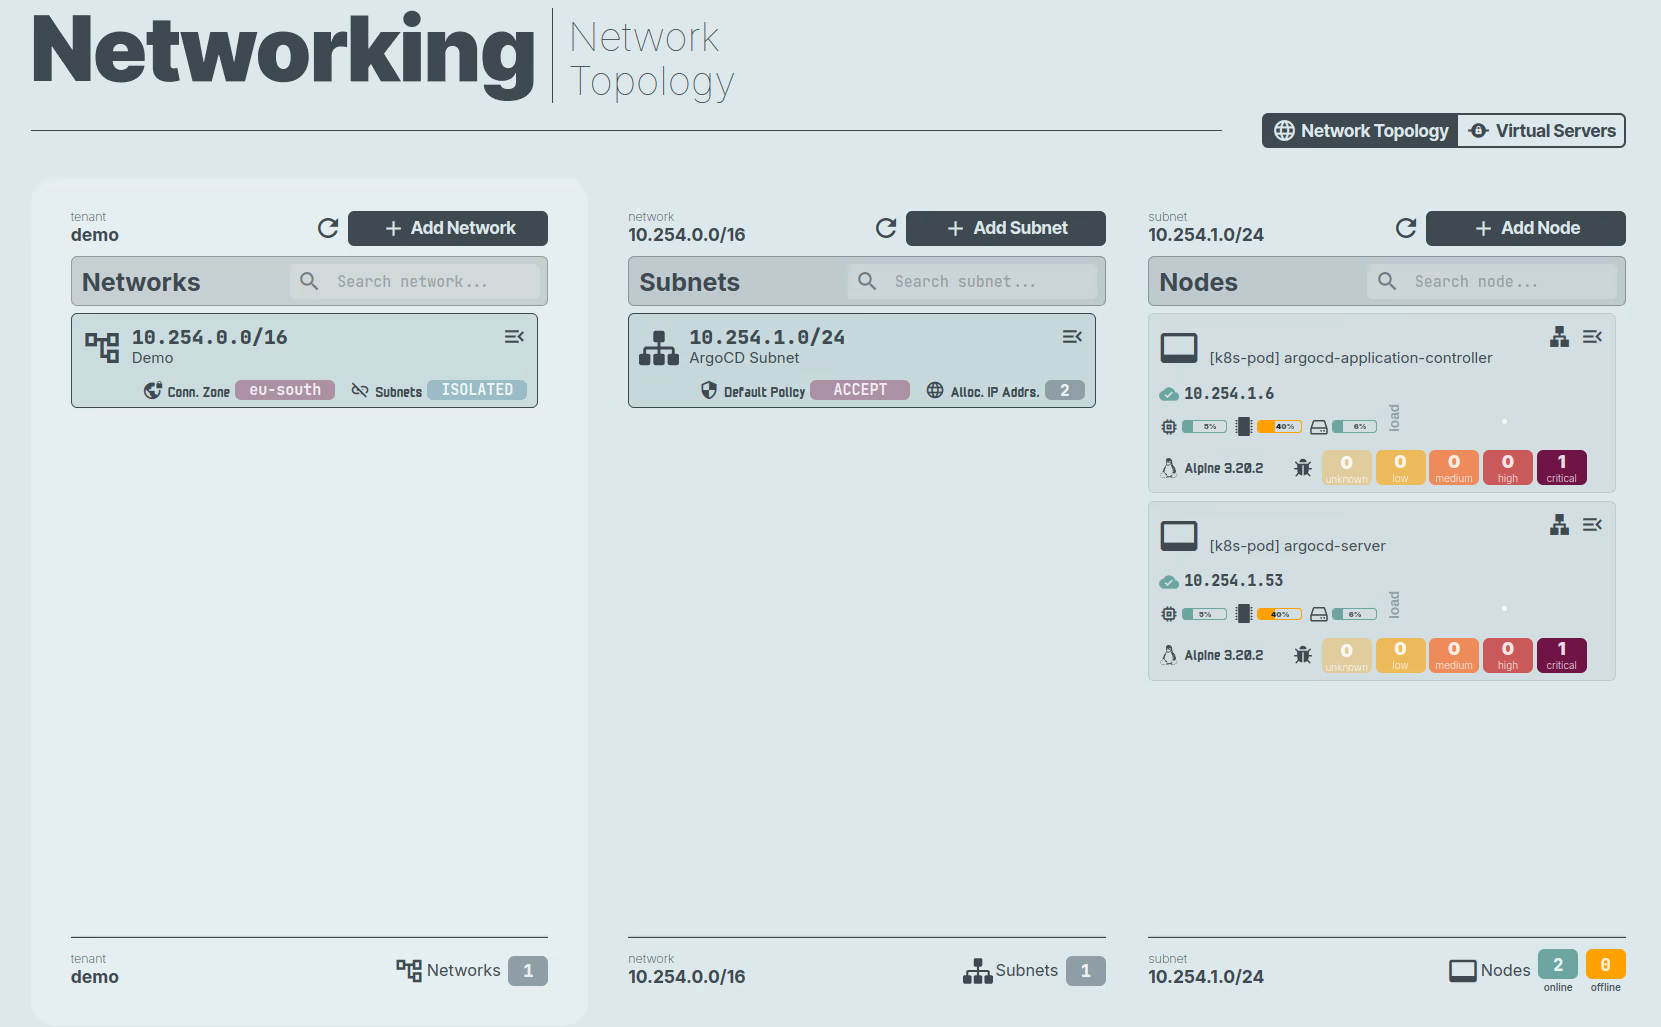
Now, we can access the Network Topology section in the left menu of n2x.io WebUI to verify that the node is correctly connected to the subnet.
Step 3: Connect the EKS cluster to our n2x.io network topology
The API server of the EKS cluster needs to be accessible by Argo CD to be able to deploy applications remotely.
Once you have successfully set up your EKS cluster, setting your context:
kubectl config use-context <eks_cluster>
To connect a new kubernetes service to the n2x.io subnet, you can execute the following command:
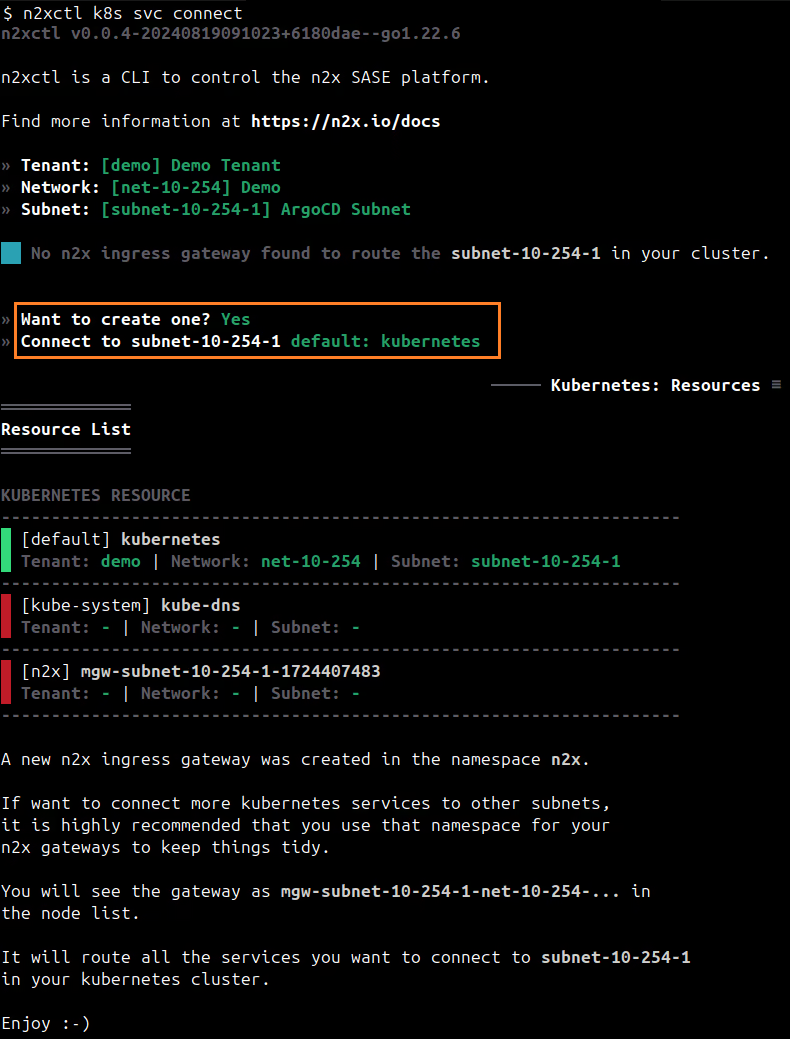
n2xctl k8s svc connect
The command will typically prompt you to select the Tenant, Network, and Subnet from your available n2x.io topology options. Then, you can choose the service you want to connect by selecting it with the space key and pressing enter. In this case, we will select default: kubernetes.
Note
The first time that you connect a k8s svc to the subnet, you need to deploy a n2x.io Kubernetes Gateway.
Finding IP address assigned to the Kubernetes Service:
-
Access the n2x.io WebUI and log in.
-
In the left menu, click on the
Network Topologysection and choose thesubnetassociated with your Kubernetes service (e.g., subnet-10-254-0). -
Click on the
IPAMsection. Here, you'll see both IPv4 and IPv6 addresses assigned to thekubernetes.default.n2x.localendpoint. Identify the IP address you need for your specific use case.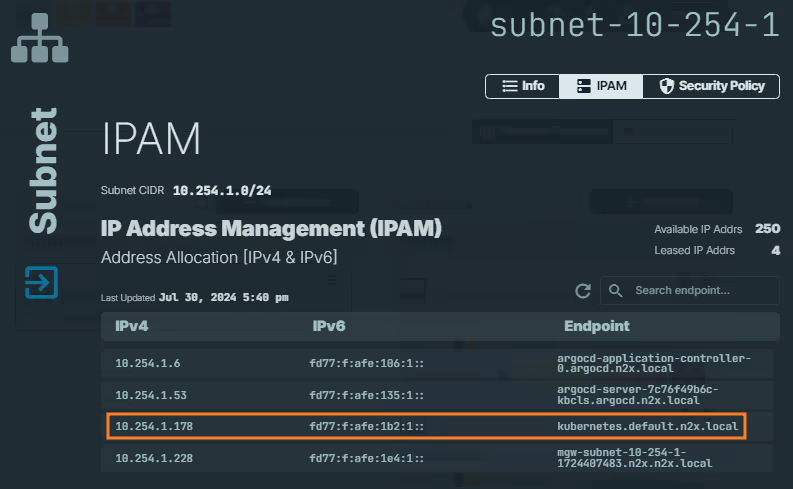
Info
Remember the IP address assigned to
kubernetes.default.n2x.localendpoint, we must be used it as cluster endpoint in Argo CD.
Step 4: Adding the target cluster (EKS) to Argo CD
Typically you could add a cluster using the Argo CD CLI command argocd cluster add <CONTEXTNAME>, where the <CONTEXTNAME> is a context available in your local kubeconfig. That command installs a argocd-manager service account into the kube-system namespace and binds this service account to an admin-level ClusterRole.
Unfortunately, adding a cluster this way is not possible in this scenario since we are going to use a different endpoint through n2x.io private virtual network. Besides creating the service account in the target cluster, the command will also try to register the cluster in Argo CD with the endpoint in your context and will validate if Argo CD can communicate with the API service.
Luckily for us, we can simulate the steps that the CLI takes to onboard a new cluster:
- Create a service account and roles in the target cluster.
- Fetch a bearer token of the service account.
- Configure a new cluster for Argo CD with the credentials in a declarative way.
First, we are going to create a service account and roles manually in the target cluster for Argo CD. So we are going to create the configuration file argocd-rbac.yaml with this information:
apiVersion: v1
kind: ServiceAccount
metadata:
  name: argocd-manager
  namespace: kube-system
---
apiVersion: v1
kind: Secret
metadata:
  name: argocd-manager-token
  namespace: kube-system
  annotations:
    kubernetes.io/service-account.name: argocd-manager
type: kubernetes.io/service-account-token
---
apiVersion: rbac.authorization.k8s.io/v1
kind: ClusterRole
metadata:
  name: argocd-manager-role
rules:
- apiGroups:
  - '*'
  resources:
  - '*'
  verbs:
  - '*'
- nonResourceURLs:
  - '*'
  verbs:
  - '*'
---
apiVersion: rbac.authorization.k8s.io/v1
kind: ClusterRoleBinding
metadata:
  name: argocd-manager-role-binding
roleRef:
  apiGroup: rbac.authorization.k8s.io
  kind: ClusterRole
  name: argocd-manager-role
subjects:
- kind: ServiceAccount
  name: argocd-manager
  namespace: kube-system
Then execute the following command to create the objects in the EKS private cluster:
kubectl -n kube-system apply -f argocd-rbac.yaml
For Argo CD, cluster configuration and credentials are stored in secrets which must have a label argocd.argoproj.io/secret-type: cluster.
The secret data must include the following fields:
- name: A descriptive and unique identifier for the cluster.
- server: The cluster API URL. Use the IP address (
10.254.1.178) assigned by n2x.io. - config: A JSON object containing the cluster credentials.
Note
More information on how this structure looks can be found in the Argo CD documentation.
Before creating this secret, we need to fetch the bearer token for the previously created service account in your EKS private cluster. You can get this information with the following command:
kubectl -n kube-system get secret argocd-manager-token -o jsonpath='{.data.token}' | base64 -d; echo
Now we can create the secret in the Self-hosted Kubernetes cluster. We'll create a configuration file named eks-private-secret.yaml with the following information. Remember to replace <EKS_N2X_IP_ADDR> and <AUTH_TOKEN> with the correct values:
apiVersion: v1
kind: Secret
metadata:
  name: eks-private
  labels:
    argocd.argoproj.io/secret-type: cluster
type: Opaque
stringData:
  name: eks-private
  server: https://<EKS_N2X_IP_ADDR>
  config: |
    {
      "bearerToken": "<AUTH_TOKEN>",
      "tlsClientConfig": {
        "insecure": true
      }
    }
Change your context to Self-Hosted Kubernetes cluster:
kubectl config use-context <self_hosted_cluster>
Then you can execute the following command to create the secret:
kubectl -n argocd apply -f eks-private-secret.yaml
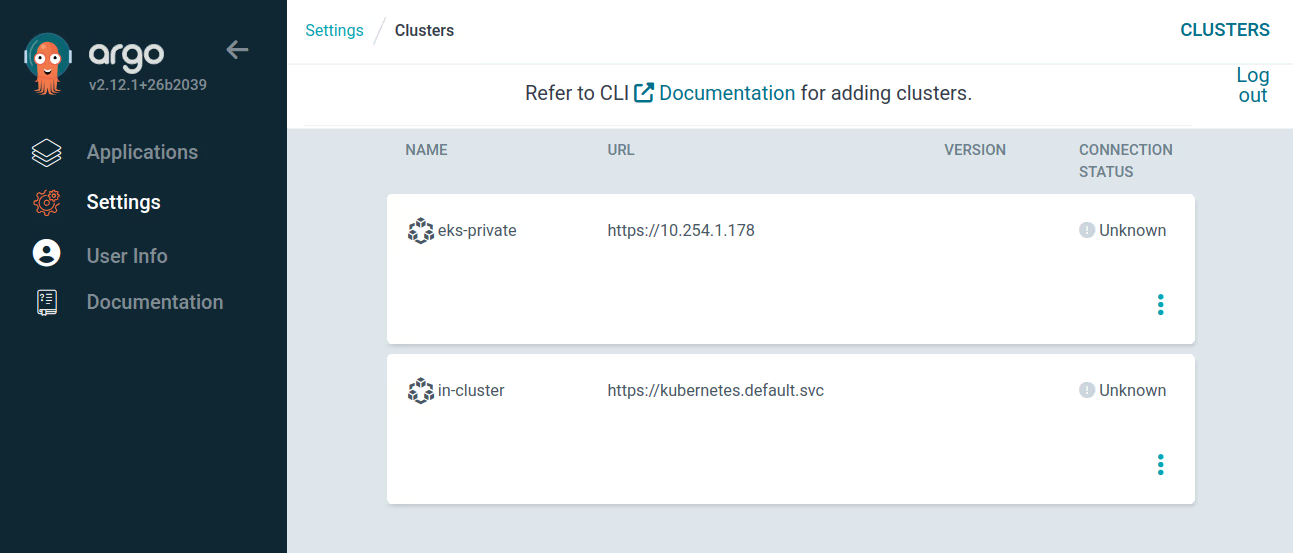
Finally, let’s switch to the ArgoCD dashboard (Setting > Clusters) and we have two clusters:
eks-privateis the EKS private cluster added remotely.in-clusteris the Self-hosted Kubernetes cluster where the Argo CD instance was deployed.
Warning
Remember that you need a active port-forward connection to access the dashboard.
Note
The connection status is Unknown because the clusters do not have applications deployed yet.
Step 5: Deploying the same testing application in both cluster
We can easily deploy the same app across multiple Kubernetes clusters with the ArgoCD ApplicationSet object. The ApplicationSet Controller is automatically installed by the ArgoCD Helm chart. So, we don’t have to do anything additional to use it.
To create a ApplicationSet for each managed cluster, we need to use Cluster Generator. So we are going to create the configuration file guestbook-applicationset.yaml with this information:
apiVersion: argoproj.io/v1alpha1
kind: ApplicationSet
metadata:
  name: sample-guestbook
  namespace: argocd
spec:
  generators:
  - clusters: {} # (1)
  template:
    metadata:
      name: '{{name}}-sample-guestbook' # (2)
    spec:
      project: default
      source: # (3)
        repoURL: https://github.com/argoproj/argocd-example-apps.git # (5)
        targetRevision: HEAD
        path: guestbook
      destination:
        server: '{{server}}' # (4)
        namespace: demo # (6)
      syncPolicy: # (7)
        automated:
          selfHeal: true
        syncOptions:
          - CreateNamespace=true
YAML Explanation
- The previous
ApplicationSetautomatically uses all clusters managed by ArgoCD (1). - We use them to generate a unique name (2) and set the target cluster name (4).
- In this exercise, we will deploy an
sample-guestbookapp that exposes some endpoints over HTTP. - The configuration is stored in Git repo (5) inside the
guestbookpath (3). - The target namespace name is demo (6).
- The app is synchronized automatically with the configuration stored in the Git repo (7).
After that, we can execute the following command in the Self-hosted Kubernetes cluster:
kubectl -n argocd apply -f guestbook-applicationset.yaml
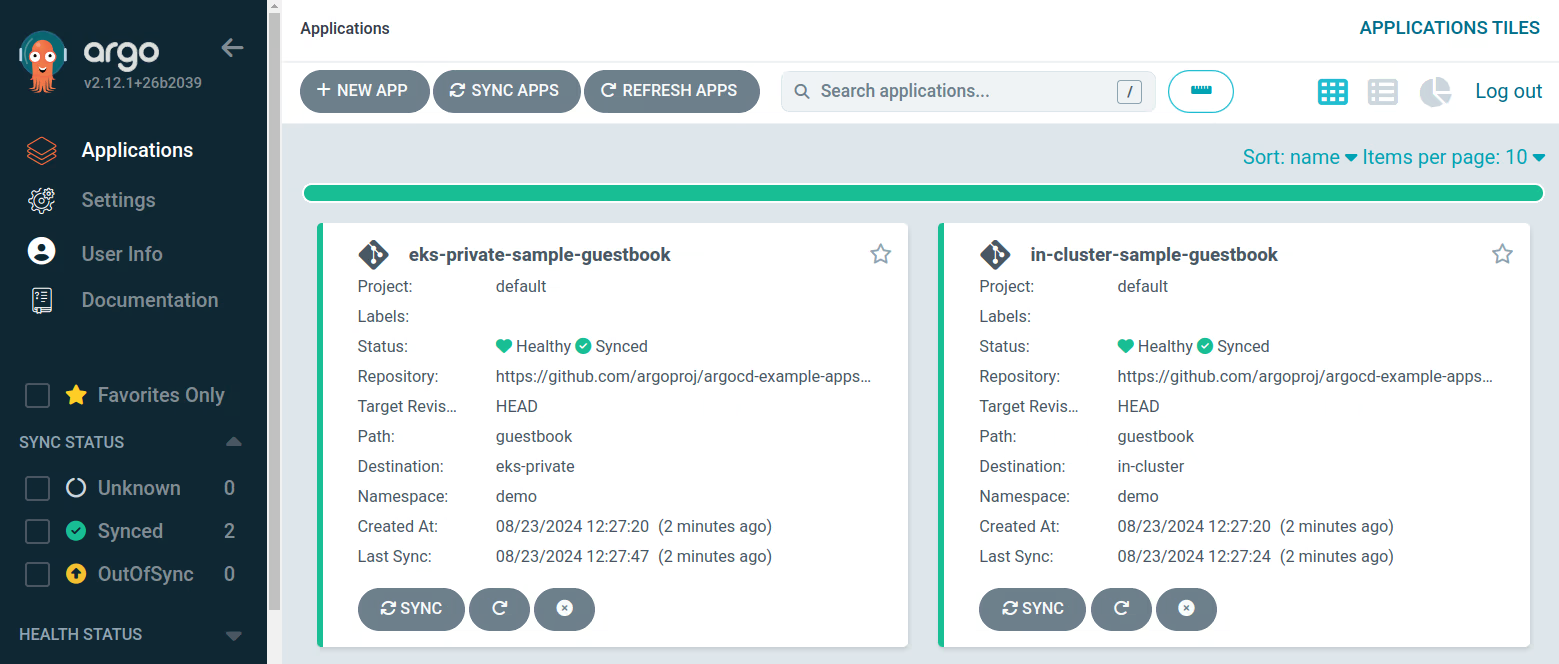
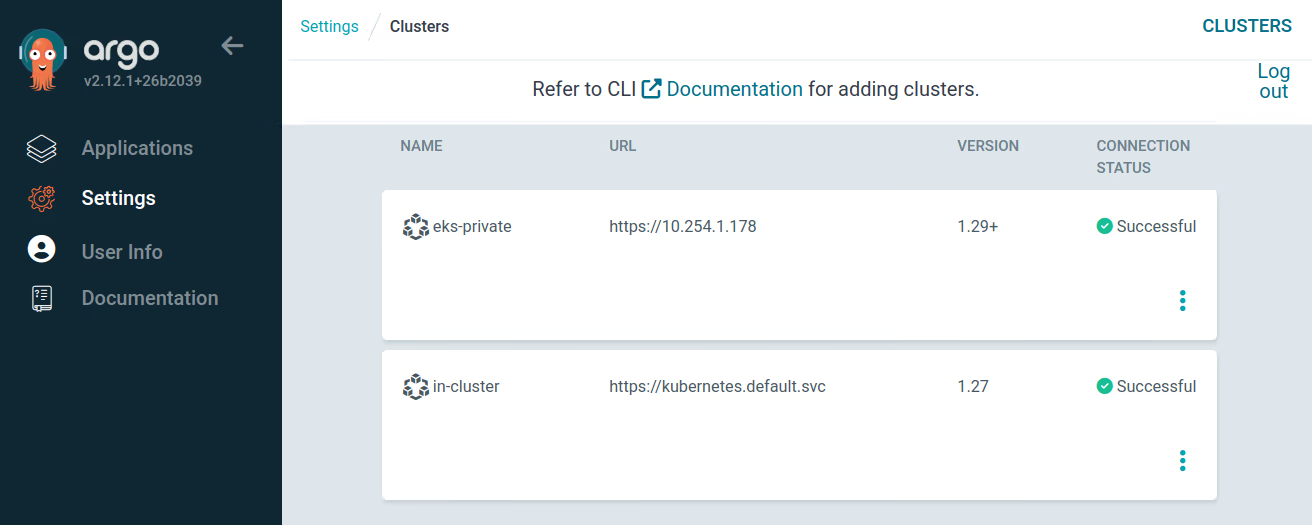
Therefore you should have two ArgoCD applications generated and automatically synchronized. It means that our sample-guestbook app is currently running on all the clusters.
Conclusion
Argo CD is a powerful GitOps tool that simplifies application deployment and management across diverse Kubernetes clusters. It centralizes control and provides real-time monitoring for all applications, regardless of their location.
However, ensuring secure communication between Argo CD and private Kubernetes clusters can pose a significant challenge. This is especially true in tightly controlled sites or when managing deployments across multiple cloud providers.
This guide explored how n2x.io addresses this challenge. By enabling a secure network topology, n2x.io facilitates seamless communication between Argo CD and any Kubernetes cluster without compromising security by exposing them directly to the internet.