How to Provide Secure External Access to Applications in a Kubernetes Cluster
In today's dynamic software landscape, containerization has revolutionized application development and deployment. Kubernetes, the de facto standard for managing containerized workloads, offers powerful automation for deployments, scaling, and load balancing. However, exposing these applications externally requires robust security measures to prevent unauthorized access and vulnerabilities.
This guide shows how n2x.io can help secure and control external access to applications running on Kubernetes clusters.

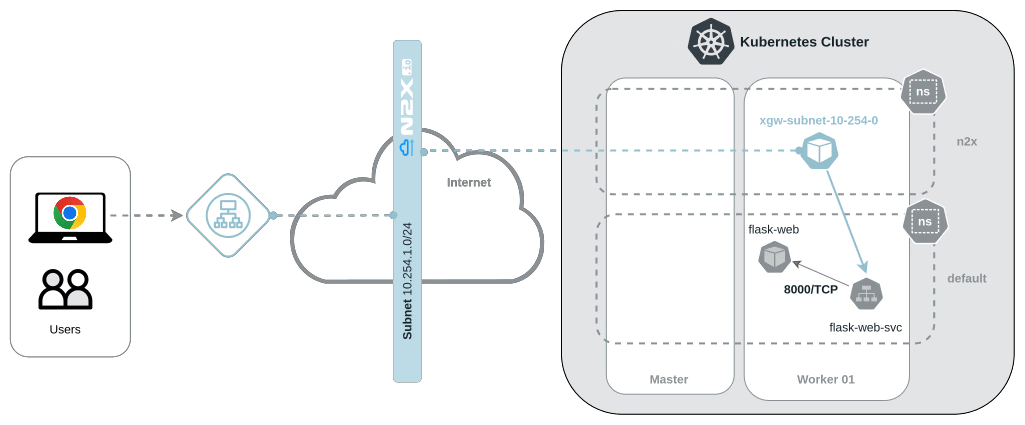
The diagram shows the following information:
- Kubernetes cluster where we will deploy the
flask-webapplication. - A n2x.io network topology, used for secure communication, where we will connect the
flask-web-svcKubernetes service using a n2x.io Kubernetes Gateway namedxgw-subnet-10-254-0. - Users can use web browsers to connect to the application through the n2x.io Secure Gateway.
Before you begin
To complete this tutorial, you must meet the following requirements:
- Access to at least two Kubernetes clusters, version
v1.27.xor greater. - A n2x.io account created and one subnet with
10.254.1.0/24prefix. - Installed n2xctl command-line tool, version
v0.0.3or greater. - Installed kubectl command-line tool, version
v1.27.xor greater.
Note
Please note that this tutorial uses a Linux OS with an Ubuntu 22.04 (Jammy Jellyfish) with amd64 architecture.
Creating a Sample Application
In the first step, we are going to create a sample application to run in your cluster Kubernetes cluster. This application will showcase how n2x.io enables secure and controlled access to applications within the cluster.
Copy the following YAML manifest and save it to flask-web-app.yaml in your working directory:
apiVersion: apps/v1
kind: Deployment
metadata:
  name: flask-web-deploy
spec:
  replicas: 1
  selector:
    matchLabels:
      app: flask-web
  template:
    metadata:
      labels:
        app: flask-web
    spec:
      containers:
      - name: flask-web
        image: jsantisteban/flask-web:latest
        ports:
        - containerPort: 8000
---
apiVersion: v1
kind: Service
metadata:
  name: flask-web-svc
spec:
  selector:
    app: flask-web
  ports:
  - name: http
    port: 8000
    targetPort: 8000
  type: ClusterIP
The manifest defines a deployment, which manages replicating pods running the flask-web container. It also includes a ClusterIP service, which exposes the deployment internally within the cluster through port 8000.
To deploy both the deployment and service, run the following command:
kubectl apply -f flask-web-app.yaml
Check if the pod is running and the service was deployed successfully:
kubectl get pod,svc
NAME                                    READY   STATUS    RESTARTS   AGE
pod/flask-web-deploy-555fd656b8-zv588   1/1     Running   0          17s

NAME                    TYPE        CLUSTER-IP      EXTERNAL-IP   PORT(S)    AGE
service/flask-web-svc   ClusterIP   10.96.155.182   <none>        8000/TCP   17s
service/kubernetes      ClusterIP   10.96.0.1       <none>        443/TCP    3m37s
Note
Notice that network 10.0.0.0/8 is unreachable outside the cluster.
Connecting the Application
To connect a new kubernetes service to the n2x.io subnet, you can execute the following command:
n2xctl k8s svc connect
The command will typically prompt you to select the Tenant, Network, and Subnet from your available n2x.io topology options. Then, you can choose the service you want to connect by selecting it with the space key and pressing enter. In this case, we will select default: flask-web-svc.
Note
The first time that you connect a k8s svc to the subnet, you need to deploy a n2x.io Kubernetes Gateway.

Exposing the Application
A Secure Gateway is a load balancer and Identity-Aware Proxy (IAP) with tag-based authentication that allows controlled public access to resources in the n2x.io network through a virtual server.
There are two main steps required to configure a Secure Gateway:
- Create a Virtual Server with authentication enabled.
- Add Node Services to the Virtual Server.
In this guide
We will configure a Secure Gateway using the n2xctl vs create command.

This command will typically prompt you to select the following:
Tenant: Choose the tenant associated with your resources in the n2x.io account.Network: Select the network where the virtual server will reside.
Then, you will be prompted to fill in the following details:
Name: Provide a descriptive name for your virtual server.Description: Add a description to further clarify the purpose of the virtual server.Custom DNS CNAME: This field is optional. If you own a domain and want to set a custom URL to access the application, enter the desired CNAME here. Otherwise, leave it blank.Authentication: SelectYesto enable authentication for access to the application.Tags: Provide thewebapptag to grant access to authorized users.
Finally, you will need to add your sample application to the virtual server. Here, select the following:
Node: Choose the node (mgw-subnet-10.254.0-xxxxxxxxxx) where the sample application is running.Protocol: Select the protocol (HTTP) used by sample application.Port: Specify the port (8000) on which the application listens.
Success
After the virtual service is configured, the command provides an auto-generated URL to access the application.
Granting Access to the Application
Once we have the application publicly exposed, the Account Administrator can access the application through a web browser without taking any additional steps.
But if you need to share the application access with other people in your organization, there are two steps required to enable it:
-
Creating an ACL
The Account Administrator must create an ACL named
Sample Applicationand associate it with thewebapptag.
Create ACL -
Creating Proxy Users
The Account Administrator must create new proxy users for each person who requires access using their email address. Then, assign the
Sample ApplicationACL to each proxy user to grant access to the Virtual Server.
Create Proxy User
Verifying External Application Access
To access the application, click on the virtual server URL. This will redirect you to the authentication page, as shown in the image below:

Fill in your email address and the verification code (or one-time password, OTP) received through your email. Once authenticated, you will be able to access the Sample Application deployed in this example.

Conclusion
This guide has explored the challenge of securely exposing containerized applications running on Kubernetes clusters. While Kubernetes itself offers robust management capabilities, additional security measures are crucial for external access.
We introduced n2x.io as a solution that simplifies and strengthens external access security for Kubernetes applications. By leveraging a network topology and a Secure Gateway, n2x.io facilitates controlled and authenticated access, protecting your applications from unauthorized exposure.
In summary, n2x.io empowers you to confidently deploy containerized applications on Kubernetes with the peace of mind of robust access security.