How to Manage Secrets Across Multiple Kubernetes Clusters
Secret management is a critical aspect of cybersecurity that involves securing and controlling access to sensitive information, often referred to as secrets. Secrets, like passwords or API keys, require secure storage and controlled access.
The difficulty arises when managing multiple Kubernetes clusters across different cloud providers or private networks. This decentralization presents a challenge for IT teams to effectively manage secrets.
There are many reasons why an enterprise may have multiple Kubernetes clusters. Some need to deploy applications across several Kubernetes clusters in different cloud providers, or within strictly controlled private networks, where the Kubernetes API server is not available on the Internet.
Solution: HashiCorp Vault + Vault Secrets Operator + n2x.io
In this tutorial, we will run the Hashicorp Vault instance on k8s-dc2 Kubernetes cluster and deploy an application in k8s-dc1 Kubernetes cluster that will have a secret got from Vault instance leveraging Vault Secret Operator. Additionally, we will create a network topology using n2x.io that enables communications between two private Kubernetes clusters geographically distributed.
Here is the high-level overview of tutorial setup architecture:
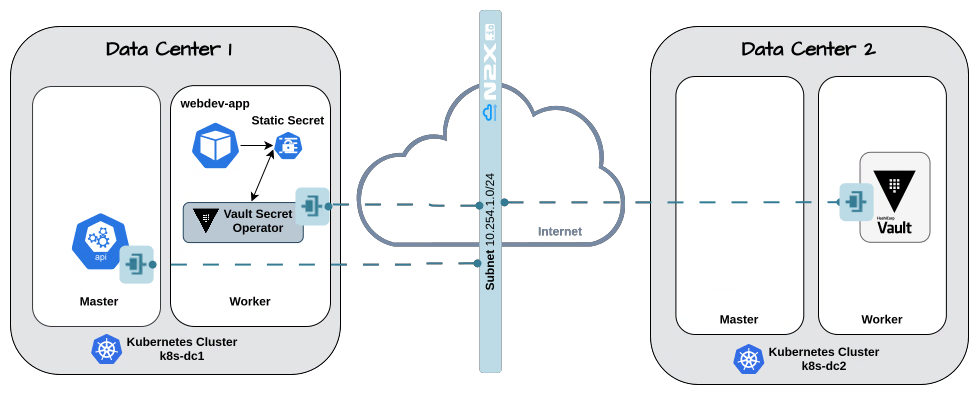
In our setup, we will be using the following components:
-
Hashicorp Vault is an identity-based secret and encryption management system. For more info please visit the Vault Documentation
-
Vault Secret Operator allows Pods to consume Vault secrets and HCP Vault Secrets Apps natively from Kubernetes Secrets. For more info please visit the Vault Secret Operator Documentation
-
n2x-node is an open-source agent that runs on the machines you want to connect to your n2x.io network topology. For more info please visit n2x.io Documentation.
Before you begin
In order to complete this tutorial, you must meet the following requirements:
-
Access two private Kubernetes clusters, version
v1.27.xor greater. -
A n2x.io account created and one subnet configured with the
10.254.1.0/24CIDR prefix. -
Installed n2xctl command-line tool, version
v0.0.3or greater. -
Installed kubectl command-line tool, version
v1.27.xor greater. -
Installed helm command-line tool, version
v3.10.1or greater.
Note
Please note that this tutorial uses a Linux OS with an Ubuntu 22.04 (Jammy Jellyfish) with amd64 architecture.
Step-by-step Guide
Step 1: Installing Hashicorp Vault in k8s-dc2 cluster
Once you have successfully set up your k8s-dc2 Kubernetes cluster, setting your context:
kubectl config use-context k8s-dc2
We are going to install the Hashicorp Vault on a k8s-dc2 cluster using the official Helm chart:
-
First, let’s add the following Helm repo:
helm repo add hashicorp https://helm.releases.hashicorp.com -
Update all the repositories to ensure helm is aware of the latest versions:
helm repo update -
Configure the Vault Helm chart with Integrated Storage:
cat > helm-vault-raft-values.yml <<EOF server: affinity: "" ha: enabled: true raft: enabled: true EOF -
We can then install Vault version
0.28.1in thevaultnamespace:Once Vault is installed, you should see the following output:helm install vault hashicorp/vault --values helm-vault-raft-values.yml -n vault --create-namespace --version 0.28.1NAME: vault LAST DEPLOYED: Thu Aug 22 10:51:36 2024 NAMESPACE: vault STATUS: deployed REVISION: 1 NOTES: Thank you for installing HashiCorp Vault! -
Now, we can verify if all of the pods in the
vaultnamespace are up and running:kubectl -n vault get podNAME READY STATUS RESTARTS AGE vault-0 0/1 Running 0 117s vault-1 0/1 Running 0 116s vault-2 0/1 Running 0 115s vault-agent-injector-7f7f68d457-k6dts 1/1 Running 0 118s
After the Vault Helm chart is installed, one of the Vault servers needs to be initialized. The initialization generates the credentials necessary to unseal all the Vault servers.
We are going to initialize vault-0 server with one key share (default: 5) and one key threshold (default: 3):
kubectl -n vault exec vault-0 -- vault operator init -key-shares=1 -key-threshold=1 -format=json > cluster-keys.json
Initializing Vault
The operator init command generates a root key that it disassembles into key shares -key-shares=1 and then sets the number of key shares required to unseal Vault -key-threshold=1. These key shares are written to the output as unseal keys in JSON format -format=json. Here the output is redirected to a file named cluster-keys.json.
Create a variable named VAULT_UNSEAL_KEY to capture the Vault unseal key:
VAULT_UNSEAL_KEY=$(jq -r ".unseal_keys_b64[]" cluster-keys.json)
Warning
Do not run an unsealed Vault in production with a single key share and a single key threshold. This approach is only used here to simplify the unsealing process for this demonstration.
The next step is unseal Vault running on the vault-0 pod:
kubectl -n vault exec vault-0 -- vault operator unseal $VAULT_UNSEAL_KEY
After that, we need to join the other vault members to Raft cluster:
kubectl -n vault exec -ti vault-1 -- vault operator raft join http://vault-0.vault-internal:8200
kubectl -n vault exec -ti vault-2 -- vault operator raft join http://vault-0.vault-internal:8200
Finally, we need to unseal the new vault members:
kubectl -n vault exec vault-1 -- vault operator unseal $VAULT_UNSEAL_KEY
kubectl -n vault exec vault-2 -- vault operator unseal $VAULT_UNSEAL_KEY
When all Vault server pods are unsealed they report READY 1/1:
kubectl -n vault get pod
NAME                                    READY   STATUS    RESTARTS   AGE
vault-0                                 1/1     Running   0          5m
vault-1                                 1/1     Running   0          5m
vault-2                                 1/1     Running   0          5m
vault-agent-injector-7f7f68d457-k6dts   1/1     Running   0          5m
Step 2: Inserting test secrets into the Vault
The applications that we will deploy in the last step expect a secret stored at the path secret/devwebapp/config. Let's create it:
-
Start an interactive shell session on the
vault-0pod and log in withRoot Token:kubectl -n vault exec -it vault-0 -- /bin/sh vault login Token (will be hidden): Success! You are now authenticated. The token information displayed below is already stored in the token helper. You do NOT need to run "vault login" again. Future Vault requests will automatically use this token.Info
You can use the
Root Tokento login in vault. The initial root token is a privileged user that can perform any operation at any path. To display the root token found incluster-keys.jsonyou can execute the following command:jq -r ".root_token" cluster-keys.json -
Enable kv-v2 secrets at the path
secret:vault secrets enable -path=secret kv-v2 Success! Enabled the kv-v2 secrets engine at: secret/ -
Next, create a secret at path
secret/devwebapp/configwith ausernameandpassword:vault kv put secret/devwebapp/config username='n2x' password='random' -
Verify that the secret is defined at the path
secret/devwebapp/config.vault kv get secret/devwebapp/config======== Secret Path ======== secret/data/devwebapp/config ======= Metadata ======= Key Value --- ----- created_time 2024-08-13T12:11:49.93588028Z custom_metadata <nil> deletion_time n/a destroyed false version 1 ====== Data ====== Key Value --- ----- password random username n2xSuccess
The secret is ready for the application.
-
Lastly, exit the
vault-0pod:exit
Step 3: Connecting Vault to our n2x.io network topology
The Vault instance must have connectivity to the Kubernetes API of a remote cluster and be accessible using the Vault Secret Operator to obtain secrets.
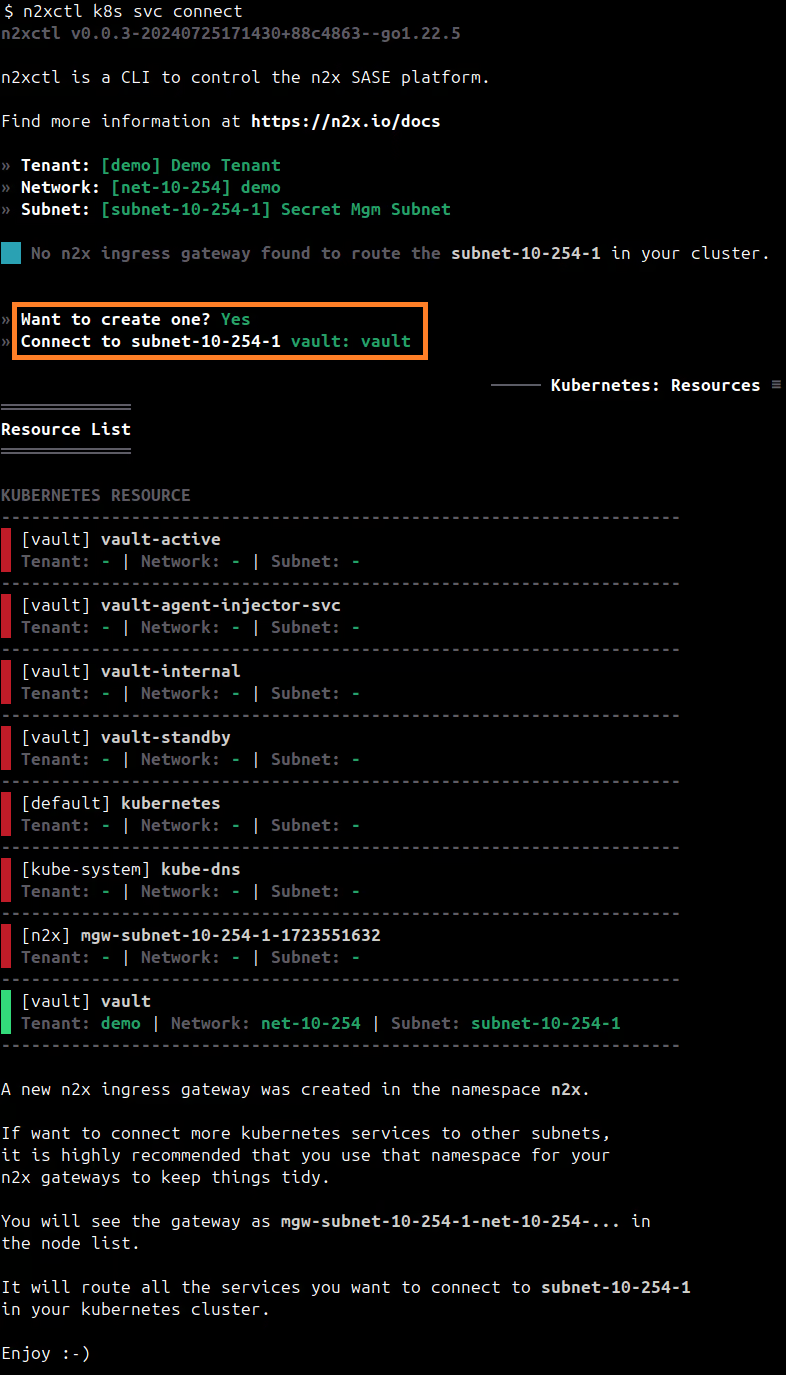
To connect a new kubernetes service to the n2x.io subnet, you can execute the following command:
n2xctl k8s svc connect
The command will typically prompt you to select the Tenant, Network, and Subnet from your available n2x.io topology options. Then, you can choose the service you want to connect by selecting it with the space key and pressing enter. In this case, we will select vault: vault.
Note
The first time that you connect a k8s svc to the subnet, you need to deploy a n2x.io Kubernetes Gateway.
Finding IP address assigned to the Vault Service:
-
Access the n2x.io WebUI and log in.
-
In the left menu, click on the
Network Topologysection and choose thesubnetassociated with your Vault service (e.g., subnet-10-254-0). -
Click on the
IPAMsection. Here, you'll see both IPv4 and IPv6 addresses assigned to thevault.vault.n2x.localendpoint. Identify the IP address you need for your specific use case.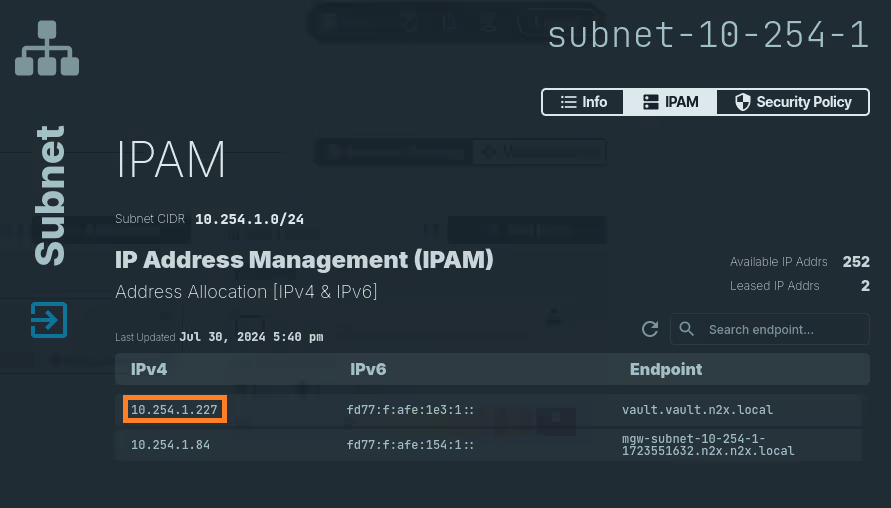
Info
Remember the IP address assigned to
vault.vault.n2x.localendpoint, we must be used it in Vault Secret Operator configuration later.
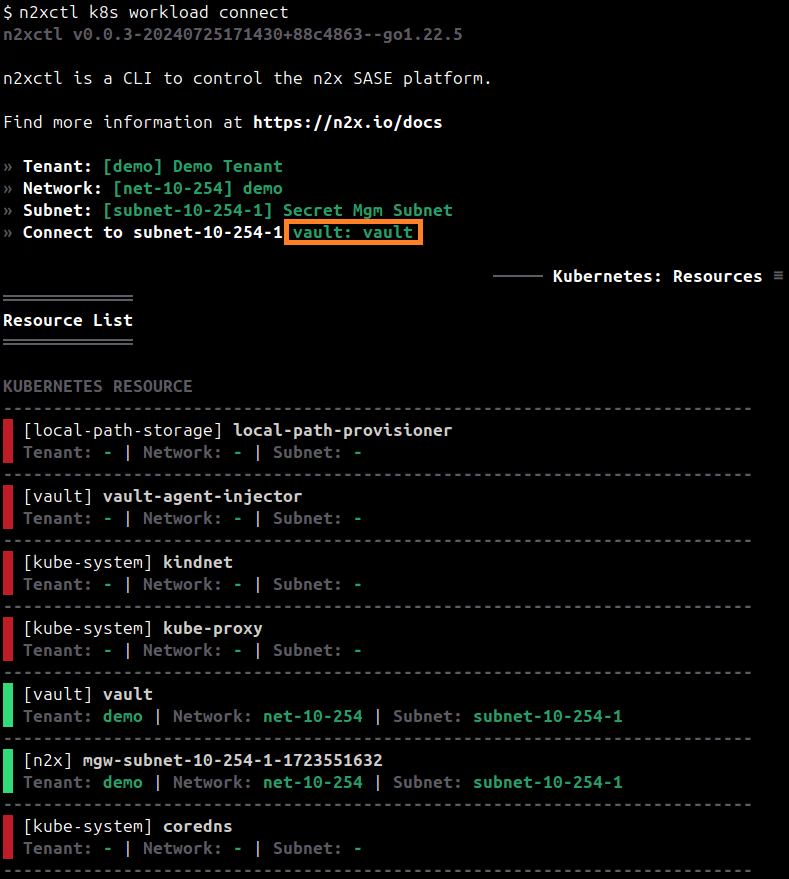
To connect a new kubernetes workload to the n2x.io subnet, you can execute the following command:
n2xctl k8s workload connect
The command will typically prompt you to select the Tenant, Network, and Subnet from your available n2x.io topology options. Then, you can choose the workload you want to connect by selecting it with the space key and pressing enter. In this case, we will select vault: vault.
Warning
If the pods of the Vault workload will not restart automatically, you can manually restart them with the following command: kubectl -n vault delete pod vault-0 vault-1 vault-2
We need to unseal the Vault members again due to the pod restart:
kubectl -n vault exec vault-0 -c vault -- vault operator unseal $VAULT_UNSEAL_KEY
kubectl -n vault exec vault-1 -c vault -- vault operator unseal $VAULT_UNSEAL_KEY
kubectl -n vault exec vault-2 -c vault -- vault operator unseal $VAULT_UNSEAL_KEY
Now we can access the n2x.io WebUI to verify that the nodes are correctly connected to the subnet.
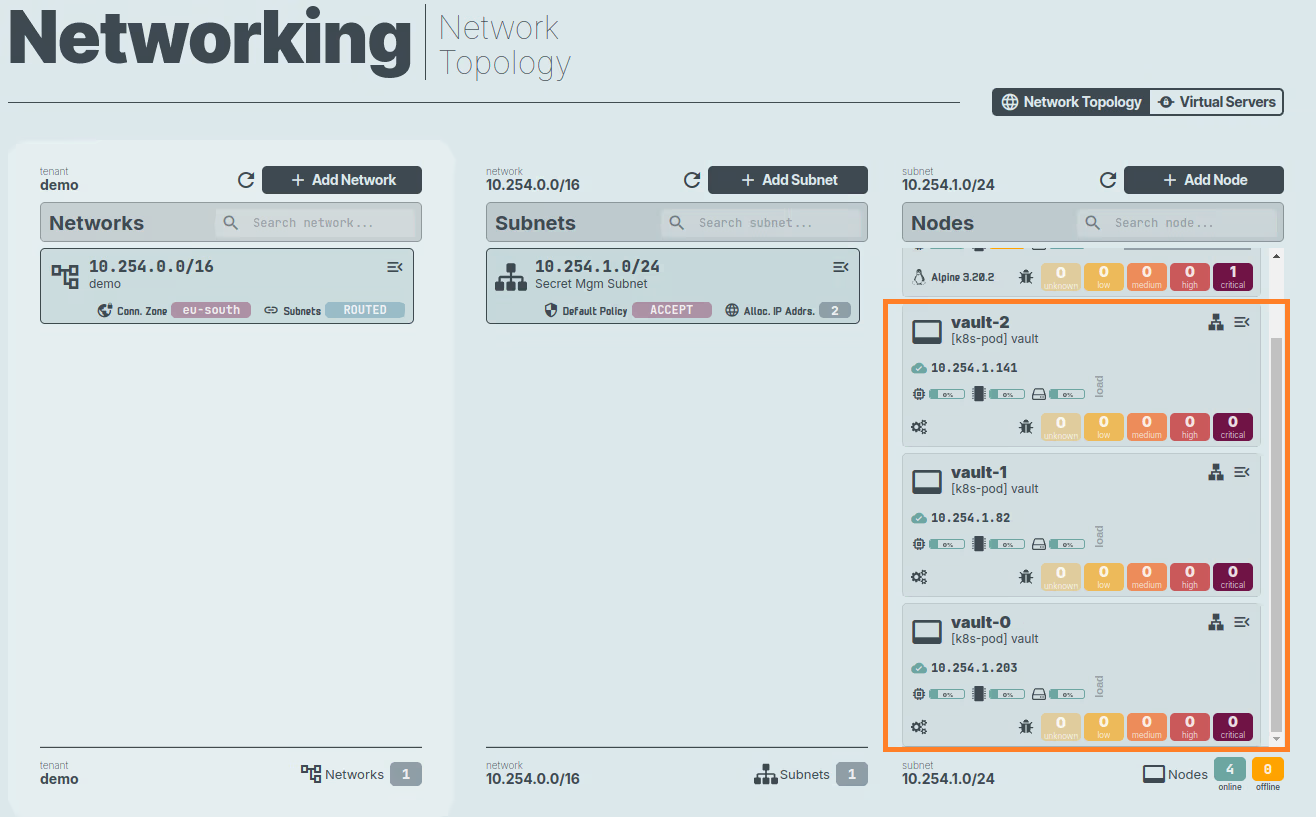
Step 4: Connecting the k8s-dc1 cluster to our n2x.io network topology
The API server of the k8s-dc1 cluster needs to be accessible by Vault to be able to configure the Kubernetes auth method.
Change your context to k8s-dc1 Kubernetes cluster:
kubectl config use-context k8s-dc1
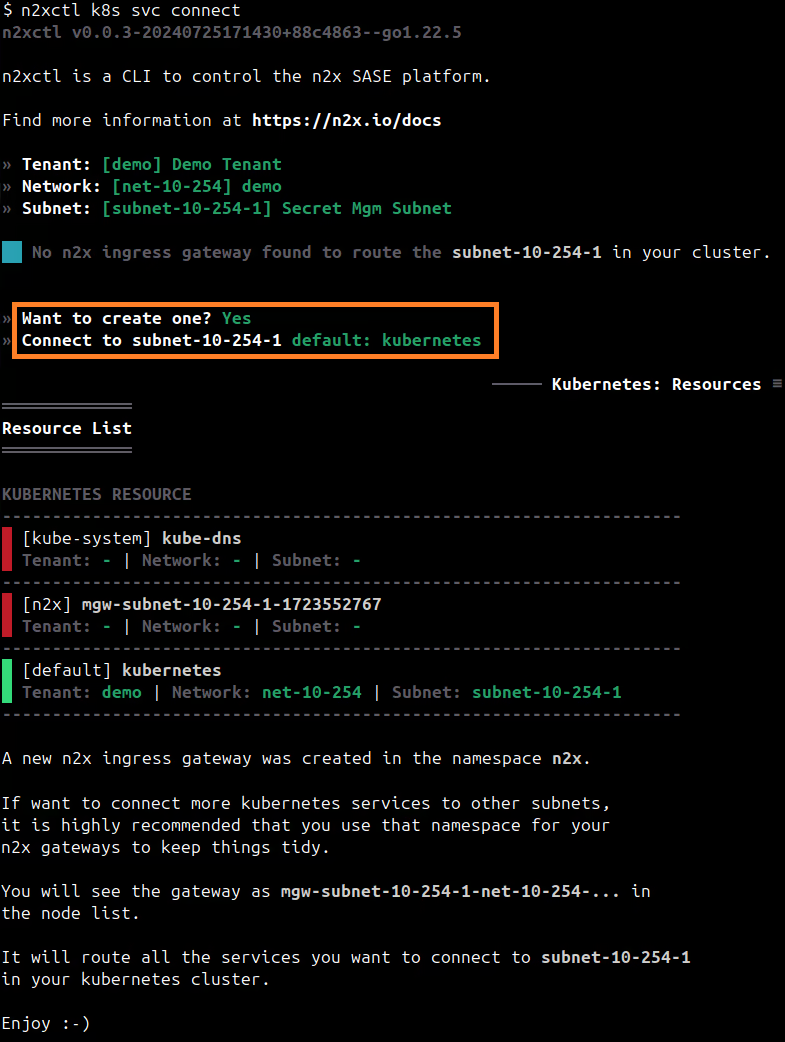
To connect a new k8s service to the n2x.io subnet, you can execute the following command:
n2xctl k8s svc connect
The command will typically prompt you to select the Tenant, Network, and Subnet from your available n2x.io topology options. Then, you can choose the service you want to connect by selecting it with the space key and pressing enter. In this case, we will select default: kubernetes.
Note
The first time that you connect a k8s service to the subnet, you need to deploy a n2x.io Kubernetes Gateway.
Finding IP address assigned to the Kubernetes Service:
-
Access the n2x.io WebUI and log in.
-
In the left menu, click on the
Network Topologysection and choose thesubnetassociated with your Kubernetes service (e.g., subnet-10-254-0). -
Click on the
IPAMsection. Here, you'll see both IPv4 and IPv6 addresses assigned to thekubernetes.default.n2x.localendpoint. Identify the IP address you need for your specific use case.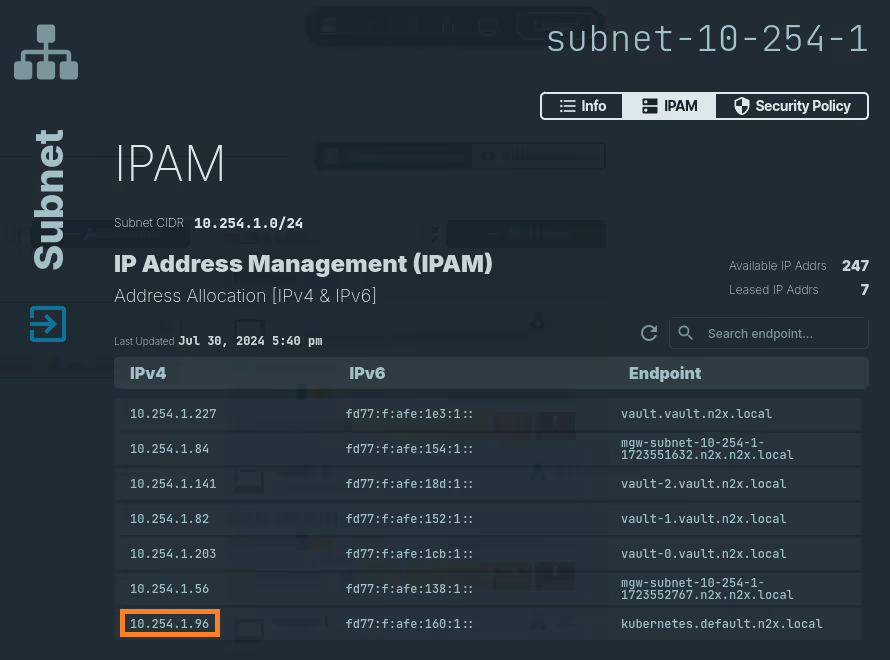
Info
Remember the IP address assigned to
kubernetes.default.n2x.localendpoint, we must be used it askubernetes_hostwhen configure Kubernetes auth method in Vault.
Step 5: Installing Vault Secret Operator in k8s-dc1 cluster
We are going to deploy a Vault Secret Operatoron a k8s-dc1 cluster using the official Helm chart:
helm install vault-secrets-operator hashicorp/vault-secrets-operator -n vault-secrets-operator-system --create-namespace --version 0.8.1
We can verify if vault-secrets-operator pod in the vault-secrets-operator-system namespace is up and running:
kubectl -n vault-secrets-operator-system get pod
NAME                                                         READY   STATUS    RESTARTS   AGE
vault-secrets-operator-controller-manager-865ff8d956-twmfw   2/2     Running   0          93s
The chart creates a few CRDs, which we need to configure. We are going to create the following vso-config.yaml file with configuration of connection, authentication and, the static secret:
---
apiVersion: secrets.hashicorp.com/v1beta1
kind: VaultConnection
metadata:
  namespace: default
  name: vault-connection
spec:
  address: http://{EXTERNAL_VAULT_ADDR}:8200
  skipTLSVerify: true
---
apiVersion: secrets.hashicorp.com/v1beta1
kind: VaultAuth
metadata:
  name: vault-auth
spec:
  vaultConnectionRef: vault-connection
  method: kubernetes
  mount: kubernetes
  kubernetes:
    role: vso-role
    serviceAccount: vault-auth
---
apiVersion: secrets.hashicorp.com/v1beta1
kind: VaultStaticSecret
metadata:
  name: vault-static-secret
spec:
  vaultAuthRef: vault-auth
  mount: kvv2
  type: kv-v2
  path:  devwebapp
  refreshAfter: 10s
  destination:
    create: true
    name: vso-handled
Warning
Replace {EXTERNAL_VAULT_ADDR} with the IP address assigned to vault.vault.n2x.local endpoint. (10.254.1.227 in this example)
We can execute the following command to apply the CRDs in the cluster:
kubectl apply -f vso-config.yaml
The VaultStaticSecret instance maps the kv secrets from Vault to vso-handled secret in the default Kubernetes namespace. The beauty of this solution is that apps can work with the secrets as if they were normal Kubernetes secrets. The secrets can be updated or rotated in the Vault and after the defined refreshAfter (10 sec in this example) it will be reflected in the cluster.
Step 6: Conneting Vault Secret Operator to our n2x.io network topology
The Vault Secret Operator instance needs to have connectivity to remote Vault clusters.
To connect new k8s workloads to the n2x.io subnet, you can execute the following command:
n2xctl k8s workload connect
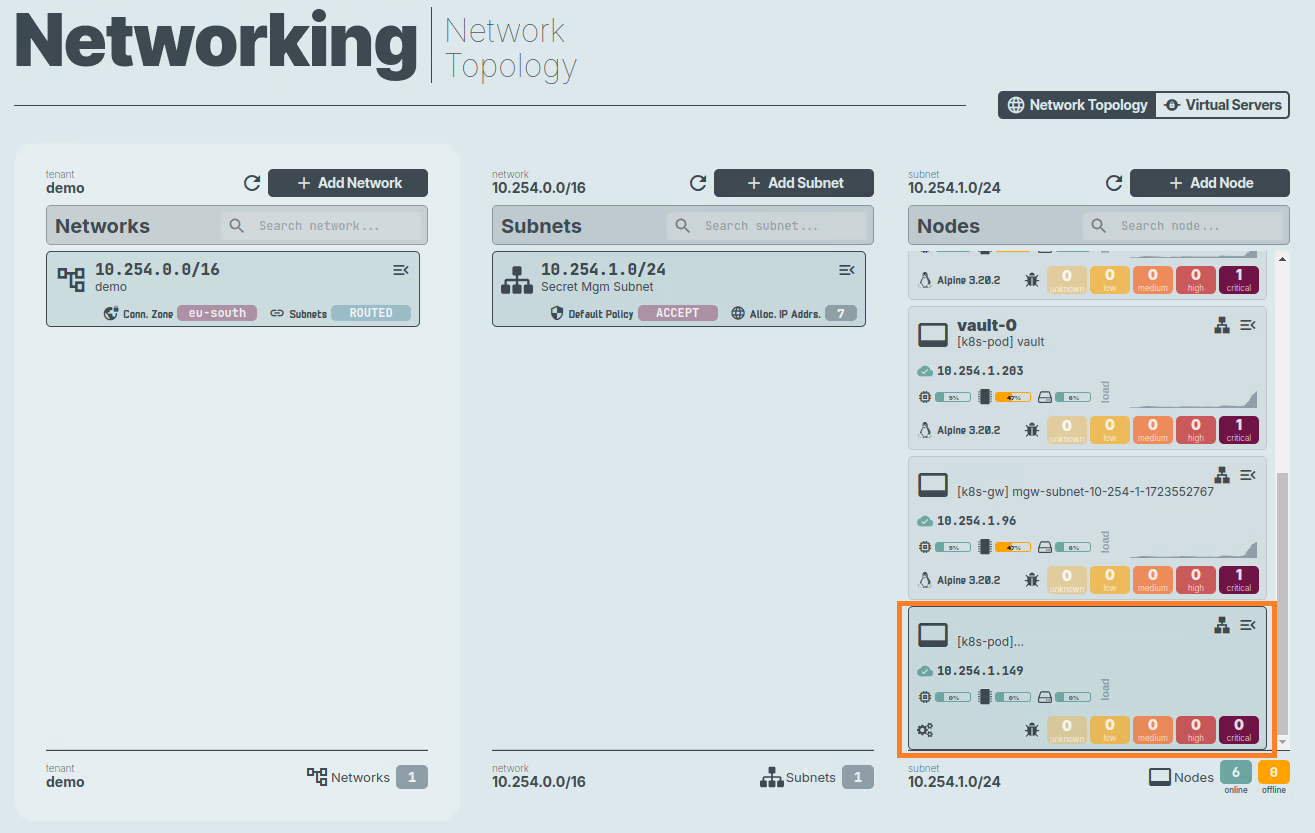
The command will typically prompt you to select the Tenant, Network, and Subnet from your available n2x.io topology options. Then, you can choose the workload you want to connect by selecting it with the space key and pressing enter. In this case, we will select vault-secrets-operator-system: vault-secrets-operator-controller-manager.
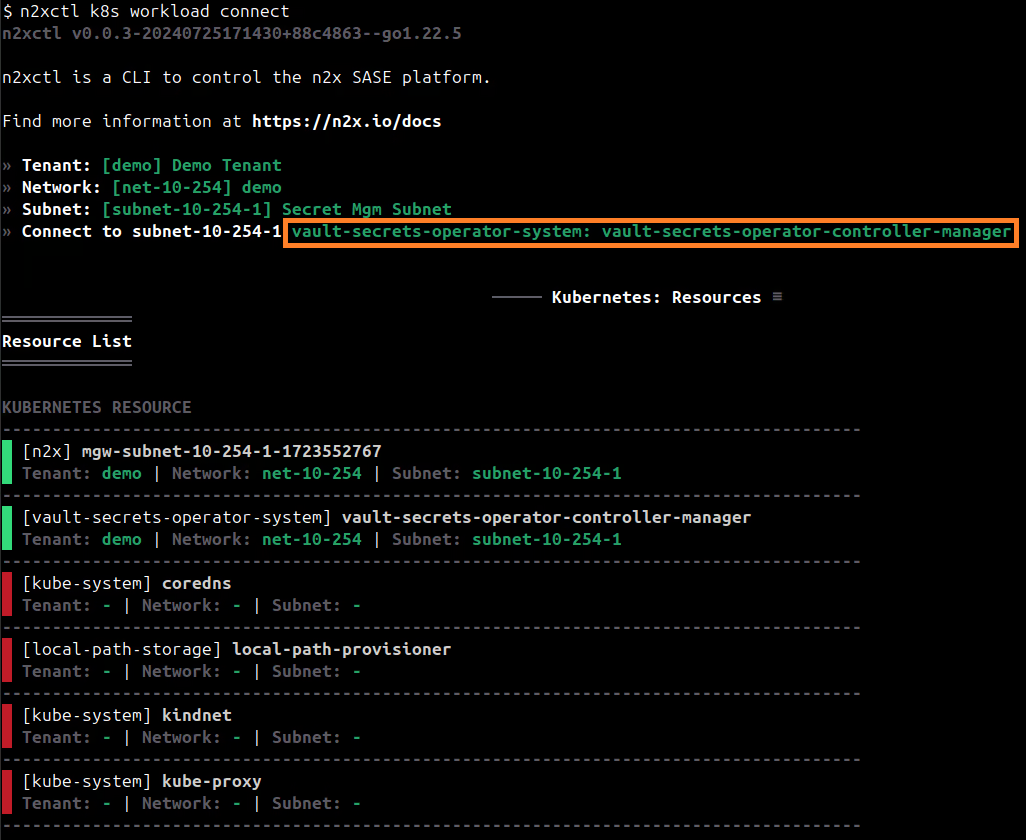
Then, we can access the n2x.io WebUI to verify that the nodes are correctly connected to the subnet.
Step 7: Creating RBAC for k8s auth and gather information in the k8s-dc1 cluster
We are going to create a dedicated service account with a secret and the right binding. We can create a vault-auth-rbac.yaml with the following information:
apiVersion: v1
kind: ServiceAccount
metadata:
  name: vault-auth
---
apiVersion: v1
kind: Secret
metadata:
  name: vault-auth
  annotations:
    kubernetes.io/service-account.name: vault-auth
type: kubernetes.io/service-account-token
---
apiVersion: rbac.authorization.k8s.io/v1
kind: ClusterRoleBinding
metadata:
  name: role-tokenreview-binding
roleRef:
  apiGroup: rbac.authorization.k8s.io
  kind: ClusterRole
  name: system:auth-delegator
subjects:
  - kind: ServiceAccount
    name: vault-auth
    namespace: default
Then, we can execute the following command to apply the RABC in the cluster:
kubectl apply -f vault-auth-rbac.yaml
Now, we are going to gather k8s authentication information for the following list of commands:
TOKEN_REVIEW_JWT=$(kubectl get secret vault-auth -o jsonpath="{ .data.token }" | base64 -d)
KUBE_CA_CERT=$(kubectl get secret vault-auth -o jsonpath="{ .data.ca\.crt }" | base64 -d)
KUBE_HOST=https://{KUBERNETES_ADDR}
Warning
Replace {KUBERNETES_ADDR} with the IP address assigned to kubernetes.default.n2x.local endpoint. (10.254.1.96 in this example)
Step 8: Setting up the k8s-dc1 cluster’s Kubernetes Auth Method in Vault
Now we configure the authentication between Vault and Kubernetes. Vault Secret Operator supports a few options for authentication, but we will use the native Kubernetes authentication method that enables clients to authenticate with a Kubernetes Service Account Token.
At this step, we will connect to our Vault which runs on k8s-dc2 Kubernetes cluster, and utilize environment variables that we set previously:
-
Change your context to
k8s-dc2Kubernetes cluster:kubectl config use-context k8s-dc2 -
Start an interactive shell session on the
vault-0pod and log in withRoot Token:kubectl -n vault exec -it vault-0 -- /bin/sh vault login Token (will be hidden): Success! You are now authenticated. ... -
Enable the Kubernetes authentication method:
vault auth enable kubernetes Success! Enabled kubernetes auth method at: kubernetes/ -
Write out the policy named
devwebappthat enables thereadcapability for secrets at pathsecret/*:vault policy write devwebapp - <<EOF path "secret/*" { capabilities = ["read"] } EOF -
Create a Kubernetes authentication role named
vso-role:vault write auth/kubernetes/role/vso-role \ bound_service_account_names=vault-auth \ bound_service_account_namespaces=default \ policies=devwebapp \ ttl=24hInfo
The role connects the Kubernetes service account,
vault-auth, and namespace,default, with the Vault policy,devwebapp. The tokens returned after authentication are valid for 24 hours. -
Exit the
vault-0pod:exit -
Finally, configure the Kubernetes authentication method:
kubectl -n vault exec -it vault-0 -- vault write auth/kubernetes/config \
  token_reviewer_jwt="$TOKEN_REVIEW_JWT" \
  kubernetes_host="$KUBE_HOST" \
  kubernetes_ca_cert="$KUBE_CA_CERT" \
  issuer="https://kubernetes.default.svc.cluster.local" \
  disable_issuer_verification=true \
  disable_local_ca_jwt=true
Step 9: Checking Vault Secret Operator integration
Change your context to k8s-dc1 Kubernetes cluster:
kubectl config use-context k8s-dc1
We can check the vso-handled secret was created automatically in default namespace with the information added previously in Vault:
kubectl get secret vso-handled -o jsonpath='{.data._raw}' | base64 --decode
{"data":{"password":":random:","username":"n2x"},"metadata":{"created_time":"2023-12-21T15:29:58.85914277Z","custom_metadata":null,"deletion_time":"","destroyed":false,"version":1}}
Conclusion
In this guide, we saw how n2x.io can help us to establish a secure connection between a Vault instance deployed in a private Kubernetes cluster and a Vault cluster Operator deployed in a different cluster. Both clusters are geographically distributed but we haven't had to expose any services or endpoints to the Internet.
So not exposing endpoints publicly provides a proactive security approach by minimizing the attack surface, protecting sensitive information, and reducing the risk of various cyber threats. This strategy aligns with best cybersecurity practices and contributes to a more resilient and secure system architecture.