Terraform Secret Management using HashiCorp Vault
Secret management is a critical aspect of cybersecurity that involves securing and controlling access to sensitive information, often referred to as secrets. The secret management process is a challenge for IT teams, especially in architectures with decentralized approaches and multiple cloud service providers.
When provisioning resources across multiple cloud providers with Terraform (or similar tools like Ansible), a common challenge is the requirement to use credentials to access your cloud account. It is generally not advisable to include these credentials directly in your code, especially if you are using a version control system (VCS) for your codebase, due to security considerations.
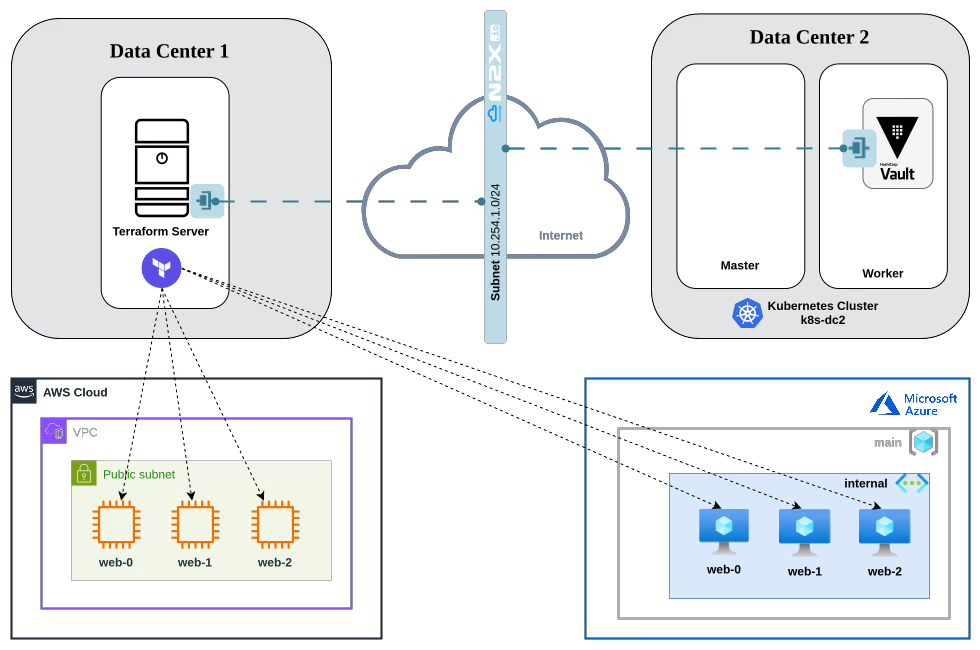
This tutorial demonstrates how to securely manage infrastructure deployments across geographically distributed data centers. We'll achieve this by:
-
Centralized Secret Management: We'll utilize Hashicorp Vault, running within a private Kubernetes cluster (
k8s-dc2), to securely store credentials. -
Secure Terraform Access: Our Terraform server (
terraform-server), located in a separate data center, will access these credentials directly from Vault. -
Inter-Data Center Connectivity: We'll leverage n2x.io to establish secure communication between these geographically dispersed data centers.
Here is the high-level overview of tutorial setup architecture:
In our setup, we will be using the following components:
-
Hashicorp Vault is an identity-based secret and encryption management system. For more info please visit the Vault Documentation
-
Terraform is infrastructure automation to provision and manage resources in any cloud or data center. For more info please visit the Terraform Documentation
-
n2x-node is an open-source agent that runs on the machines you want to connect to your n2x.io network topology. For more info please visit n2x.io Documentation.
Before you begin
In order to complete this tutorial, you must meet the following requirements:
-
Access to a private Kubernetes cluster running version
v1.27.xor greater. -
A n2x.io account created and one subnet configured with the
10.254.1.0/24CIDR prefix. -
Cloud Accounts and Credentials:
-
An AWS account and Access Key created.
-
Azure account with a Service Principal created.
-
-
Command-Line Tools:
Note
Please note that this tutorial uses a Linux OS with an Ubuntu 22.04 (Jammy Jellyfish) with amd64 architecture.
Step-by-step Guide
Step 1: Install Hashicorp Vault in k8s-dc2 cluster
Once you have successfully set up your k8s-dc2 Kubernetes cluster, setting your context:
kubectl config use-context k8s-dc2
We are going to install the Hashicorp Vault on a k8s-dc2 cluster using the official Helm chart:
-
First, let’s add the following Helm repo:
helm repo add hashicorp https://helm.releases.hashicorp.com -
Update all the repositories to ensure helm is aware of the latest versions:
helm repo update -
Configure the Vault Helm chart with Integrated Storage:
cat > helm-vault-raft-values.yml <<EOF server: affinity: "" ha: enabled: true raft: enabled: true EOF -
We can then install Vault version
0.28.1in thevaultnamespace:helm install vault hashicorp/vault --values helm-vault-raft-values.yml -n vault --create-namespace --version 0.28.1Once Vault is installed, you should see the following output:
LAST DEPLOYED: Thu Aug 22 17:13:31 2024 NAMESPACE: vault STATUS: deployed REVISION: 1 NOTES: Thank you for installing HashiCorp Vault! -
Now, we can verify if all of the pods in the
vaultnamespace are up and running:kubectl -n vault get podNAME READY STATUS RESTARTS AGE vault-0 0/1 Running 0 92s vault-1 0/1 Running 0 92s vault-2 0/1 Running 0 92s vault-agent-injector-5dc9fcd4bc-ds6vn 1/1 Running 0 93s
After the Vault Helm chart is installed, one of the Vault servers needs to be initialized. The initialization generates the credentials necessary to unseal all the Vault servers.
We are going to initialize vault-0 server with one key share (default: 5) and one key threshold (default: 3):
kubectl -n vault exec vault-0 -- vault operator init -key-shares=1 -key-threshold=1 -format=json > cluster-keys.json
Initializing Vault
The operator init command generates a root key that it disassembles into key shares -key-shares=1 and then sets the number of key shares required to unseal Vault -key-threshold=1. These key shares are written to the output as unseal keys in JSON format -format=json. Here the output is redirected to a file named cluster-keys.json.
Create a variable named VAULT_UNSEAL_KEY to capture the Vault unseal key:
VAULT_UNSEAL_KEY=$(jq -r ".unseal_keys_b64[]" cluster-keys.json)
Warning
Do not run an unsealed Vault in production with a single key share and a single key threshold. This approach is only used here to simplify the unsealing process for this demonstration.
The next step is unseal Vault running on the vault-0 pod:
kubectl -n vault exec vault-0 -- vault operator unseal $VAULT_UNSEAL_KEY
After that, we need to join the other vault members to Raft cluster:
kubectl -n vault exec -ti vault-1 -- vault operator raft join http://vault-0.vault-internal:8200
kubectl -n vault exec -ti vault-2 -- vault operator raft join http://vault-0.vault-internal:8200
Finally, we need to unseal the new vault members:
kubectl -n vault exec vault-1 -- vault operator unseal $VAULT_UNSEAL_KEY
kubectl -n vault exec vault-2 -- vault operator unseal $VAULT_UNSEAL_KEY
When all Vault server pods are unsealed they report READY 1/1:
kubectl -n vault get pod
NAME                                    READY   STATUS    RESTARTS   AGE
vault-0                                 1/1     Running   0          5m40s
vault-1                                 1/1     Running   0          5m40s
vault-2                                 1/1     Running   0          5m40s
vault-agent-injector-5dc9fcd4bc-ds6vn   1/1     Running   0          5m40s
Step 2: Insert AWS and Azure credentials into the Vault
To create resources in AWS and Azure resources, we'll need credentials to authenticate against their APIs:
-
AWS Credentials: We'll utilize the
Access Key IDandSecret Access Keyfor programmatic access. While convenient, it's recommended to explore temporary credentials or roles for enhanced security. -
Azure Credentials: We'll leverage the Service Principal credentials specifically designed for automated tools like Terraform.
We are going to store these credentials in the Vault:
-
Start an interactive shell session on the
vault-0pod and log in withRoot Token:kubectl -n vault exec -it vault-0 -- /bin/sh vault login Token (will be hidden): Success! You are now authenticated.Info
You can use the
Root Tokento login in vault. The initial root token is a privileged user that can perform any operation at any path. To display the root token found incluster-keys.jsonyou can execute the following command:jq -r ".root_token" cluster-keys.json -
Enable kv-v2 secrets at the path
secret:vault secrets enable -path=secret kv-v2 Success! Enabled the kv-v2 secrets engine at: secret/ -
Create a secret at the path
secret/clouds/aws/configwith aaws_access_key_id,aws_secret_access_keyandregionto store AWS credentials:vault kv put secret/clouds/aws/config aws_access_key_id='xxxxxxxxx' aws_secret_access_key='xxxxxxxxx' region='us-east-2'Warning
Remember to replace the correct values of
aws_access_key_idandaws_secret_access_key. -
Verify that the secret is defined at the path
secret/clouds/aws/config.vault kv get secret/clouds/aws/config======== Secret Path ======== secret/data/clouds/aws/config ======= Metadata ======= Key Value --- ----- created_time 2024-08-22T15:31:00.439397294Z custom_metadata <nil> deletion_time n/a destroyed false version 1 ============ Data ============ Key Value --- ----- aws_access_key_id xxxxxxxxx aws_secret_access_key xxxxxxxxx region us-east-2 -
Create a secret at path
secret/clouds/azure/configwith asubscription_id,client_id,client_secret,tenant_id,admin_username,admin_passwordandlocationto store Azure credentials:vault kv put secret/clouds/azure/config subscription_id='xxxxxxxxx' client_id='xxxxxxxxx' client_secret='xxxxxxxxx' tenant_id='xxxxxxxxx' admin_username='demo' admin_password='Password123!' location='eastus'Warning
Remember to replace the correct values of
subscription_id,client_id,client_secretandtenant_id. -
Verify that the secret is defined at the path
secret/clouds/azure/config.vault kv get secret/clouds/azure/config========= Secret Path ========= secret/data/clouds/azure/config ======= Metadata ======= Key Value --- ----- created_time 2024-08-22T15:32:23.640149179Z custom_metadata <nil> deletion_time n/a destroyed false version 1 ========= Data ========= Key Value --- ----- admin_password Password123! admin_username demo client_id xxxxxxxxx client_secret xxxxxxxxx location eastus subscription_id xxxxxxxxx tenant_id xxxxxxxxx -
Lastly, exit the
vault-0pod:exit
Step 3: Connect Vault to our n2x.io network topology
The Vault instance must be accessible by the Terraform server to retrieve the AWS and Azure credentials.
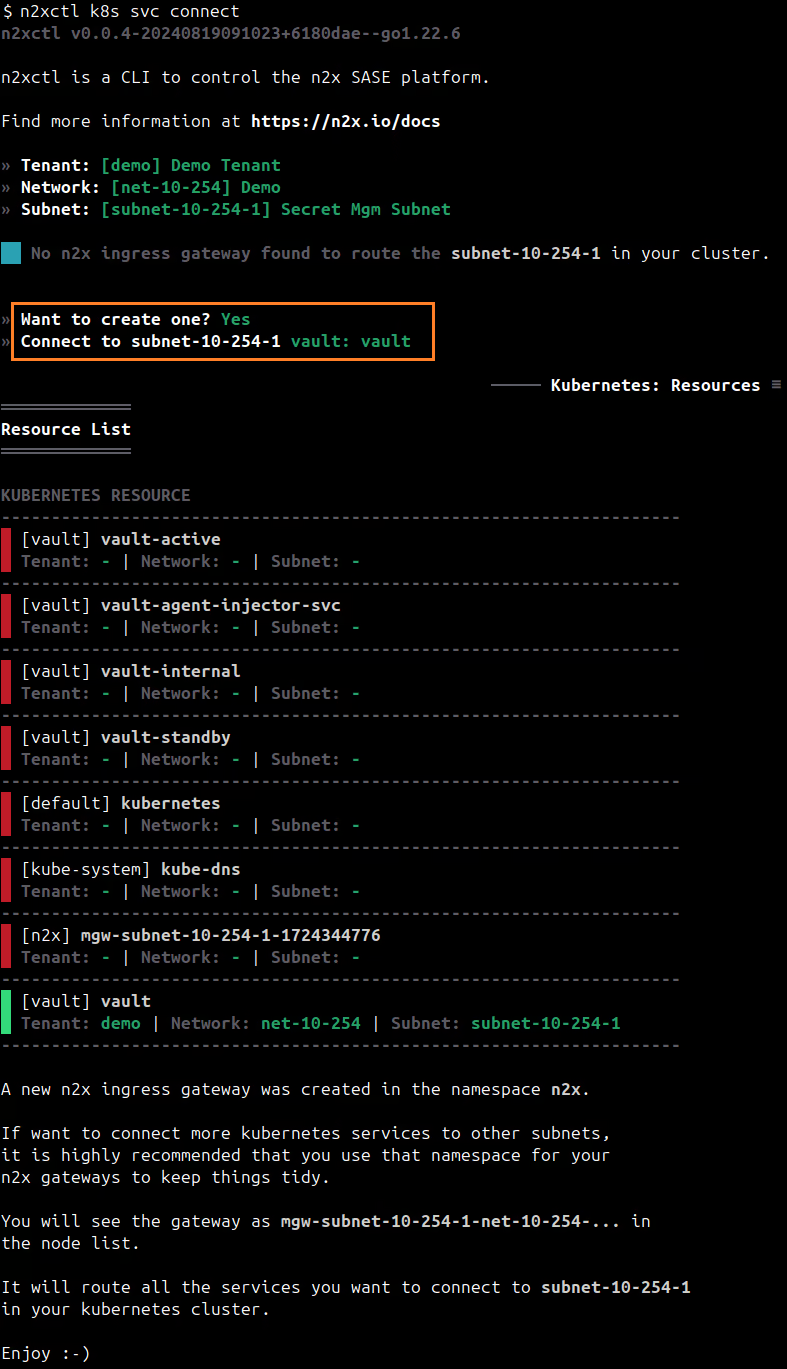
To connect a new kubernetes service to the n2x.io subnet, you can execute the following command:
n2xctl k8s svc connect
The command will typically prompt you to select the Tenant, Network, and Subnet from your available n2x.io topology options. Then, you can choose the service you want to connect by selecting it with the space key and pressing enter. In this case, we will select vault: vault.
Note
The first time that you connect a k8s svc to the subnet, you need to deploy a n2x.io Kubernetes Gateway.
Finding IP address assigned to the Vault Service:
-
Access the n2x.io WebUI and log in.
-
In the left menu, click on the
Network Topologysection and choose thesubnetassociated with your Vault service (e.g., subnet-10-254-0). -
Click on the
IPAMsection. Here, you'll see both IPv4 and IPv6 addresses assigned to thevault.vault.n2x.localendpoint. Identify the IP address you need for your specific use case.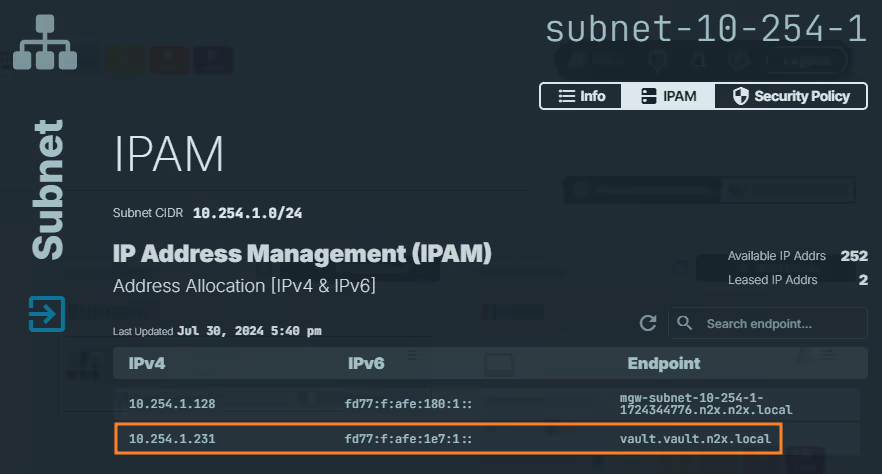
Info
Remember the IP address assigned to
vault.vault.n2x.localendpoint, we must be used it in Terraform configuration later.
Step 4: Connect the Terraform server to our n2x.io network topology
To securely retrieve AWS and Azure credentials from the Vault instance, we need to connect the Terraform server to our n2x.io network topology. This establishes a secure communication channel between the Terraform server and Vault.
Add a new connected node in a subnet with n2x.io is very easy. Here's how:
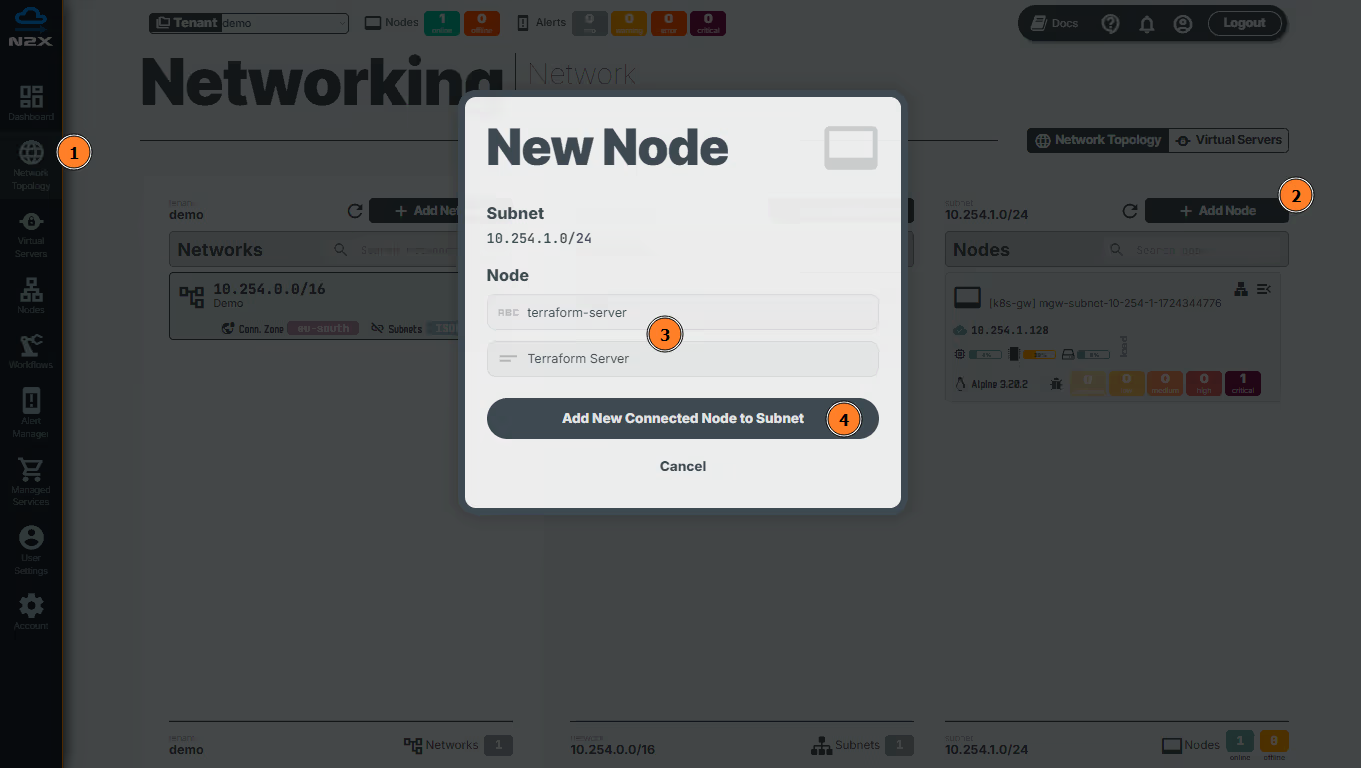
- Head over to the n2x.io WebUI and navigate to the
Network Topologysection in the left panel. - Click the
Add Nodebutton and ensure the new node is placed in the same subnet as the vault service. - Assign a
nameanddescriptionfor the new node. - Click
Add New Connected Node to Subnet.
Here, we can select the environment where we are going to install the n2x-node agent. In this case, we are going to use Linux:
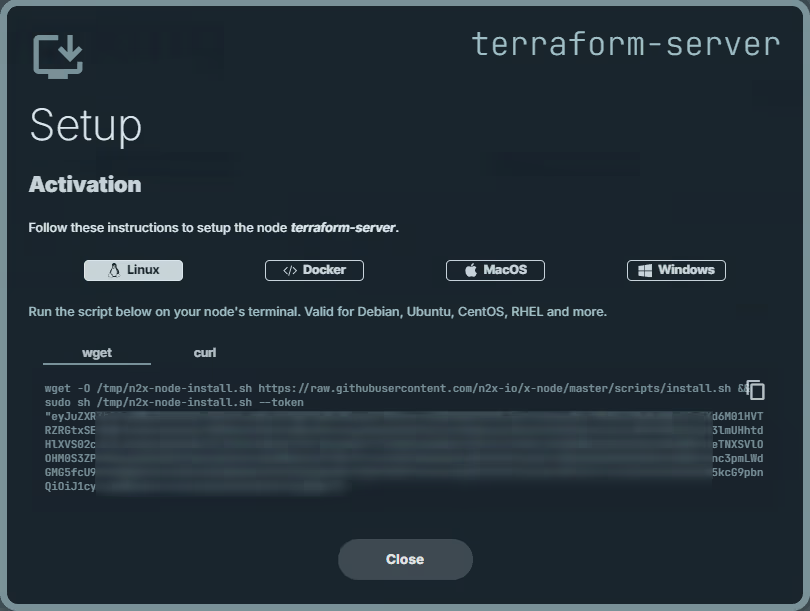
Run the script on Terraform server terminal and check if the service is running with the command:
systemctl status n2x-node
You can use ip addr show dev n2x0 command on Terraform server to check the IP assigned to this node:

Step 5: Deploy VM instances in AWS and Azure
First, we need to create our Terraform project directory:
mkdir tf-vault
We are going to create a file named main.tf in our Terraform project directory tf-vault. This file will contain the main configuration and resource definitions for creating the EC2 instances and Azure VMs:
terraform {
  required_providers {
    aws = {
      source  = "hashicorp/aws"
      version = "5.63.1"
    }
    vault = {
      source = "hashicorp/vault"
      version = "4.4.0"
    }
    azurerm = {
      source  = "hashicorp/azurerm"
      version = "=3.116.0"
    }
  }
}

# Config Vault Provider
provider "vault" {
  address = "http://{EXTERNAL_VAULT_ADDR}:8200"
  skip_tls_verify = true
}

# Get AWS credentials from Vault
data "vault_generic_secret" "aws_creds" {
    path = "secret/clouds/aws/config"
}

# Get Azure credentials from Vault
data "vault_generic_secret" "azure_creds" {
    path = "secret/clouds/azure/config"
}

# Config AWS Provider
provider "aws" {
  region  = data.vault_generic_secret.aws_creds.data["region"]
  access_key = data.vault_generic_secret.aws_creds.data["aws_access_key_id"]
  secret_key = data.vault_generic_secret.aws_creds.data["aws_secret_access_key"]
}

# Config Azure Provider
provider "azurerm" {
  features {}
  subscription_id = data.vault_generic_secret.azure_creds.data["subscription_id"]
  client_id       = data.vault_generic_secret.azure_creds.data["client_id"]
  client_secret   = data.vault_generic_secret.azure_creds.data["client_secret"]
  tenant_id       = data.vault_generic_secret.azure_creds.data["tenant_id"]
}

# Create AWS Instances
resource "aws_instance" "web" {
  ami           = "ami-0ee4f2271a4df2d7d"
  instance_type = "t2.micro"
  count         = 3

  tags = {
    Name  = "web-${count.index}"
  }
}

# Create a Azure resource group
resource "azurerm_resource_group" "main" {
  name     = "demo-resources"
  location = data.vault_generic_secret.azure_creds.data["location"]
}

# Create a Azure virtual network within the resource group
resource "azurerm_virtual_network" "main" {
  name                = "demo-network"
  address_space       = ["10.0.0.0/22"]
  location            = azurerm_resource_group.main.location
  resource_group_name = azurerm_resource_group.main.name
}

# Create a Azure virtual subnet within the network
resource "azurerm_subnet" "internal" {
  name                 = "internal"
  resource_group_name  = azurerm_resource_group.main.name
  virtual_network_name = azurerm_virtual_network.main.name
  address_prefixes     = ["10.0.2.0/24"]
}

# Create a Azure network interface associate to subnet
resource "azurerm_network_interface" "main" {
  count                           = 3
  name                            = "web-${count.index}-nic"
  resource_group_name = azurerm_resource_group.main.name
  location            = azurerm_resource_group.main.location

  ip_configuration {
    name                          = "internal"
    subnet_id                     = azurerm_subnet.internal.id
    private_ip_address_allocation = "Dynamic"
  }
}

resource "azurerm_linux_virtual_machine" "web" {
  count                           = 3
  name                            = "web-${count.index}"
  resource_group_name             = azurerm_resource_group.main.name
  location                        = azurerm_resource_group.main.location
  size                            = "Standard_B1s"
  admin_username                  = data.vault_generic_secret.azure_creds.data["admin_username"]
  admin_password                  = data.vault_generic_secret.azure_creds.data["admin_password"]
  disable_password_authentication = false
  network_interface_ids           = [element(azurerm_network_interface.main.*.id, count.index)]

  os_disk {
    caching              = "ReadWrite"
    storage_account_type = "Standard_LRS"
  }

  source_image_reference {
    publisher = "Canonical"
    offer     = "0001-com-ubuntu-server-jammy"
    sku       = "22_04-lts"
    version   = "latest"
  }
}
Warning
Replace {EXTERNAL_VAULT_ADDR} with the IP address assigned to vault.vault.n2x.local endpoint. (10.254.1.231 in this example)
Notice that we're setting the required Vault token as an environment variable:
export VAULT_TOKEN="$(jq -r ".root_token" cluster-keys.json)"
Info
Remember that you can found the root token in cluster-keys.json.
We need to initialize the Terraform project and download the necessary provider plugins. We can execute the following command in the terminal or command prompt:
terraform init
Now, we can apply the changes to create multiple EC2 instances and Azure VMs with the following command:
terraform apply -auto-approve
The output should be something like that:
data.vault_generic_secret.azure_creds: Reading...
data.vault_generic_secret.aws_creds: Reading...
data.vault_generic_secret.aws_creds: Read complete after 2s [id=secret/clouds/aws/config]
data.vault_generic_secret.azure_creds: Read complete after 2s [id=secret/clouds/azure/config]

Terraform used the selected providers to generate the following execution plan. Resource actions are
indicated with the following symbols:
  + create

Terraform will perform the following actions:

...

Plan: 12 to add, 0 to change, 0 to destroy.
aws_instance.web[0]: Creating...
aws_instance.web[2]: Creating...
aws_instance.web[1]: Creating...
azurerm_resource_group.main: Creating...
azurerm_resource_group.main: Creation complete after 1s [id=/subscriptions/xxxxxxxx-xxxx-xxxx-xxxx-xxxxxxxxxxxx/resourceGroups/demo-resources]
azurerm_virtual_network.main: Creating...
aws_instance.web[0]: Still creating... [10s elapsed]
aws_instance.web[2]: Still creating... [10s elapsed]
aws_instance.web[1]: Still creating... [10s elapsed]
azurerm_virtual_network.main: Creation complete after 6s [id=/subscriptions/xxxxxxxx-xxxx-xxxx-xxxx-xxxxxxxxxxxx/resourceGroups/demo-resources/providers/Microsoft.Network/virtualNetworks/demo-network]
azurerm_subnet.internal: Creating...
azurerm_subnet.internal: Creation complete after 7s [id=/subscriptions/xxxxxxxx-xxxx-xxxx-xxxx-xxxxxxxxxxxx/resourceGroups/demo-resources/providers/Microsoft.Network/virtualNetworks/demo-network/subnets/internal]
azurerm_network_interface.main[1]: Creating...
azurerm_network_interface.main[0]: Creating...
azurerm_network_interface.main[2]: Creating...
azurerm_network_interface.main[0]: Creation complete after 2s [id=/subscriptions/xxxxxxxx-xxxx-xxxx-xxxx-xxxxxxxxxxxx/resourceGroups/demo-resources/providers/Microsoft.Network/networkInterfaces/web-0-nic]
aws_instance.web[0]: Still creating... [20s elapsed]
aws_instance.web[2]: Still creating... [20s elapsed]
aws_instance.web[1]: Still creating... [20s elapsed]
azurerm_network_interface.main[2]: Creation complete after 4s [id=/subscriptions/xxxxxxxx-xxxx-xxxx-xxxx-xxxxxxxxxxxx/resourceGroups/demo-resources/providers/Microsoft.Network/networkInterfaces/web-2-nic]
azurerm_network_interface.main[1]: Creation complete after 5s [id=/subscriptions/xxxxxxxx-xxxx-xxxx-xxxx-xxxxxxxxxxxx/resourceGroups/demo-resources/providers/Microsoft.Network/networkInterfaces/web-1-nic]
azurerm_linux_virtual_machine.web[2]: Creating...
azurerm_linux_virtual_machine.web[0]: Creating...
azurerm_linux_virtual_machine.web[1]: Creating...
aws_instance.web[0]: Creation complete after 23s [id=i-05fc211adbcea16e9]
aws_instance.web[2]: Creation complete after 23s [id=i-07725ae3b380bfe61]
aws_instance.web[1]: Creation complete after 23s [id=i-064351021f333f0ad]
azurerm_linux_virtual_machine.web[2]: Still creating... [10s elapsed]
azurerm_linux_virtual_machine.web[0]: Still creating... [10s elapsed]
azurerm_linux_virtual_machine.web[1]: Still creating... [10s elapsed]
azurerm_linux_virtual_machine.web[0]: Creation complete after 19s [id=/subscriptions/xxxxxxxx-xxxx-xxxx-xxxx-xxxxxxxxxxxx/resourceGroups/demo-resources/providers/Microsoft.Compute/virtualMachines/web-0]
azurerm_linux_virtual_machine.web[1]: Creation complete after 19s [id=/subscriptions/xxxxxxxx-xxxx-xxxx-xxxx-xxxxxxxxxxxx/resourceGroups/demo-resources/providers/Microsoft.Compute/virtualMachines/web-1]
azurerm_linux_virtual_machine.web[2]: Still creating... [20s elapsed]
azurerm_linux_virtual_machine.web[2]: Creation complete after 27s [id=/subscriptions/xxxxxxxx-xxxx-xxxx-xxxx-xxxxxxxxxxxx/resourceGroups/demo-resources/providers/Microsoft.Compute/virtualMachines/web-2]

Apply complete! Resources: 12 added, 0 changed, 0 destroyed.
Now, we can verify that the resources have been created correctly in the AWS and Azure dashboards:


Finally, we can destroy the AWS and Azure resources with the following command:
terraform destroy -auto-approve
Conclusion
Securing confidential data (secrets) is critical in cybersecurity, especially for teams managing decentralized, multi-cloud architectures. Thankfully, solutions like n2x.io can simplify this challenge.
This guide explored how n2x.io enables a centralized secret management system with Hashicorp Vault, eliminating public endpoints and allowing secure access to secrets from Terraform across various cloud providers.